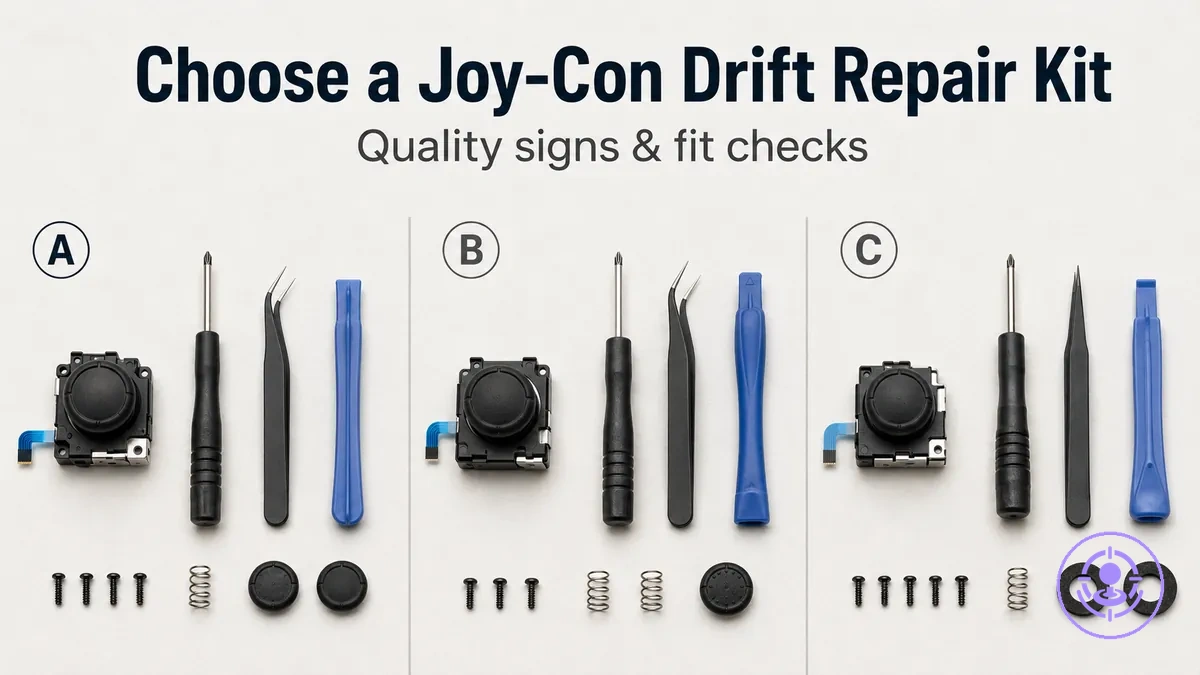
How to choose a Joy-Con drift repair kit for reliable parts and correct fit
Choosing a Joy-Con drift repair kit means selecting a replacement stick and the tools needed to install it. Fit certainty comes first, then part quality, then risk control for beginners. By keeping kit selection separate from the repair itself, you can evaluate each option without assuming your skill level or experience.
When choosing a Joy-Con drift repair kit for reliable parts and correct fit, consider these factors:
- Kit scope: parts-only kits provide the joystick module; full tool kits add opening tools and spare screws.
- Fit match: compatibility varies by controller model, side, and internal connector layout.
- Quality signals: consistent material feel, clear part labeling, and included instructions often indicate better durability.
- Beginner-friendly design: kits with extra screws and detailed instructions reduce the risk of common mistakes.
Kit inclusions and fit confirmation from product listings are what to check next.
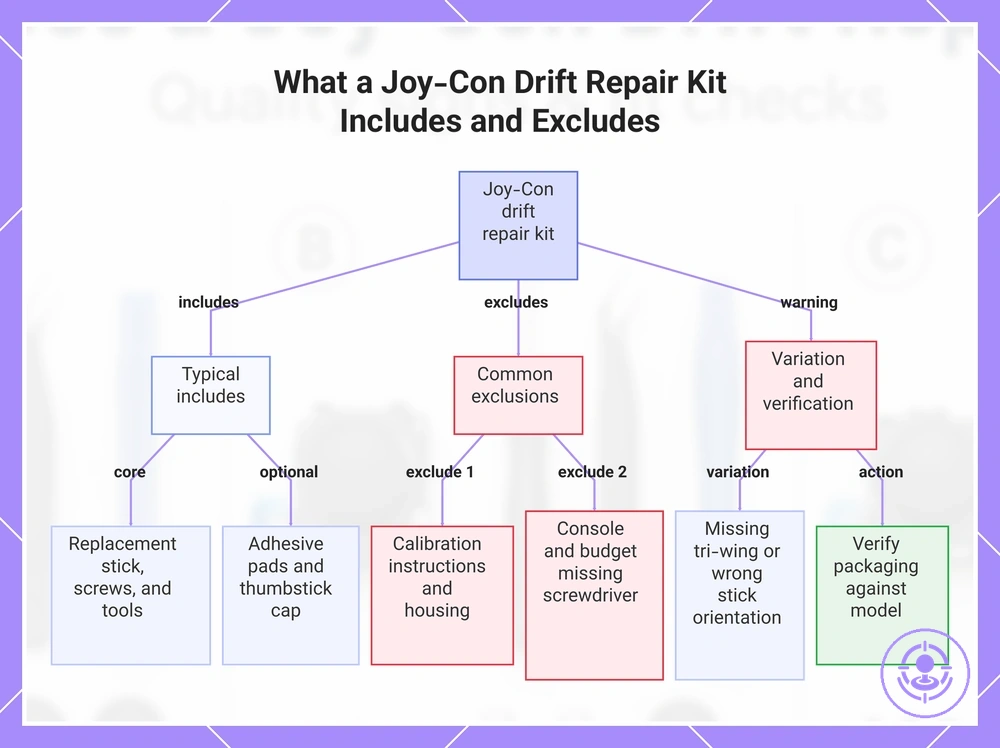
What a Joy-Con drift repair kit includes and what it excludes
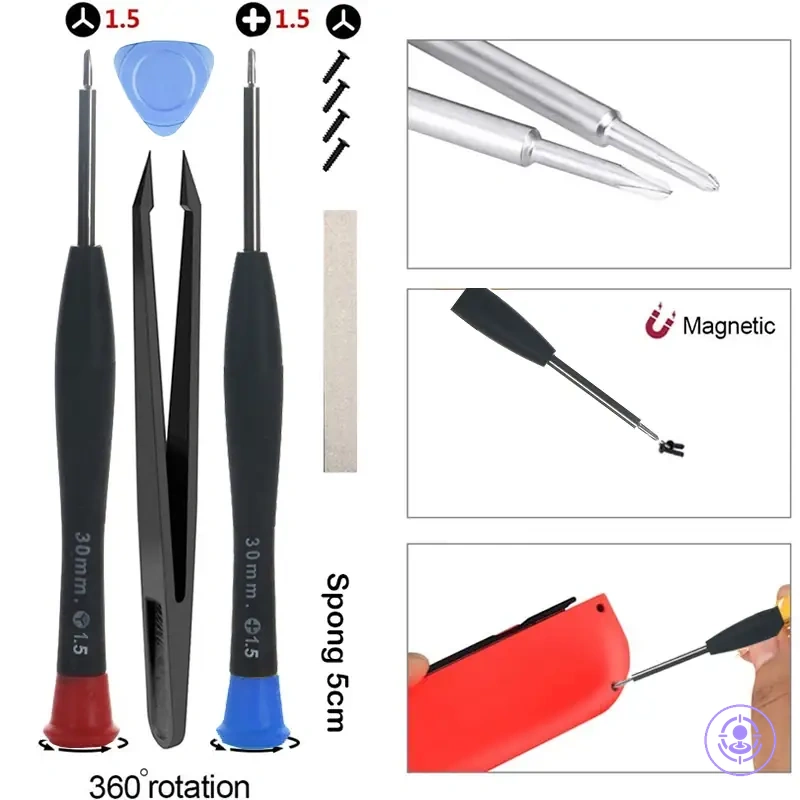
A Joy-Con drift repair kit typically contains replacement sticks and the opening tools needed to access and swap the component. These kits are designed for do-it-yourself repair, so you do not have to source each part separately.
A common misconception is that every kit includes all necessary tools and a perfectly fitting replacement. In practice, contents vary widely between sellers. Some kits omit the tri-wing screwdriver that may be required for certain Joy-Con models, or include a replacement stick that may not match the original orientation. This can lead to a delayed repair and additional spending. Verify the packaging contents against your specific controller model using our Joy-Con drift repair kit hub.
The following list outlines typical includes and excludes for what should be included in a kit. Use this list as a baseline, not a guarantee.
- Core parts
- Replacement stick (left or right)
- Spare screws
- Common tools
- Tri-wing or Phillips screwdriver
- Tweezers
- Spudger or plastic opening tool
- Optional extras
- Adhesive or foam pads
- Replacement thumbstick cap
- Often excluded
- Calibration instructions specific to model
- Replacement controller housing
- The Switch console or controller itself
- Tri-wing screwdriver in budget kits
This chart shows the typical contents of a Joy-Con drift repair kit, common exclusions, and the important variation to check before purchasing.
Choosing kit type: full tool kits vs parts-only packs
A full tool kit is the safer choice when you have no existing tools and want a complete set to start repairs immediately; a parts-only pack is sufficient if you already own the basic opening tools and only need replacement screws, sticks, or springs. A full kit reduces the risk of being stuck mid-repair without a necessary tool, while a parts-only pack costs less upfront but requires the user to verify tool compatibility. Your choice depends on what you already own.
Full tool kits and parts-only packs have different contents, as the image below shows. The table compares their risk, completeness, and best-fit user situations.
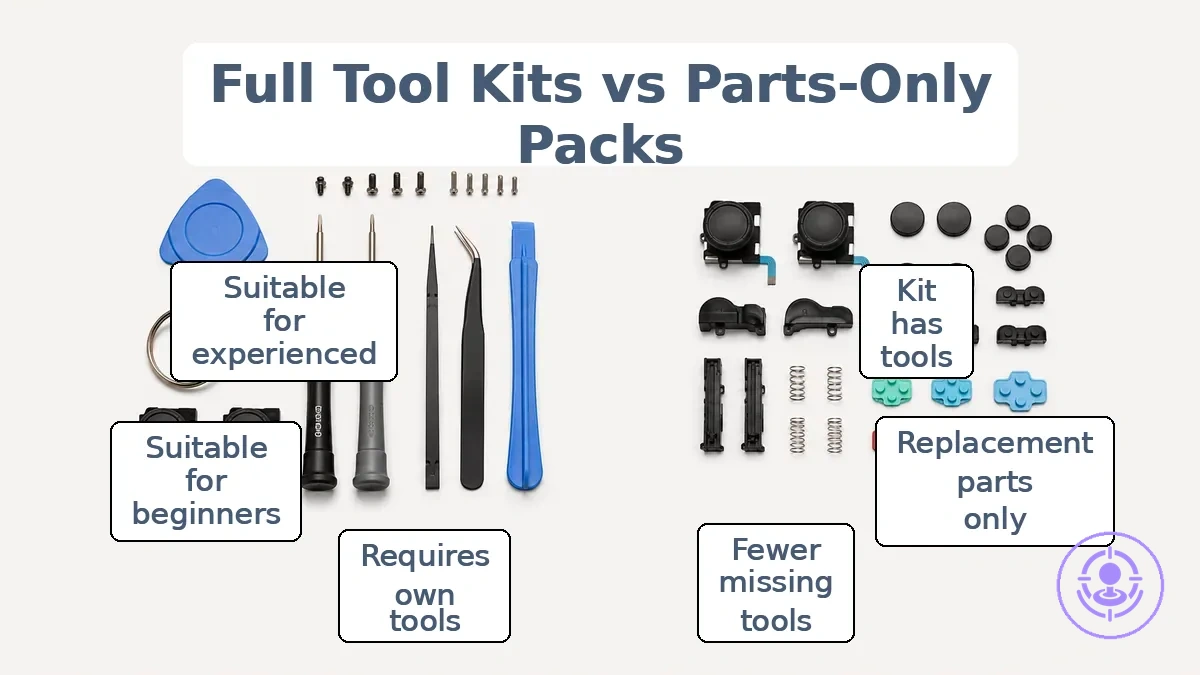
| Option | What you usually get | Main advantage | Main risk | Best for |
|---|---|---|---|---|
| Full tool kit | Opener, screwdrivers, tweezers, spudger, replacement sticks or pads, and often extra screws | Convenience and lower risk of missing tools; immediate readiness | Includes tools you may already own; higher upfront cost; some kit tools may be flimsy | Beginners, first-time repairers, or those without any repair tools |
| Parts-only pack | Only the replacement parts (e.g., sticks, buttons, springs) | Lower cost; no waste of duplicate tools | User must supply all tools; higher chance of damage from improper tools; requires verification | Experienced users who already own a full set of compatible opening tools |
A full kit lowers damage risk during disassembly but may include redundant or low-quality tools. A parts-only pack saves you from paying for tools you already own, but requires verifying tool compatibility and condition. So choose the kit type that fits your tool inventory.
Choose a full kit if your tool drawer lacks a tri-wing bit or a plastic spudger; choose a parts-only pack if you already own those items, as it costs less and typically does not increase damage risk.
Compatibility Checks That Prevent Wrong-Bag Purchases
Many listings claim a kit works with all Switch controllers, but compatibility depends on Joy-Con model, side, and connector type. Joy-Con revisions can use different connector types and ribbon cable layouts. Compatibility is a set of checks, not a label.
Compatibility checks that prevent wrong-bag purchases start with recognizing your Joy-Con's side and connector region. This image labels those cues.
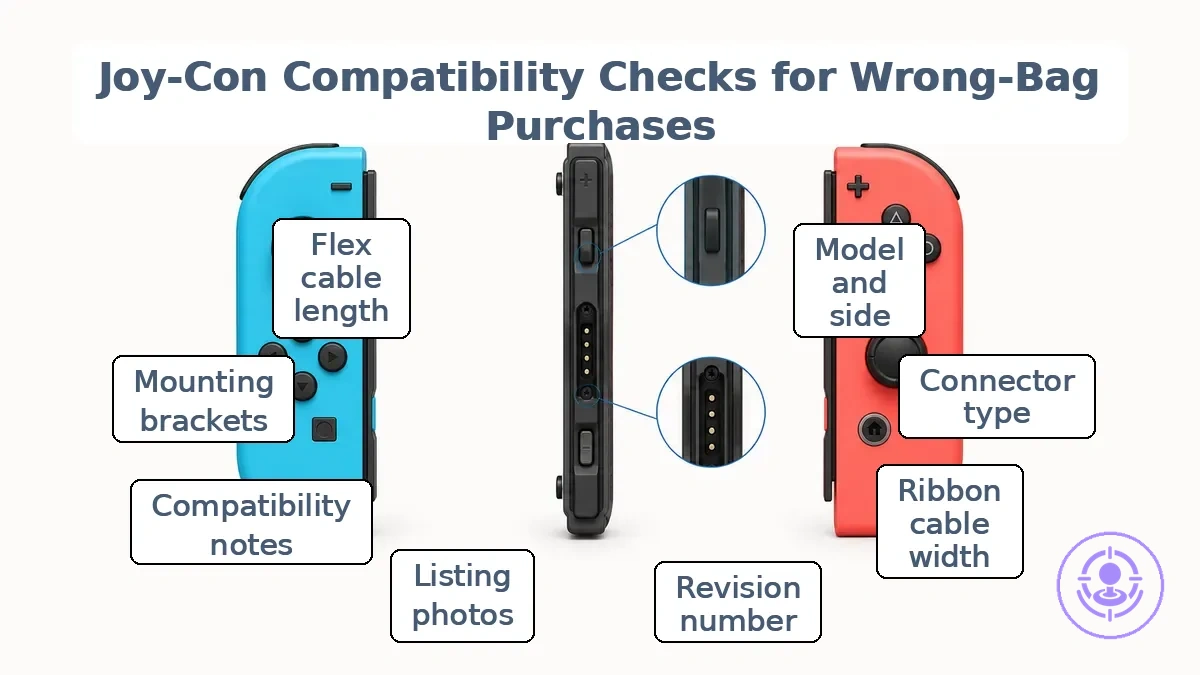
Compatibility checks confirm model/side, connector type, and ribbon cable seating. This checklist verifies kit-to-unit match.
- Check model and side (left/right) – mismatch causes physical misalignment.
- Verify connector type (JST or Molex) – wrong type prevents connection.
- Inspect ribbon cable width and pin count – mismatch blocks seating and signal.
- Confirm revision number (01, 02) – different revision may alter flex routing.
- Compare listing photos to Joy-Con internal layout – unclear photos hide revision differences.
- Look for explicit compatibility notes in listing – vague 'fits all' suggests seller hasn't verified.
- Check for required mounting brackets – missing brackets cause fit failure.
- Verify flex cable length – too short risks tear; too long risks seating problems.
- Confirm return policy – uncertain fit is safer with return option.
- Cross-reference kit type (drift-only vs full module) – replacement part may differ in design.
Stop if any check is unclear. Contact the seller or request additional photos.
Some compatibility factors cannot be confirmed from a listing alone. Internal revision markings and ribbon cable seating depth may only be visible after opening the Joy-Con. Compare the delivered part against your original module before starting installation. If anything looks different, pause and verify.
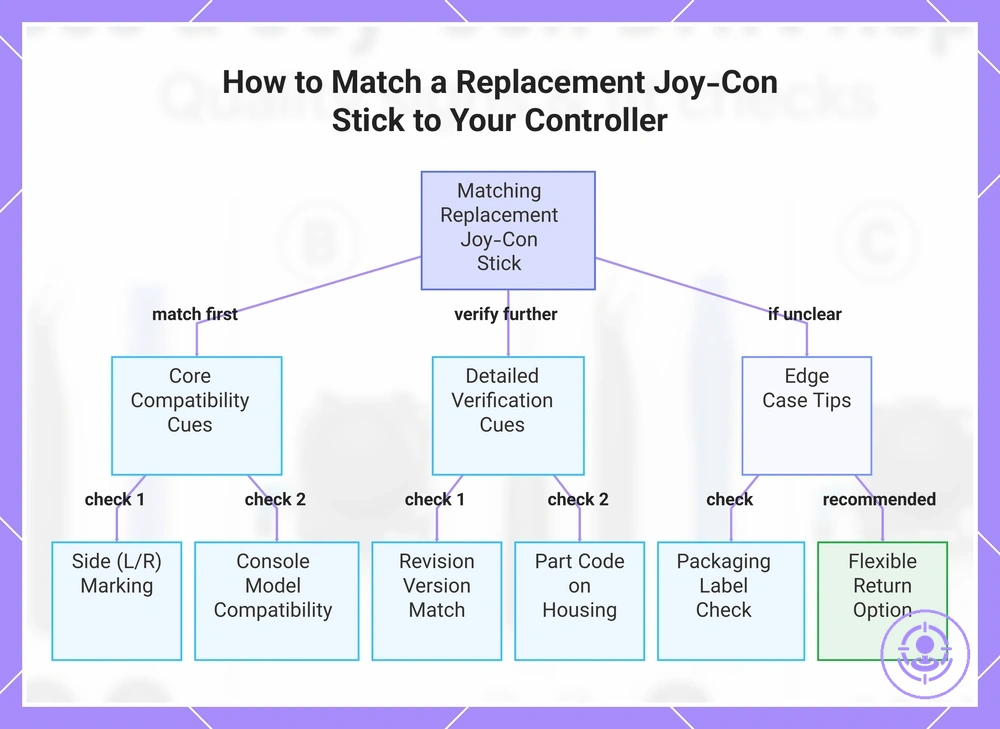
Matching Joy-Con model, side, and revision cues to the replacement stick
Start by matching your Joy-Con's side (left or right), console model (Switch, Switch OLED, or Switch Lite), and any revision cue shown on the listing to the replacement stick specifications. Match cue-to-cue, not label-to-label.
Check these cues on the product listing and your controller's exterior before buying:
- Side (left/right): Look for “L” or “R” markings in the listing title or product images. A mismatch usually means the stick will not physically mount — the ribbon connector and screw hole positions differ.
- Console model: Check the compatibility section for phrases like “for Switch / Switch OLED / Switch Lite”. A mismatch may cause poor fit, incorrect height, or calibration issues.
- Revision cue (if shown): A version number or “rev” may appear on the packaging label or in product photos. A mismatch can result in slight differences in feel or calibration behavior.
- Packaging label details: Check for region codes or model numbers on the box image. If the label matches your controller’s serial number range, fit confidence may improve.
- Part code in listing: If the listing shows a printed part code on the stick housing, a mismatch suggests the internal contact layout may be different.
- Color variant: Color is often cosmetic, but some colors are tied to specific model runs. A mismatch alone rarely affects function, but can indicate a different production batch.
If the listing lacks clear revision details or product images, choose listings that include explicit compatibility notes and a flexible return option.
This chart shows the critical and secondary cues to check when selecting a replacement joystick for a Nintendo Switch Joy-Con, ensuring proper fit and function.
Cable and Connector Fit Cues That Affect Installation Success
The cable and connector on the stick assembly may look fine, but the fit can still be wrong. A mismatch in connector shape, latch type, or cable length can cause poor seating and intermittent input. Even if the connector looks undamaged, it may not seat correctly in the socket. Connector mismatch is a stop signal.
To reduce these risks, compare cable and connector fit cues during inspection.
- Compare the connector shape to the socket profile.
- Check the latch or locking tab type. The wrong latch may not engage, leading to a loose connection and tear risk.
- Verify cable length. A cable that is too short can cause pinch points and tear risk; one that is too long may interfere with proper cable placement.
- Inspect the ribbon/flex cable for visible damage or creases. Even slight tears can cause intermittent behavior.
- Ensure the connector seats fully. A partially seated connector can cause signal loss and unpredictable input.
- Assess the cable for sharp bends or pinch points near the connector.
Stop conditions: bent pins, wrong latch type, cable too short — do not proceed. Do not force a connection that does not seat smoothly. Forcing can damage pins or the ribbon cable.
Replacement Stick Quality Signals That Affect Feel and Drift Recurrence
Replacement stick quality signals indicate how consistently the stick responds and how soon drift may return. A module with tighter tolerance and centering precision can maintain smooth travel longer, while one with loose fit or poor calibration may introduce uneven input early. These are signals, not guarantees.
Myth: A new stick module will always feel identical to the original. Truth: Differences in centering, dead zone size, and travel smoothness can make one module feel precise and another introduce sloppy or erratic behavior. A stick with inconsistent quality control or vague specification may develop drift recurrence sooner than the original. To predict long-term feel and drift risk, look for these replacement stick quality signals.
Replacement stick quality signals appear in the labeled diagram, which highlights the centering, travel, and connector cues the criteria list evaluates. 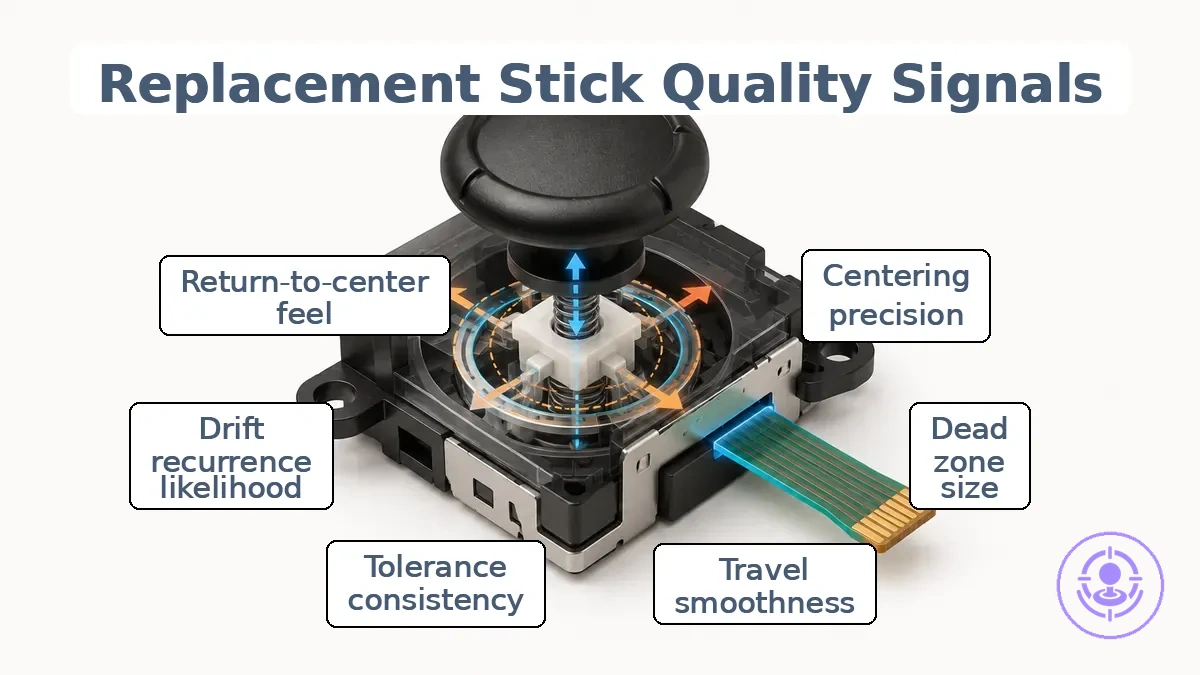
The criteria list separates feel signals from reliability signals.
- Centering precision – How consistently the stick returns to center affects feel and can predict early drift if return is weak or inconsistent.
- Dead zone size – Smaller dead zones may improve sensitivity but often require consistent calibration; larger dead zones can mask uneven input temporarily.
- Travel smoothness – Sticks with uneven travel can create unpredictable input and accelerated wear over time.
- Tolerance/consistency – Tighter fit precision across units can indicate better quality control and more predictable long-term behavior.
- Quality control (QA) transparency – Brands that disclose batch consistency, defect rates, or return policies signal higher reliability.
- Drift recurrence likelihood – Depends on sensor type (potentiometer vs contactless) and build quality; magnetic sensors can reduce mechanical wear but may still vary in centering.
- Listing specificity – Detailed specs (sensor type, material, tested cycles) suggest better QA than vague marketing claims.
- Return-to-center feel – A crisp, consistent return can reduce phantom inputs; sluggish or offset return may signal poor tolerance.
- Connector build cues – Sturdy connectors and clean mounting can reduce intermittent connection issues that mimic drift.
Combine several signals rather than trusting any single claim about performance.
Centering stability, smooth travel, and dead-zone consistency
Centering stability, smooth travel, and dead-zone consistency help predict long-term reliability. Good centering stability means predictable return to neutral, smooth travel implies uniform movement without catching, and dead-zone consistency means uniform play area around center. Together, these qualities reduce unintended input and suggest consistent mechanical tolerances. Look for consistency, not perfection.
Each cue signals a specific outcome and the tolerance risks behind it.
- Consistent return-to-center after each deflection suggests predictable centering stability; uneven return can indicate worn centering mechanisms.
- Smooth travel with no notches or resistance changes suggests uniform movement; sudden resistance suggests binding or track misalignment.
- A dead zone that feels equal in all directions suggests even tolerance; a lopsided dead zone can indicate misalignment or uneven wear that may cause diagonal drift.
- A stick that drifts when at rest suggests poor centering stability and insufficient dead-zone consistency, often a precursor to frequent drift.
- Drift that appears soon after replacement may indicate inadequate centering or dead-zone quality, suggesting a shorter functional lifespan.
- Sensitivity that changes between left and right movement suggests friction or tolerance imbalance, which can lead to uneven input response.
- Uniform resistance across the full range of travel suggests consistent build quality; uneven resistance may indicate a defect in the housing or contacts.
Multiple signals together suggest that the replacement stick likely lacks the mechanical consistency needed for reliable performance.
Durability cues and manufacturing consistency signals from listings
A common myth is that any listing mentioning ‘durable’ or ‘premium’ guarantees a long-lasting part. The truth is that vague durability language is marketing, not evidence. Durability cues separate evidence from marketing: strong signals support repeatable quality claims, while weak signals rely on language without supporting detail. Evidence must be repeatable.
Strong signals
- Listings that mention specific QA steps (like ‘tested before shipping’) or defect-rate ranges provide stronger evidence of manufacturing consistency.
- Consistency cues such as ‘batch-tested’ or ‘same batch’ suggest the seller tracks variation; this is a stronger signal than a single ‘durable’ claim.
- Return-handling policies that explicitly address defects (e.g., ‘replacement for QA failure’) show the seller stands behind the product’s consistency.
- Multiple reviews mentioning the same issue (e.g., a recurring defect) form a repeatable pattern that qualifies as evidence of a consistency problem.
Weak signals
- Vague claims such as ‘durable’, ‘premium’, or ‘long-lasting’ without supporting QA or batch details are marketing, not verifiable cues.
- A single review praising durability without corroboration from other buyers is an anecdote, not a repeatable pattern.
- Listings that avoid mentioning defect rate, return handling, or batch variation often rely on vague durability language to appear premium.
Specificity beats adjectives. Prioritize repeatable patterns over single-review anecdotes when evaluating listing-level durability cues.
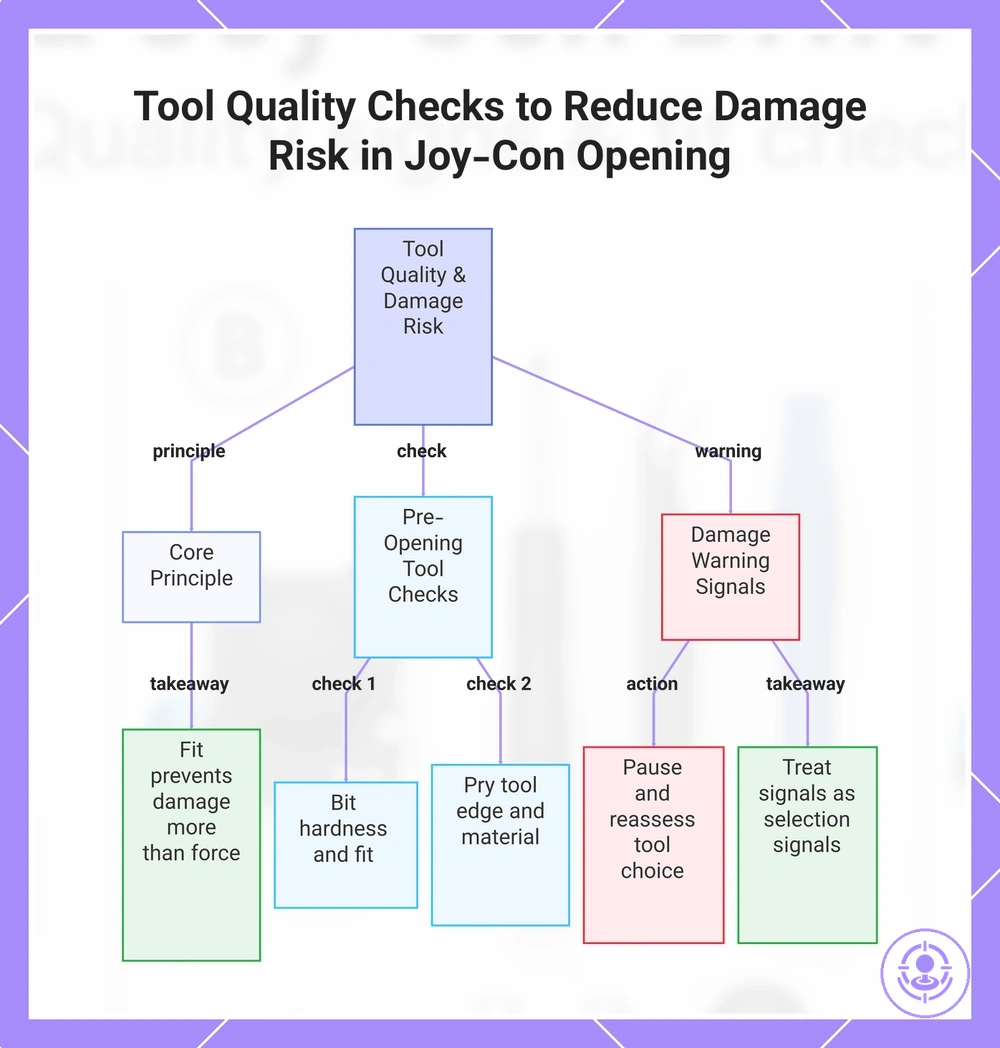
Tool and Accessory Quality That Reduces Damage Risk During Opening
Tool quality directly controls damage risk during Joy-Con opening because the assembly uses small, fragile components and precision fasteners. A single misapplied or poorly fitted tool can strip a screw head, snap a plastic clip, or damage a ribbon cable. Choosing tools with the right size, hardness, and edge finish lets you control the force you apply. Tool fit prevents damage more than force.
To reduce damage risk during opening, check each tool for control, fit, and edge quality before you start.
- Proper screwdriver bit hardness – helps prevent stripped screw heads
- Correct bit size and profile – reduces cam-out and rounding of the screw recess
- Sharp, thin pry tool (spudger) edge – minimizes stress that can snap plastic clips
- Fine, well-aligned tweezers tips – helps avoid bending or tearing ribbon cables
- Non-marring pry tool material (e.g., nylon) – helps prevent cosmetic scratches and gouges on the housing
- Precise fit between bit and screw – reduces the risk of slipping that can damage adjacent components
- Controlled handle diameter – provides better torque transmission without overtightening
- Magnetic bit retention (when applicable) – reduces the chance of dropping a removed screw into the assembly
Slipping driver, rounding screw head, or bending plastic: pause and reassess your tool choice or technique.
A stripped screw or snapped clip often results from a mismatch between the tool attribute and the part it engaged. A soft bit deforms under load, a worn tip loses purchase, or a blunt spudger wedges instead of lifting. Treat damage signals as selection signals next time.
This chart shows how tool quality directly influences damage risk during Joy-Con opening, including key tool checks and warning signals to watch for.
Opening Tools and Handling Accessories That Protect Clips and Cables
Opening tools and handling accessories help reduce clip and cable damage during disassembly. Better control during separation reduces the risk of damaging plastic clips and cables. For beginners, prioritizing control and visibility lowers the chance of accidental breakage.
Key tool features that protect clips and cables include:
- Pry edge design: A well-defined pry edge with appropriate stiffness allows controlled separation, reducing the likelihood of bending or breaking clips.
- Tip shape: A fine, angled tip shape improves precision when opening casings, enhancing control and clip safety.
- Grip: Ergonomic grip reduces hand fatigue and slippage, maintaining control during delicate handling.
- Tweezers: Precision tweezers with anti-slip tips improve cable handling and reduce tear risk when repositioning ribbons.
- Clip protection: Tools with integrated clip protection features prevent accidental over-flexing of plastic clips.
- Cable safety: Features like rounded edges or non-marring surfaces avoid damaging cables during access.
- Stiffness balance: Optimal stiffness provides enough leverage without excessive force, lowering the risk of stress on clips.
When selecting tools, choose features that prioritize control over speed to protect clips and cables. Even with proper tools, careful technique remains essential.
Screwdriver and bit fit quality for small fasteners
Bit fit safeguards against stripping small screws. Bit fit refers to how precisely the driver tip matches the screw head recess; good engagement means the bit contacts the full depth and width of the recess without wobble, and fit beats force when preventing cam-out. When selecting bits, checking the screwdriver requirements for the kit helps ensure the bit shape and size align with the fastener’s drive geometry. A mismatch becomes evident early — excessive free play or difficulty seating the bit signals a high risk of cam-out and damage.
Bit fit quality evaluation helps prevent stripped heads. The checklist covers fit attributes:
- Bit hardness: Sufficiently hard bits maintain their shape under load; soft bits deform, reducing engagement and increasing cam-out risk, while hardened bits preserve grip and can allow repeated use.
- Precision of tip geometry: A precisely machined tip fills the screw recess closely; poor precision leaves gaps that cause slip and eventual stripping.
- Driver size match: Using the correct driver size (e.g., PH2 vs PH1) helps achieve better contact; too small a bit concentrates force and can cam out, too large may not seat properly and may round the head.
- Magnetic retention: A magnetized bit can hold the screw during initial engagement, reducing slip during start; lack of magnetism may require manual stabilization in tight spaces.
- Bit length relative to access: A bit short enough to maintain straight alignment reduces side-load; excessive length can cause wobble and uneven engagement.
- Wear condition: A new or unworn bit improves contact; worn edges round off and lose grip, making cam-out more frequent.
If any of these checks reveal a poor fit — such as visible gap, wobble, or resistance when inserting the bit — stop and change the bit before driving further.
Small parts completeness: when spare screws help and when they are filler
Spare screws help only when they are clearly specified and match the correct fastener type and dimensions. Match evidence matters; without clear specification, a screw may not fit the mounting point or may fail under torque.
The distinction is clear: specified spare screws help, while unspecified ones act as filler.
| Useful spares | Filler spares |
|---|---|
| Clearly specified thread and size | Unspecified with no thread or size info |
| Match the original fastener type | May be low-quality and prone to stripping |
| Included for commonly lost or stripped parts | Included only to increase part count |
Completeness should not outrank compatibility and tool fit. A single matched spare screw is more useful than several unspecified ones that may strip during installation.
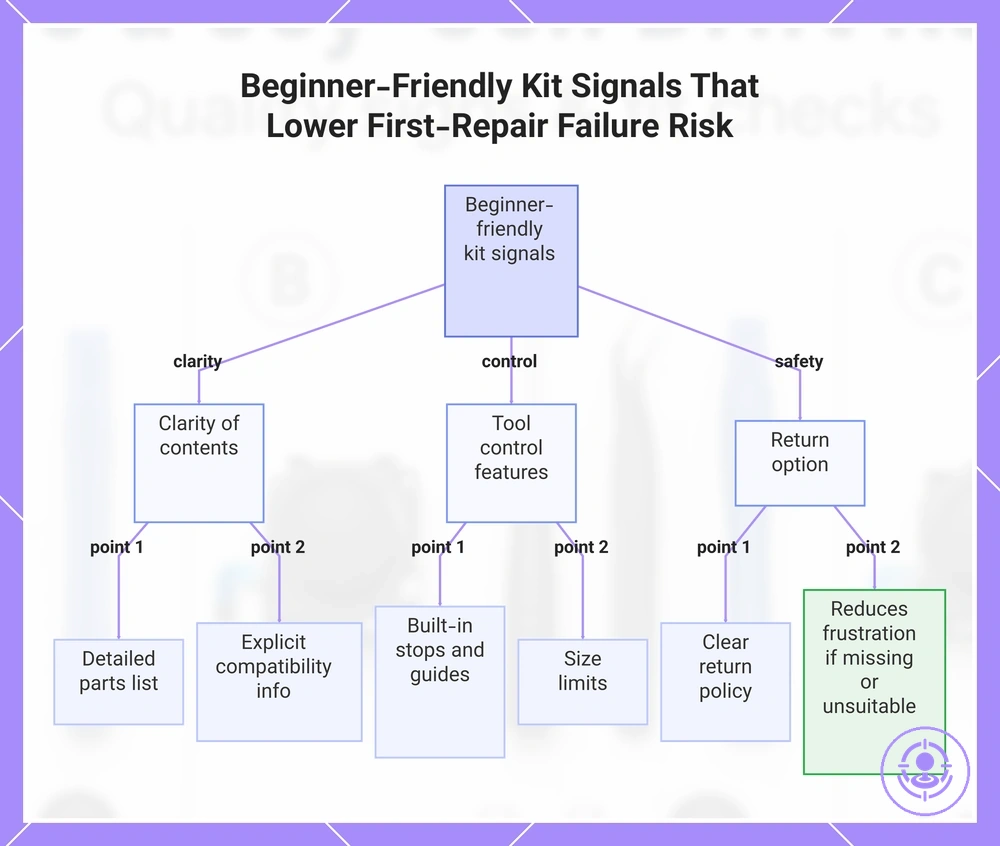
Beginner-friendly kit signals that lower first-repair failure risk
The two most critical beginner-friendly signals are clarity of the kit’s contents and tool control features, and a flexible return option adds further safety. Together, these three factors reduce the likelihood of a failed first repair, but they do not guarantee success.
The beginner-friendly kit signals that most reduce mistake risk are as follows. Prioritize clarity and control when evaluating a kit.
- Clarity of included parts: A detailed parts list helps a beginner confirm completeness before starting, reducing the chance of missing components.
- Explicit compatibility information: Fit claims and device-specific details lower the risk of ordering a non-matching kit.
- Tool control features: Built-in stops, guides, or size limits reduce damage risk during a first repair.
- Return option: A clear return policy reduces frustration if the kit arrives with missing parts or is unsuitable.
- Listing photos showing actual contents: Vague photos increase uncertainty; clear visuals help assess what is included.
- Seller reputation and reviews: Customer feedback on completeness and ease of use helps qualify the kit’s beginner-friendliness.
Consider two kits at a similar price point: one lists 'assorted screws, epoxy, tool' without specifications; another lists '4 M2 screws, 2 ml epoxy, precision screwdriver with torque stop.' The second kit’s clarity and control reduce the chance of missing parts and improper tool use. If the price difference is small, choosing the better-specified kit can lower first-repair failure risk.
This chart shows the three most critical beginner-friendly kit signals—clarity of contents, tool control features, and a flexible return option—that reduce mistake risk during a first repair.
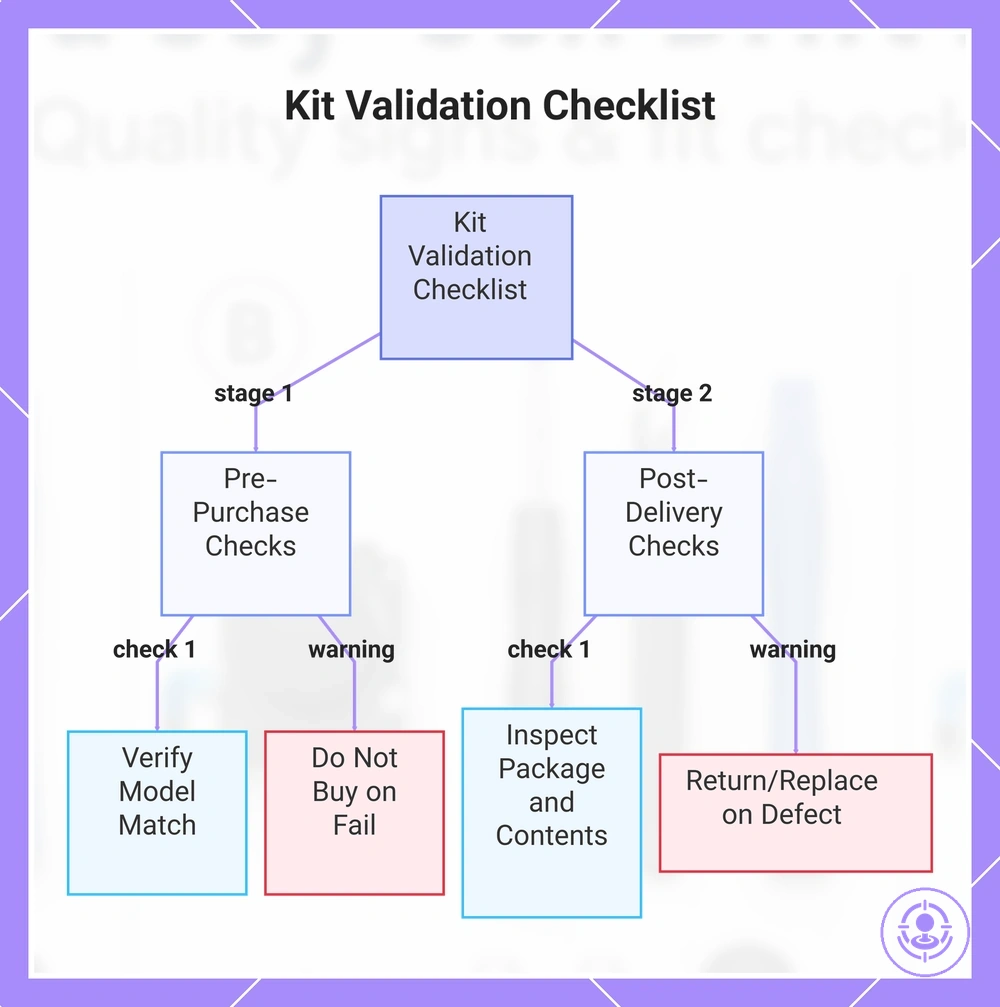
Decision checklist for choosing and validating a kit before you start
A decision checklist can prevent wasted purchases and avoidable damage by validating fit and quality at two separate points: before buying (pre-purchase) and after delivery (post-delivery). The two stages serve different purposes: pre-purchase checks confirm the listing matches your model and the seller terms are acceptable, while post-delivery checks confirm the physical kit is complete and undamaged. Stage 1 can prevent wrong purchase; stage 2 can prevent starting with bad parts.
Pre-purchase checks: use these criteria to verify listing and seller terms. Pause if compatibility is unclear.
- Model compatibility: listing matches your Joy-Con model → clear match → add to cart; unclear or generic → pause and verify with seller
- Listing clarity: all included items are listed with names and quantities → clear → proceed; vague or missing info → ask seller before buying
- Return terms: seller clearly states return policy → clear → buy; no return policy or returns not accepted → consider another listing
- Tool specification: driver sizes and bit types are stated → matches your tools → confident; not stated → check compatibility separately
- Price range: compare with similar kits from multiple sellers → within common range → reasonable; far below average → suspicious of quality
- Seller reputation: positive reviews with recent dates → trusted → proceed; no reviews or complaints → pause
- Shipping timeline: delivery within stated period → meets deadline → order; extended or unclear → consider urgency
Post-delivery checks: perform these non-destructive checks upon receipt to verify kit condition and completeness. A failed check is a stop condition—do not proceed.
- Package condition: outer box undamaged → intact → proceed; crushed or open → document and inspect contents
- Contents match listing: all items from listing are present → complete → proceed; missing parts → stop condition, contact seller
- Visible defects: no cracks, bent pins, or loose components → intact → proceed; visible damage → treat as return/replace item
- Tool fit: screwdrivers fit Joy-Con screws without forcing → good fit → proceed; too loose or too tight → do not force, check compatibility
- Component finish: edges smooth, no burrs or excess plastic → clean → proceed; rough edges → evaluate whether safe to use
- Documentation included: quick start or guide present → clear → proceed; missing → verify steps online before starting
Based on the checklist results, you can decide whether to return, replace, or pause by evaluating price range and offer evaluation. If any check fails during pre-purchase, do not buy until compatibility is confirmed. If any check fails after delivery, do not start the repair—treat it as a return/replace decision.
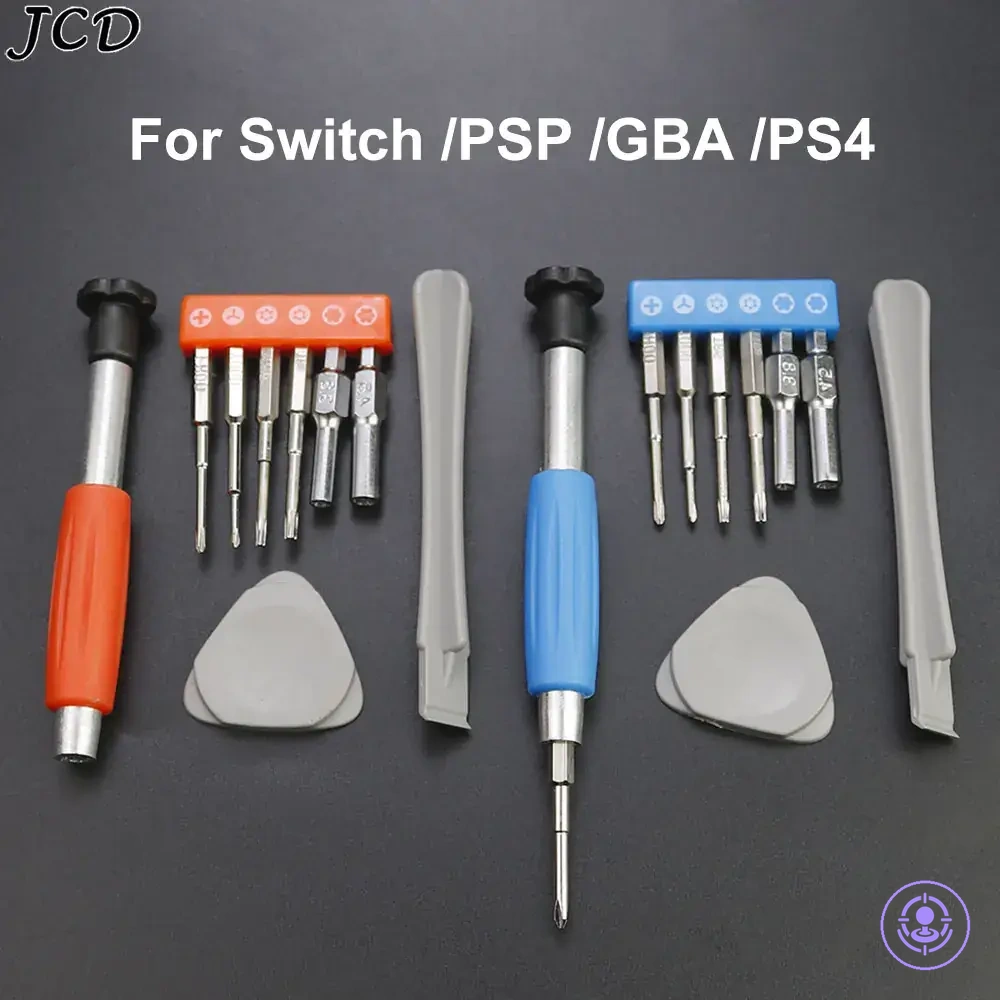
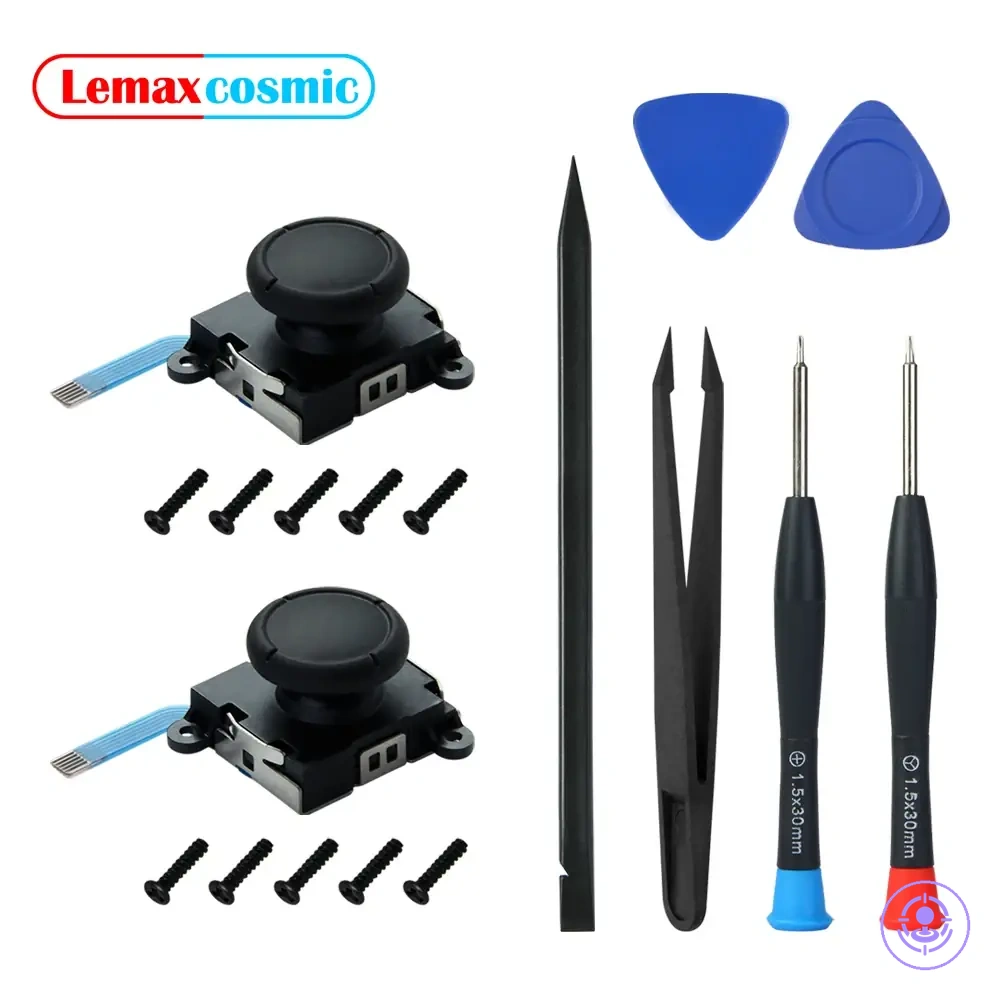
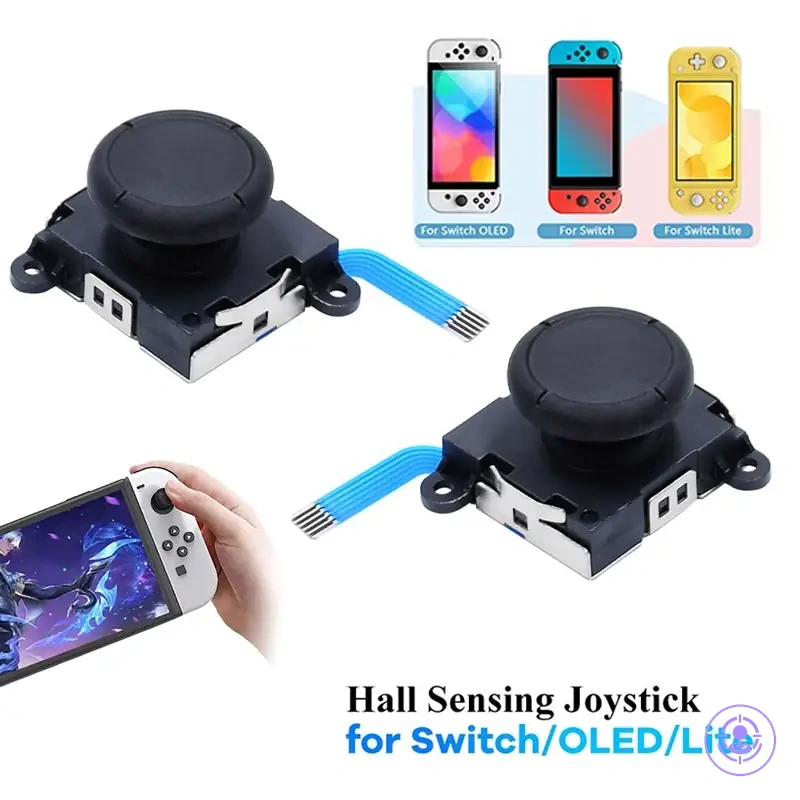
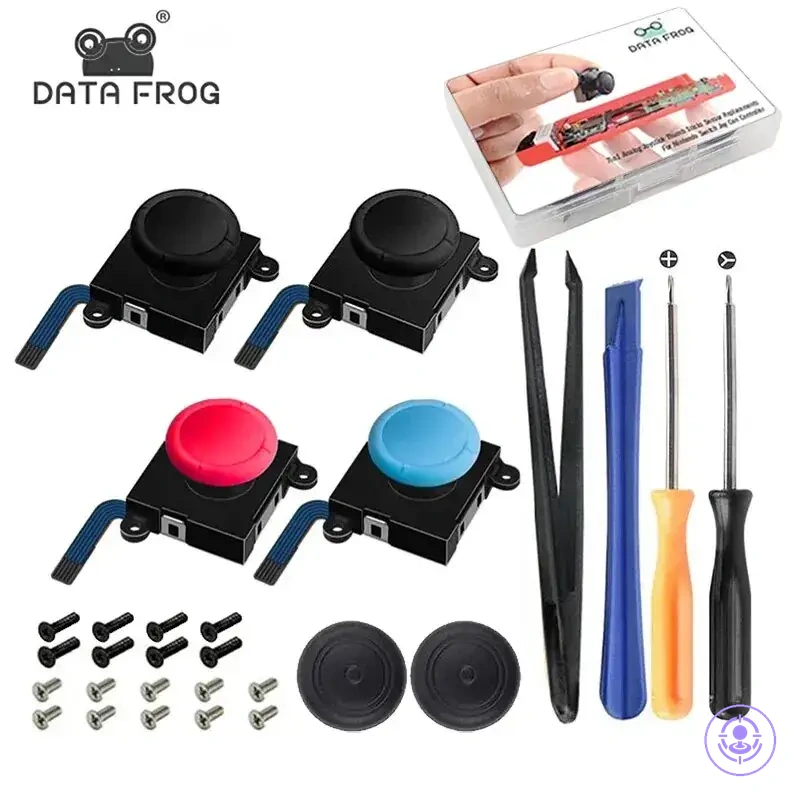
Here are product examples that may make comparison easier. Before buying, always review the compatibility criteria, essential features, and product details.
This chart shows the two-stage decision checklist to avoid wasted purchases and damaged parts when choosing and validating a Joy-Con repair kit.
Listing evaluation signals: clarity of fit claims, returns, and quality proof
Proof in a product listing means verifiable specificity. Claims without specifics are not proof. Vague language offers no actionable evidence; a clear fit claim builds confidence. In listing evaluation, specific beats promotional.
Listing evaluation signals check clarity, returns, and evidence consistency to help qualify confidence in a listing:
- The fit claim names the specific model, side, and version rather than generic terms.
- Photos show the product from multiple angles, such as the connector side and model markings.
- Return terms are stated upfront, including the return window and its conditions.
- The listing is consistent: description matches photos (mismatches reduce confidence), and details are repeated across title, description, and bullet points without contradiction.
- Evidence of compatibility comes from model numbers or part numbers, not just brand names.
- The listing avoids vague phrases like 'fits most' or 'universal' when the product is not.
- Customer Q&A may confirm fit details, but verify independently with official specifications.
- The seller provides additional specifics like dimensions, color, or material when relevant.
Clear return terms reduce risk but do not replace compatibility validation.
Pre-purchase checks: compatibility, included items, and risk controls
Before ordering, confirm compatibility first, then verify included items, then apply risk controls. This order helps you avoid mistakes because compatibility determines fit, included items affect repair completeness, and risk controls protect your purchase. If a listing lacks clear photos or an explicit fit claim, treat it as a warning to verify before buying.
These pre-purchase checks help prevent wrong-fit purchases when used before ordering.
- Compatibility (model/side/connector) — Check that the listing matches your specific model and side. A mismatch often results in an incorrect part.
- Explicit fit claim — Look for a clear statement of compatibility. Without it, the risk of mismatch increases.
- Included items — Verify contents such as screwdriver, opening tool, or replacement parts. Missing items may require a separate purchase.
- Clear photos — Look for multiple angles showing connector and shape. Unclear images can hide important differences.
- Return option — Confirm the seller offers returns for wrong fit. Without this, a mistaken purchase may be non-refundable.
- Minimum tools required — Check if the kit includes the necessary tools. Needing additional tools can delay the repair.
- Seller feedback — Positive history for similar items suggests reliable fit claims. Without it, the risk of incorrect fit increases.
- Packaging description — Original packaging indicates better protection. Generic packaging may increase the risk of damage during shipping.
- Warranty or guarantee — Some sellers guarantee fit, providing a safety net. Without a guarantee, you may have no recourse if the part doesn't fit.
- Customer questions — Reading Q&A can confirm fit from real user experiences. Without Q&A, you have less information to judge fit.
When in doubt, pause rather than guess.
Post-delivery checks: missing parts, tool fit, and obvious defects
Post-delivery checks involve inspecting the delivered kit for missing parts, tool fit, and obvious defects before opening the controller. These checks are non-destructive and help you decide whether to proceed or stop.
The following inspection points identify stop conditions before opening the controller. For each point, note the fail signal and decision action:
- Missing parts: count all items listed in the packaging; if any part is missing → stop, document missing parts, and contact the seller for return/replace.
- Tool fit: insert the bit into the driver; if the bit slips or does not engage securely → stop, do not use, return/replace the kit.
- Visible defect: examine the housing and key surfaces; if you find a cracked or bent part → stop, photograph the damage, initiate return/replace.
- Damaged cable: check any included cable for cuts, kinks, or fraying; if damaged → stop, avoid forcing the connector due to connector damage risk, return/replace.
- Case integrity: open the storage case and inspect latches and corners; if the case is broken or parts are loose → stop, secure contents, request replacement from seller.
- Guide slot condition: run a finger along any guide slot; if you feel a dent or obstruction → stop, tool fit may be compromised, return/replace.
- Bit condition: examine carbide or steel bits for chips, dull edges, or breakage; if damaged → stop, do not use, return/replace.
- Missing hardware: verify that screws, nuts, or alignment pins are present; if any hardware is missing → stop, contact seller for replacement.
- Packaging seal: check whether the outer seal is intact; if the seal is broken or tape appears tampered → stop, inspect all contents thoroughly for missing parts before contacting seller.
- Alignment marks: look for factory alignment marks on moving parts; if marks are shifted or missing → stop, suspect disassembly or defect, return/replace.
Any fail signal means you should pause, close the package, photograph the issue, and contact the seller immediately to arrange a return or replacement. Do not open the controller or attempt to force assembly. Forcing tools or connectors after a fail signal increases the risk of connector damage and may void your return options.
Here are product examples that may make comparison easier. Before buying, always review the compatibility criteria, essential features, and product details.