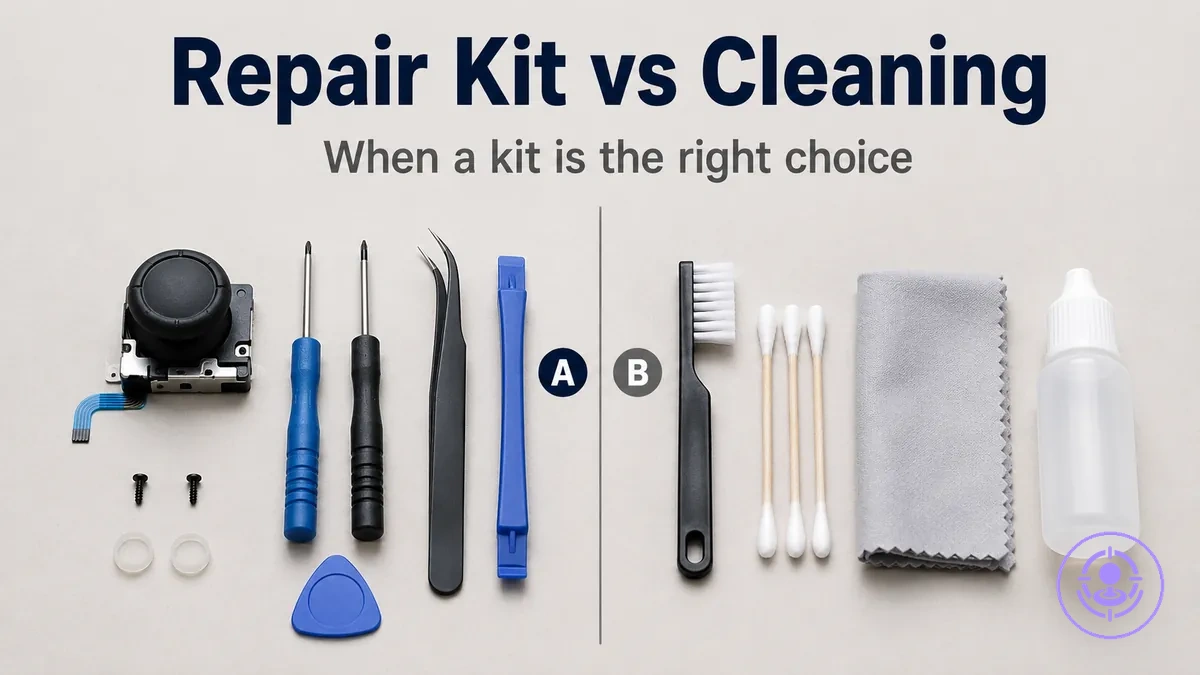
Joy-Con drift repair kit vs cleaning: when joystick replacement is the right move
Choosing between cleaning and joystick replacement for Joy-Con drift depends on whether the issue comes from surface contamination or from worn internal components. Cleaning changes contact conditions by removing dust or residue; joystick replacement changes the component itself when wear has developed.
Cleaning can fix drift if it is caused by dirt or oxidation on the sensor contacts. If drift persists after repeated cleaning or returns quickly, joystick replacement is often the better option. The decision signals include how often drift occurs, whether it started gradually or suddenly, and how the controller responds to calibration.
The two paths in this Joy-Con drift repair kit vs cleaning comparison are:
- Cleaning – targets contamination and can provide temporary improvement when the sensor is dirty or slightly oxidized.
- Joystick replacement – targets component wear and can produce a longer-lasting result when the module is physically degraded, depending on part quality and installation care.
Many assume cleaning can permanently resolve drift, but it is often a temporary first step when contamination is likely. The durability of each approach depends on whether the root cause is contamination or wear.
Why Joy-Con drift fixes differ: contamination, wear, and what each approach can change
Joy-Con drift arises from two distinct conditions inside the joystick module: contamination-like behavior and wear-like behavior. Each condition affects a different part of the mechanism and produces its own symptom pattern. Separate interventions typically address each condition: cleaning targets contamination, replacement addresses wear. The diagram below shows contamination, wear, and what each approach can change at the joystick module level.
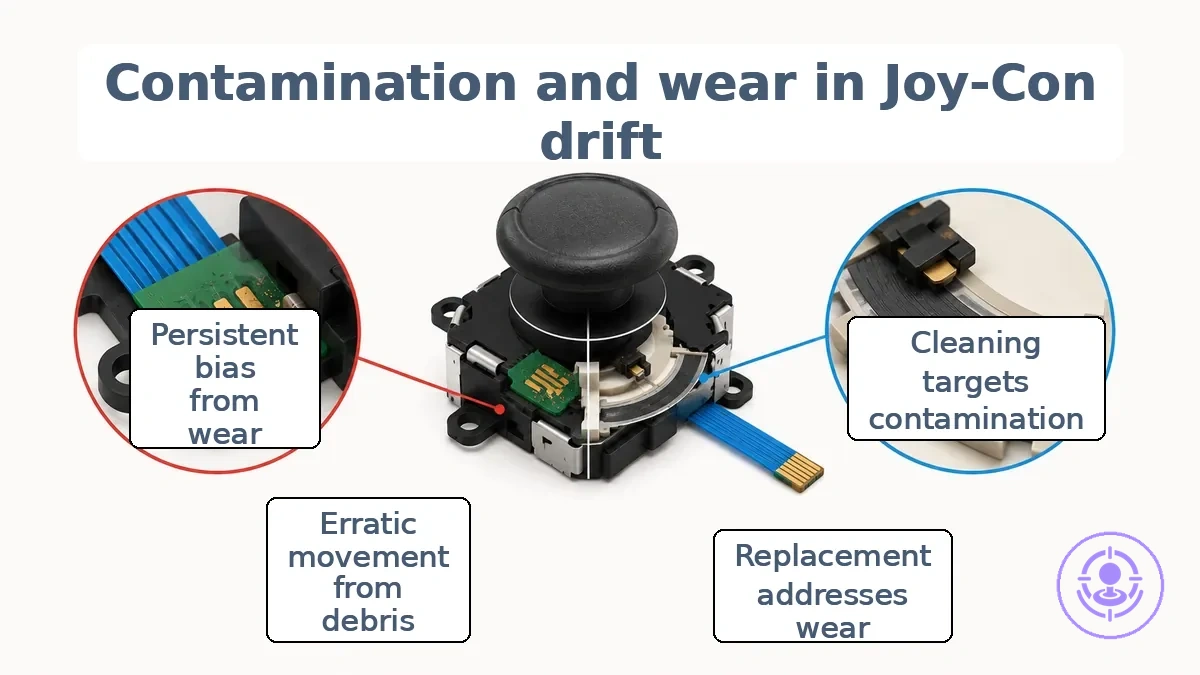
Dust, debris, or residue inside the joystick module interferes with the contact behavior between the internal wipers and carbon pads. Contamination creates a symptom pattern of erratic stick movement, especially after movement or inactivity. Cleaning can often remove debris and restore normal contact, leading to short-term improvement. However, cleaning only helps when contamination is the primary factor and usually cannot correct drift from worn components.
Mechanical wear develops when resistive tracks or potentiometer surfaces degrade after repeated use. Wear leads to persistent stick bias or continuous input detection even when untouched. The symptom pattern is consistent across sessions and typically does not respond to cleaning. The following bullets separate what each approach can change for contamination-like and wear-like drift.
- Contamination-like pathway
- Contamination-related debris on contact pads can be cleaned away, often restoring stick response temporarily.
- Intermittent stick fluctuations typical of contamination often respond to cleaning.
- Cleaning typically does not address wear already present on the resistive track.
- Wear-like pathway
- Persistent drift from worn potentiometer tracks is usually not resolved by cleaning.
- When wear is dominant, drift persists after cleaning, making replacement the more effective intervention.
Cleaning a drifting Joy-Con: methods, safe materials, and realistic improvement limits
Cleaning a drifting Joy-Con can reduce or eliminate drift symptoms when the issue stems from debris or contaminant buildup on the joystick's internal contact surfaces. It is a non-replacement intervention that targets the sensor area rather than worn components. The process uses minimal application of a cleaning agent such as electronics contact cleaner or isopropyl alcohol 99% applied to the joystick base with a cotton swab. When done correctly, cleaning can improve contact stability by removing residue, but the improvement is often short-term because cleaning does not fix underlying wear.
Cleaning a drifting Joy-Con targets the joystick base area, and the illustration highlights this area and the minimal-application principle.
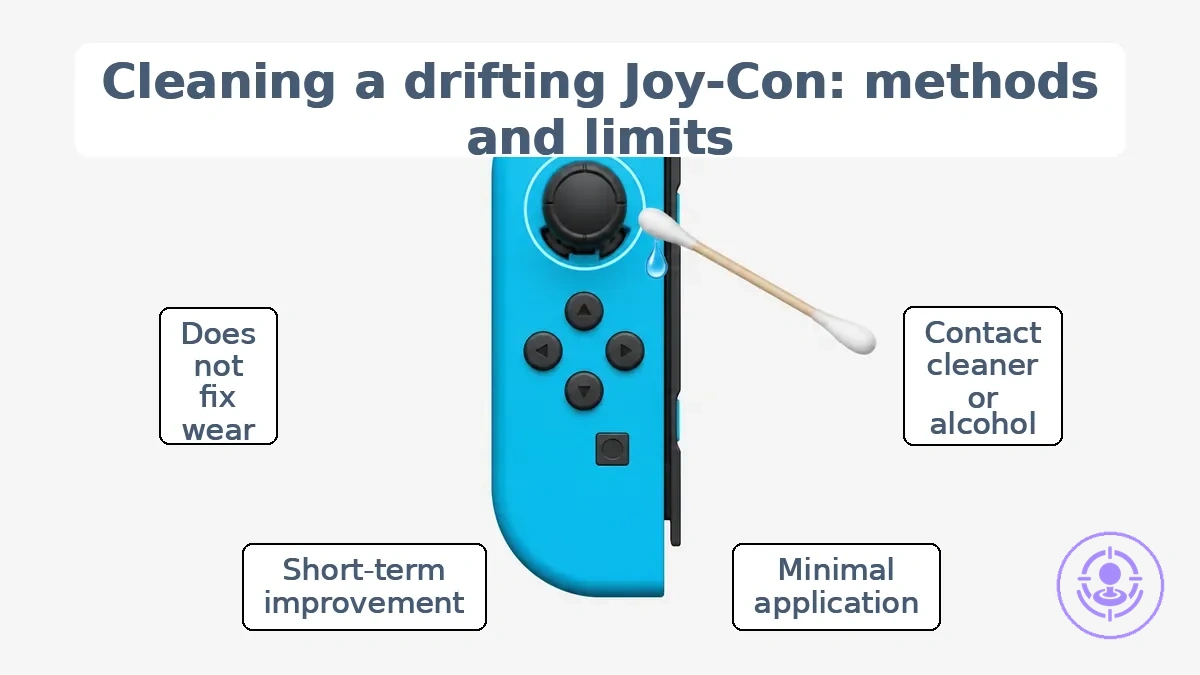
A safe cleaning baseline starts with materials that are compatible with the Joy-Con's plastics and do not leave conductive residue. Electronics contact cleaner is formulated to evaporate quickly without residue, while isopropyl alcohol (preferably 99%) dries clean and reduces the risk of moisture damage. Apply minimally — a single drop on a cotton swab is sufficient — and only touch the joystick base under the rubber cover. Over-saturating the area can cause liquid to seep into the controller board, so do not soak is the primary rule to reduce damage risk.
This checklist organizes safe materials and application limits for cleaning a drifting Joy-Con.
- Electronics contact cleaner or isopropyl alcohol 99% as the primary cleaning agents
- Cotton swabs for precise, minimal application — one drop is enough
- Plastics-safe materials only: avoid solvents that can soften or discolor the controller shell
- Allow full evaporation of residue after application before testing the joystick
- Expect short-term improvement; cleaning can improve contact but does not rebuild worn parts. If drift returns quickly, suspect mechanical wear rather than contamination.
When cleaning restores normal joystick behavior for a short time but drift later returns, the pattern suggests that contamination was initially present but that accumulation or wear has since reappeared. Repeated cleaning is unlikely to provide lasting relief in such cases, and the underlying wear of the contact pads becomes the likely cause. This scenario signals that a replacement — such as a joystick replacement kit — may be the next appropriate step.
Electronics contact cleaner vs isopropyl alcohol: where each fits for Joy-Con cleaning
Use electronics contact cleaner for heavy residue and isopropyl alcohol 99% for lighter dirt, depending on plastics safety constraints. Residue, evaporation, and plastics compatibility determine where each agent fits.
- Residue: Electronics-grade contact cleaners typically leave little to no residue, while isopropyl alcohol 99% typically evaporates completely without trace. Contact cleaners are often the better option when avoiding residue is critical.
- Evaporation: Both dry quickly, but some contact cleaners (especially high‑flash formulas) can take longer. IPA often offers faster evaporation, making it a good fit for quick cleaning sessions.
- Plastics compatibility: Isopropyl alcohol is generally gentler on the plastics used inside Joy‑Cons. Some contact cleaners may craze or soften plastic housings, so IPA is the safer option when plastic type is unknown.
- Cleaning strength: Contact cleaners are more aggressive on heavy grease, flux, and oxidation. IPA is often used for light dirt and dust. Use contact cleaner when grime is stubborn and plastic compatibility has been verified.
Apply either cleaner sparingly and stop immediately if the material shows any sign of damage or if the plastics’ resistance is unclear.
Compressed air and dry cleaning: when it helps and when it wastes time
A compressed air duster helps briefly if debris is loose and reachable; it wastes time when the contaminant is out of reach or the drift is mechanical, making it a low-value attempt.
One quick attempt is reasonable; stop if symptoms persist.
Helps when…
- Debris is superficial and visible around the joystick base – compressed air can dislodge it and restore normal movement temporarily.
- The symptom changed suddenly after exposure to dust or crumbs – airflow can reach and remove the recent contaminant.
- Drift appears only in one direction and feels gritty – loose particles may be causing friction that air can clear.
- Short-term improvement suggests contamination rather than wear, confirming a low-risk first step.
- The user can access the stick opening without disassembly – compressed air can reach the gap and sweep out loose material.
Wastes time when…
- Debris packed into tight crevices or under the membrane – compressed air lacks the force to dislodge it.
- The drifting is consistent and stable over days – mechanical wear or corrosion is the likely cause, not loose dust.
- Oil or liquid residue is present – compressed air typically cannot remove it and may spread it further.
- Repeating the attempt more than once is usually unhelpful; persistent symptoms mean the problem is beyond a quick clean.
- Drift returns within minutes after cleaning – the underlying issue is likely not superficial debris that can be reached.
For example, a joystick that drifts only after being used on a dusty surface may respond to a brief pass of compressed air. One that drifts consistently after months of normal use rarely benefits from a second dry cleaning attempt. Avoid repeated or aggressive spraying of compressed air, which can push debris deeper or damage internal components.
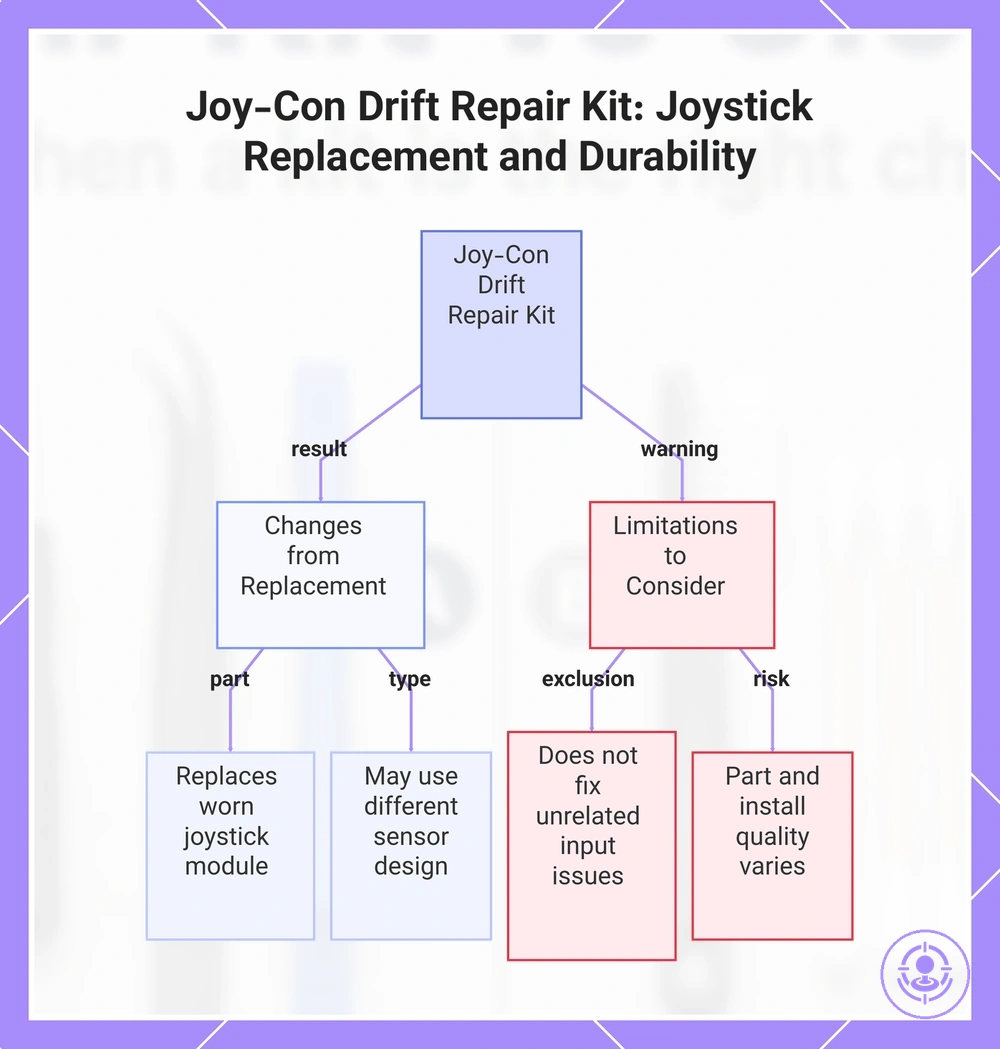
Joy-Con drift repair kit approach: joystick replacement and why it can be more lasting
Joystick replacement can be more lasting than cleaning when drift originates from a worn component, but durability also depends on part and install quality. When drift originates from worn resistive film, replacing the module can restore signal stability. Replacing the worn component addresses the root cause rather than surface contact issues.
To avoid false expectations, the list below and the Joy-Con drift repair kit overview clarify what changes and what does not.
- Changes: The drift source is replaced with a new joystick module.
- Changes: Signal stability is restored from a fresh sensor.
- Changes: Durability may be longer if the replacement uses a different sensor design.
- Does not change: The repair does not fix unrelated input issues.
- Does not change: It does not guarantee indefinite resistance.
- Does not change: Part quality varies across kits, and the same housing and buttons remain.
The assumption that any joystick replacement kit provides permanent results is not accurate. Some kits use different sensor designs that can reduce contact-based wear, making the fix more lasting for drift caused by worn potentiometers. For those considering this path, a step-by-step repair with a kit can guide the process.
This chart shows the key changes and limitations of using a joystick replacement kit to fix Joy-Con drift, explaining why it can be more lasting and what factors affect durability.
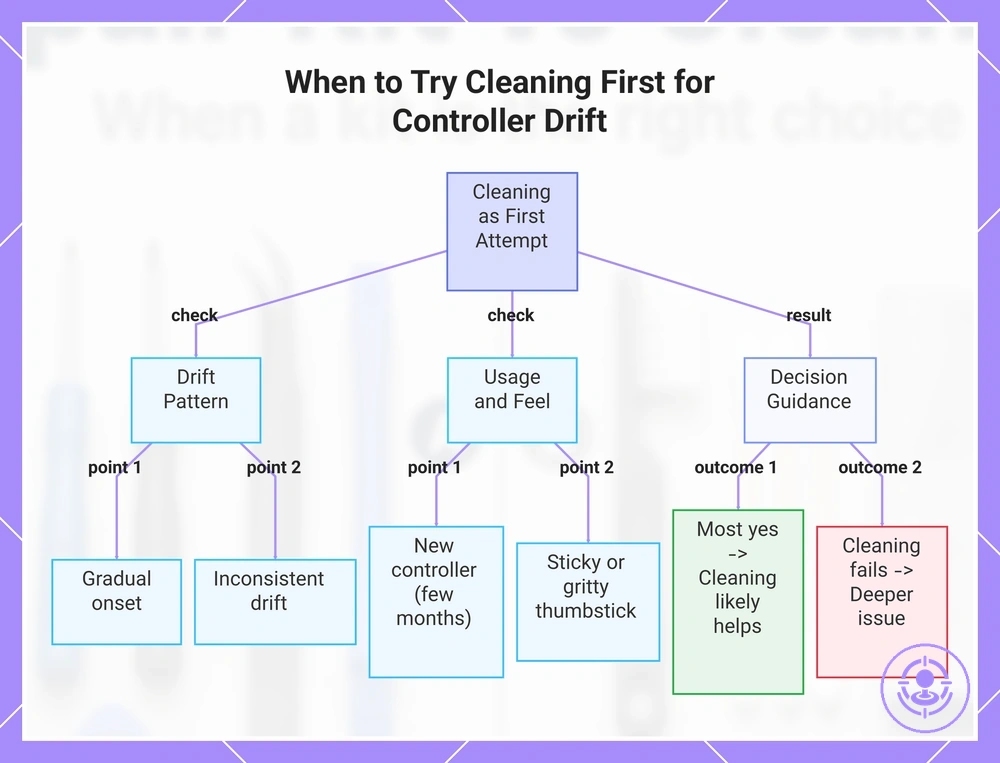
When cleaning is the right first attempt before buying a repair kit
Clean first if the drift pattern points to contamination rather than worn internal parts. A brief test can tell you whether a low-risk cleaning attempt is worth trying. Use this checklist to verify when cleaning is the right first attempt. Each item describes an observable pattern you can check without tools. Stop after one reasonable cleaning attempt; repeated tries rarely help.
- Did the drift start gradually and build over time rather than appear suddenly?
- Is the drift inconsistent – sometimes present, sometimes absent – rather than constant?
- Have you used the controller in a dusty, greasy, or high-humidity environment recently?
- Does the thumbstick feel sticky, gritty, or less smooth when moved?
- Is the controller relatively new (less than a few months of regular use)?
- Have you not already attempted a basic cleaning of the thumbstick mechanism?
- Is the drift not accompanied by visible damage, loose parts, or a dropped controller?
When most answers are yes, contamination likelihood may be high and expected improvement from a single cleaning attempt can be positive. When you clean and the drift quickly returns or does not improve, the problem is likely deeper than surface debris. For a newer controller with gradual onset, improvement is more likely; for a heavily used controller with persistent drift, contamination is less likely to be the sole cause.
This chart shows the conditions that indicate contamination-based drift and the expected outcome of a first cleaning attempt.
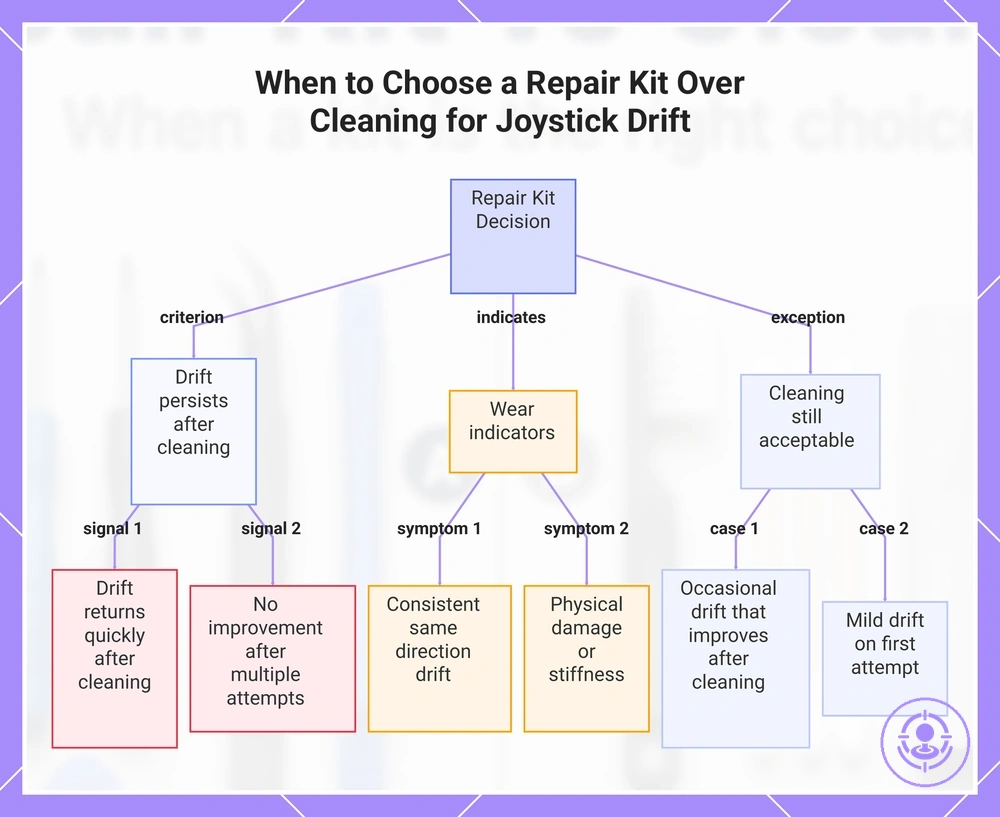
When a repair kit is the right choice because cleaning is unlikely to hold
Choose a repair kit when cleaning does not meaningfully improve drift after a reasonable attempt and the problem returns quickly. Repeated drift suggests wear that cleaning may not address. These criteria help decide when replacement is better than another cleaning round.
The decision depends on drift frequency, return speed, and past cleaning results. Consider these signals:
- Drift that returns within a short period after a thorough cleaning
- Consistent drift in the same direction or stick movement
- No noticeable improvement after a careful cleaning attempt
- Drift that reappears even after multiple cleaning sessions
- Wear likelihood that increases with each failed cleaning attempt
- Observed physical damage or stiffness in the joystick mechanism
- Replacement benefit that outweighs the risk of further cleaning damage
Persistent drift after a reasonable cleaning effort is exactly when you need a repair kit.
Cleaning addresses surface contamination, not internal wear. A single conservative cleaning attempt can still be reasonable if drift was not severe, but if it returns, cleaning is unlikely to hold and replacement should be considered.
- If the drift returns quickly after cleaning and the stick does not recenter fully, then replacement is more likely to help because wear is likely the root cause.
- If the drift appears only occasionally and improves noticeably after cleaning, then a second conservative cleaning attempt may still be acceptable.
- If cleaning has failed multiple times with no lasting improvement, then the risk of ongoing wear makes replacement the more reliable option.
This chart shows the key criteria and symptoms that indicate when a repair kit is needed instead of further cleaning attempts.
Symptoms that point to joystick wear rather than removable contamination
Stick drift symptoms are signals, not guarantees, of joystick wear, especially when cleaning fails to resolve them. The symptom pattern — whether consistent, recurrent, or sensitive — carries more diagnostic weight than any single occurrence.
The symptoms below group into patterns that often point to internal wear. Each pattern suggests the likelihood of wear, how it behaves after cleaning, and whether replacement is suitable.
Consistency symptoms
- Consistent drift in the same direction after cleaning can suggest a worn sensor or mechanical wear.
- Drift that returns to the exact same position error each session is more likely a wear signal than a random contamination issue.
- Drift that stays constant regardless of controller orientation or movement indicates internal wear that cleaning may not fix.
Recurrence symptoms
- Drift that disappears briefly after cleaning but returns quickly suggests internal wear rather than removable debris.
- Persistent drift that recurs after multiple cleaning attempts suggests that replacement is a more likely solution.
- A symptom that reappears within minutes or hours of cleaning likely signals a wear pattern rather than surface contamination.
Sensitivity symptoms
- Inconsistent input—like jittery or erratic movement during small stick deflections—often signals wear.
- A stick that registers movement when not touched (deadzone drift) and persists after cleaning suggests mechanical wear.
- Inconsistent response to slow tilts versus fast flicks can indicate internal sensor degradation that cleaning often cannot fix.
Decision trade-offs: durability, risk of damage, time, and difficulty
The decision between cleaning and replacement depends on how you prioritize durability, risk of damage, time, and difficulty against your own skill level and expected outcome. Cleaning is low-risk and quick but typically gives temporary results. Replacement requires more effort and has a higher chance of error, but when done correctly, it can restore durability over the long term.
The graphic summarizes the trade-offs between cleaning and replacement across durability, risk, time, and difficulty.
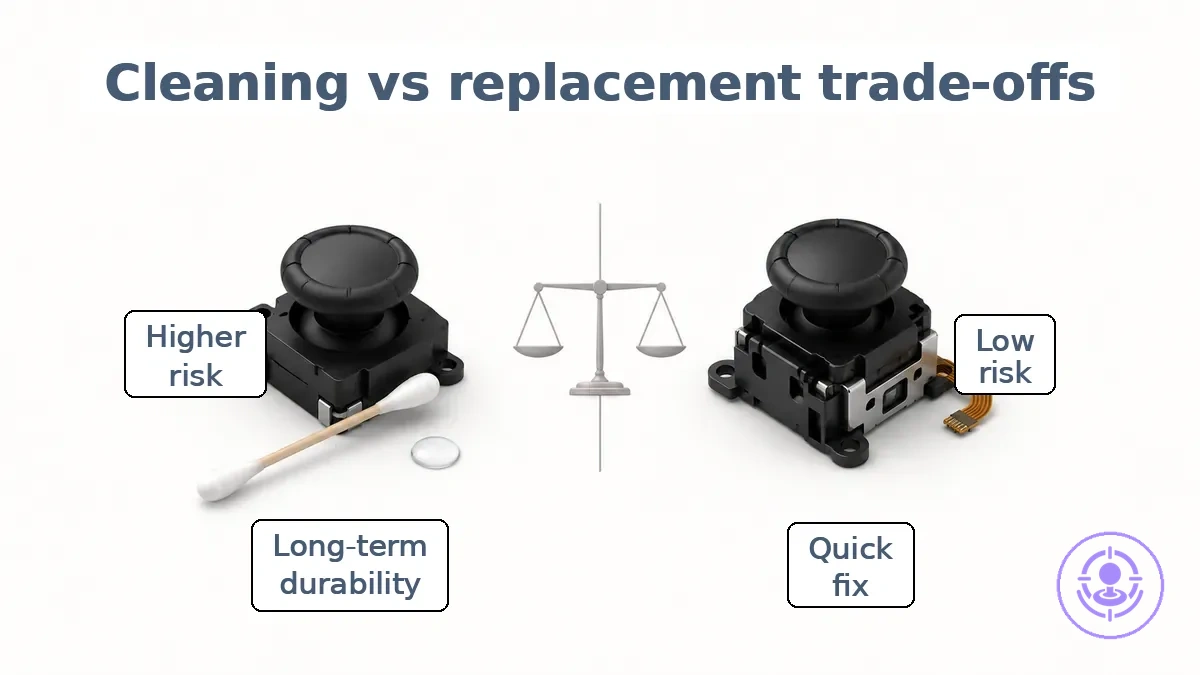
The table directly compares the two options across these variables.
| Option | Durability expectation | Damage risk | Time/effort | Difficulty | Best fit |
|---|---|---|---|---|---|
| Cleaning | Short-term solution; may need repeating | Low risk of damage | Low time/effort | Low difficulty | Quick fix, low-skill users |
| Replacement (repair kit) | Long-term durability if done carefully | Higher risk of damage during replacement work | Moderate to high time/effort | Moderate to high difficulty; skill matters | Can be a longer-lasting solution for users willing to learn |
Two common scenarios illustrate the difference: a low-risk attempt and a fix-it-once approach. Cleaning suits the low-risk attempt; replacement aligns with the fix-it-once goal. Your choice depends on your constraint: time available, comfort with disassembly, and tolerance for errors.
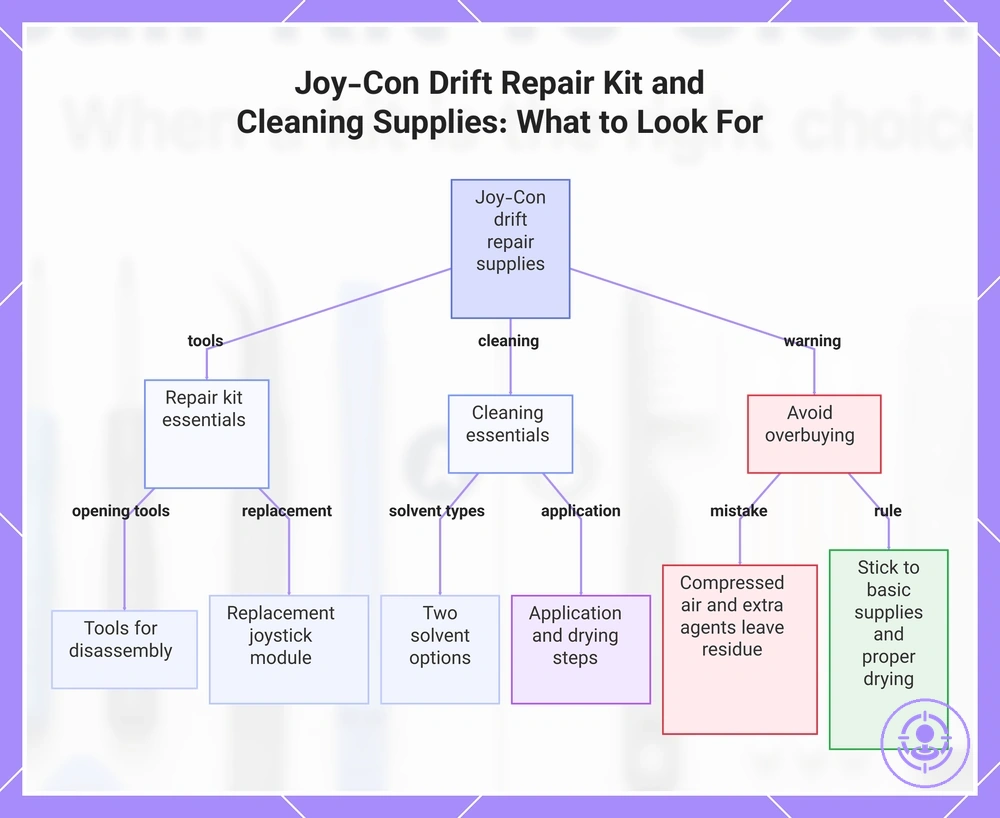
What to Look for in a Joy-Con Drift Repair Kit and Cleaning Supplies Without Overbuying
Focus on the tools and solvents that directly address drift, skipping unnecessary extras. The checklist organizes what matters for success without overbuying.
Repair kit essentials are the tools for opening the Joy-Con and reaching the joystick assembly. The critical attribute is tool usability — whether the screwdrivers, tweezers, and spudger fit the small tri-wing and cross-head screws without stripping them.
- Precision screwdrivers (tri-wing and cross-head) – open the shell with reduced risk of stripping screws.
- Plastic spudger or opening tool – reduces risk of scratching the shell during disassembly.
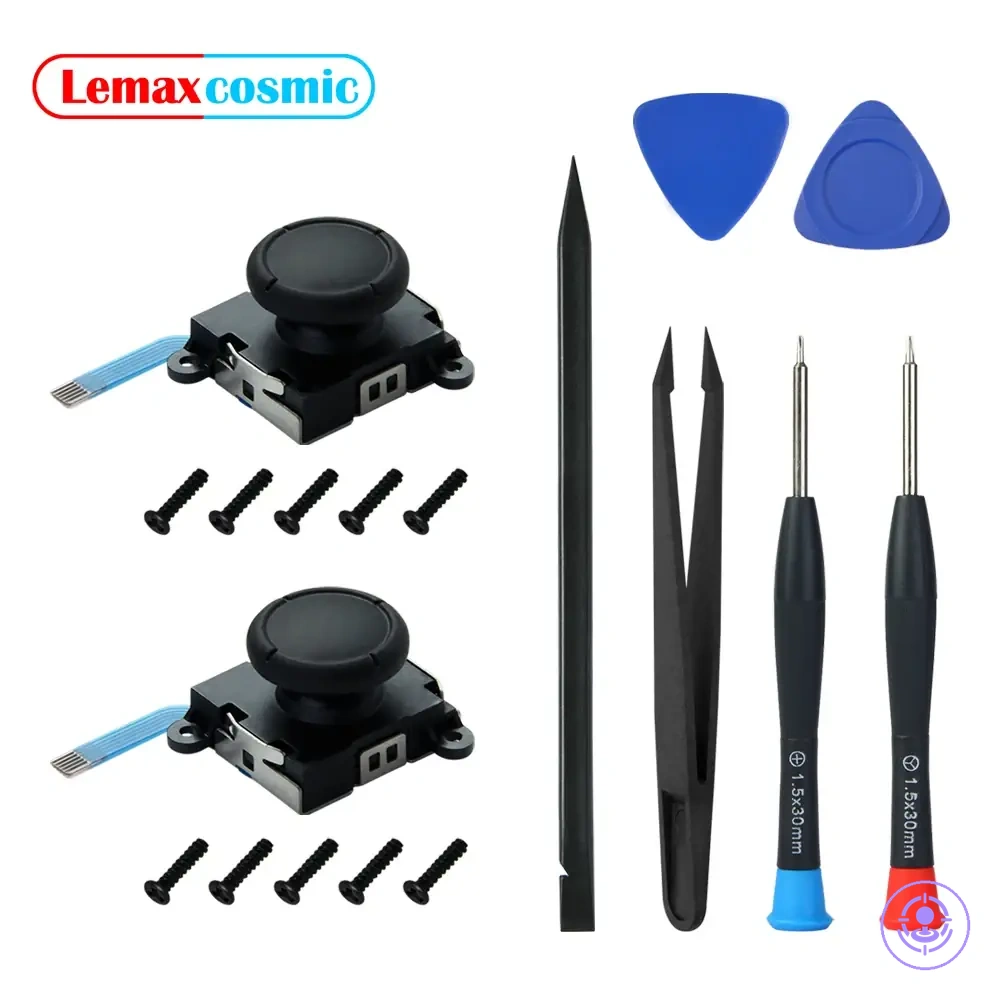
- Replacement joystick module – should match the shape and mounting points of your Joy-Con version.
- Tweezers – lift the rubber skirt and handle small cables.
Cleaning essentials should provide application control and be safe for plastic components. Electrical contact cleaner and isopropyl alcohol are two effective options, each requiring precise application under the rubber skirt. A frequent overbuy is adding compressed air or extra cleaning agents, which can leave residue or push debris further inside. Stick to basic supplies and allow proper drying time to reduce damage risk.
The products below are useful examples for comparing available options. Before buying, check that the compatibility criteria, key features, and product details match your needs.
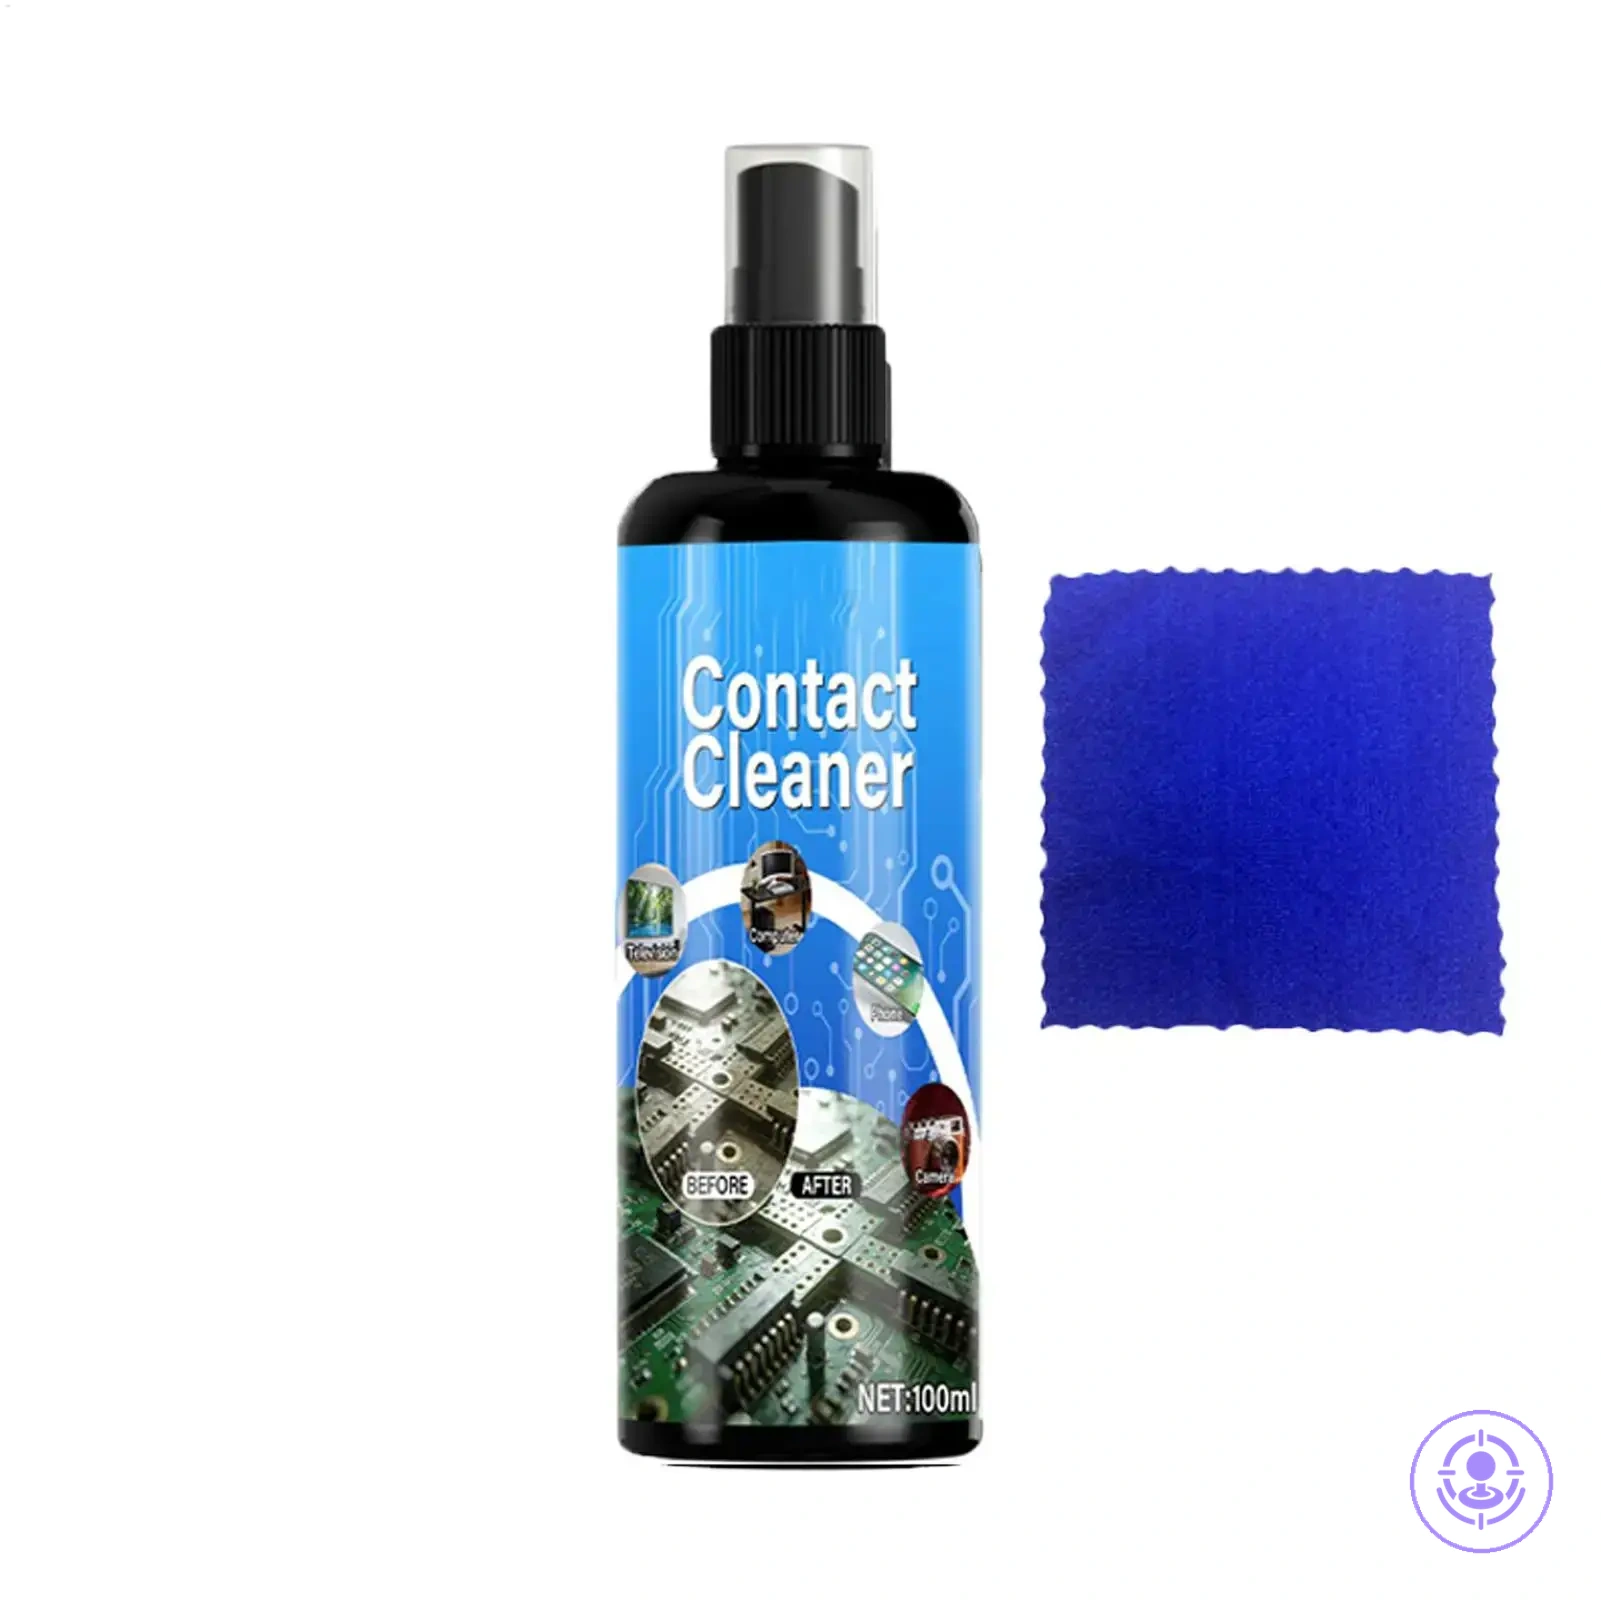
- Isopropyl alcohol (70% or higher) – safe for delicate electronics and evaporates without residue.
- Electrical contact cleaner with straw nozzle – allows targeted spray into the sensor area.
- Cotton swabs – for dabbing solvent under the joystick skirt without oversaturation.
- Drying time – allow enough time for solvent to evaporate before reassembly.
This chart shows the essential repair tools and cleaning supplies for fixing Joy-Con drift, and warns against common overbuying mistakes.
Repair Kit Essentials That Affect Success and Reduce Avoidable Mistakes
Screw compatibility and pry control are two repair kit essentials that directly affect success and help reduce avoidable mistakes. Each essential targets a specific error, lowering the chance of common mistakes and improving the outcome.
- Screwdriver (correct bit): Ensures screw compatibility and fit precision, reducing the risk of stripped screws and removal problems caused by using the wrong bit.
- Tape measure: Lowers the chance of measurement errors that compromise fit precision, preventing misaligned parts and the need for rework.
- Level: Prevents crooked installation by keeping components straight, which protects fit precision and stability.
- Needle-nose pliers: Give better control to reduce the chance of damaging fragile wires or connectors — a common mistake when using improper tools.
- Utility knife: Reduces the risk of jagged edges, surface damage, and injury by enabling controlled, precise cutting.
- Duct tape: Provides a strong hold that prevents temporary repair failure, reducing the chance of having to redo the repair because of weak adhesion.
- Super glue: Reduces the chance of joint separation and repeated failure on small plastic or ceramic breaks by forming a durable bond.
- Pry tool: Provides needed control to reduce the risk of surface and cable damage, such as cracking housings or damaging nearby cables — a common mistake when using improvised tools.
Keep your essentials organized in a compartmentalized box for quick access, which helps prevent mistakes and wasted time from fumbling.
Cleaning supplies that are safer for electronics contacts and plastics
Low-residue, plastics-safer cleaning supplies reduce the risk of damage to Joy-Con contacts and housings. Safer choices still require careful, minimal application to avoid residue buildup that can lead to drift returns. The following list separates safer cleaning supplies from higher-risk options based on solvent strength and residue behavior.
- Do use low-residue contact cleaners labeled plastics-safe, such as those for sensitive electronics contacts, to reduce solvent strength risk.
- Do choose isopropyl alcohol when a gentle approach is needed for light residue on contacts.
- Do select nonflammable, fast-evaporating sprays designed for sensitive plastics to reduce dwell time and material interaction risk.
- Do apply cleaner sparingly to avoid pooling that can seep into plastics or leave residue.
- Don't use heavy-duty degreasers or solvent-based cleaners not rated for plastics; high solvent strength increases plastics risk.
- Don't apply cleaners with additives like silicones or oils unless specified as electronics-grade, because residue can affect contact behavior and lead to drift returns.
- Don't soak plastic housings or leave cleaner on surfaces; residue from stronger formulas may cause hazing or cracking over time.
Cost-value: when a repair kit is worth doing compared to repeated cleaning
A repair kit is worth doing when the time cost of repeated cleaning, your risk tolerance for a one-time fix, and the likely effectiveness of a replacement align in its favor. The value depends on how often drift returns after cleaning, how much effort each cleaning session consumes, and the expected durability of the outcome. A comparison framework helps clarify the decision.
| Path | Main costs | What you gain | Best fit |
|---|---|---|---|
| Repeated cleaning | Time per session, cleaning supplies, risk of wearing contacts | Quick temporary fix, no disassembly, low skill needed | Time-sensitive users, low tolerance for risk, very occasional drift |
| Repair kit replacement | One-time effort, kit cost, risk of improper installation | Potential for longer-lasting resolution, addresses root cause | Fix-once preference, moderate technical comfort, frequent relapse |
For most users who face regular drift returns, is a repair kit worth it compared to repeated cleaning depends on whether the one-time effort is acceptable, and also on your skill level and the controller’s condition.
A repair kit is not always the smarter route. Repeated cleaning, though recurring, requires minimal supplies and learning. Risk-averse users who prefer to avoid opening the controller may find cleaning a better recurring choice. The kit’s value shows most clearly when drift returns quickly after cleaning, making the one-time effort a worthwhile trade. Neither approach guarantees permanent resolution; outcome stability varies by skill, kit quality, and the controller’s wear level.
The products below are useful examples for comparing available options. Before buying, check that the compatibility criteria, key features, and product details match your needs.
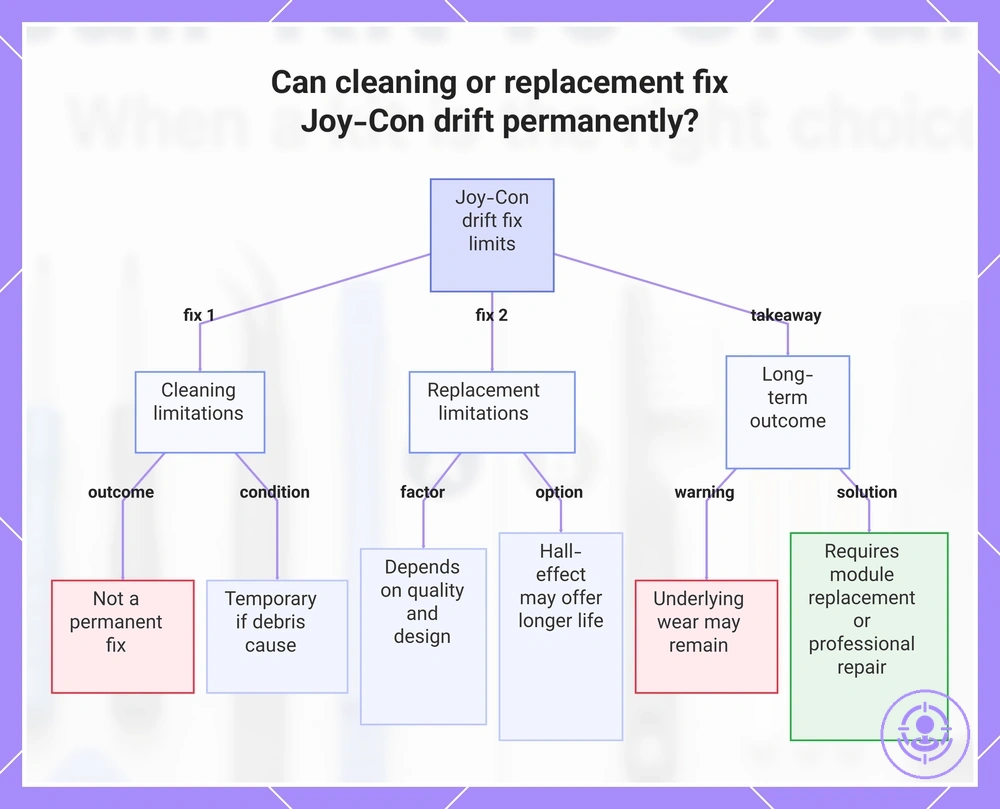
FAQ: can cleaning fix Joy-Con drift permanently, and does a new joystick always solve it
No, cleaning does not fix Joy-Con drift permanently, and replacing the joystick does not always solve the issue. Whether a fix lasts long depends on the root cause, part condition, and repair quality. Each answer explains the limits of these methods, with conditions because results vary by wear, contamination, and install quality.
Question: Can cleaning fix Joy-Con drift permanently?
Answer: Cleaning cannot fix Joy-Con drift permanently in most cases. Drift often results from internal wear or deformation of the potentiometer components, not just surface contamination. If drift is solely caused by debris lodged under the stick skirt, cleaning may restore normal function temporarily, but the condition usually returns as debris re-accumulates.
Question: Does replacing the joystick always solve Joy-Con drift?
Answer: Replacing the joystick does not always solve Joy-Con drift permanently. The outcome depends on part quality, installation quality, and whether the new joystick uses the same potentiometer design. Hall-effect sensor replacements may offer longer life but are not guaranteed to eliminate drift forever, especially if the controller housing or other components contribute.
Question: Is there a permanent fix for Joy-Con drift?
Answer: A permanent fix for Joy-Con drift is possible in some cases, but not guaranteed. Hall-effect sensor joysticks reduce physical contact that causes drift. However, manufacturing tolerances, solder quality, and future contamination can still affect performance even with Hall-effect sticks.
Question: What should you expect if drift returns after cleaning or replacement?
Answer: If drift returns after cleaning or replacement, underlying wear or contamination may still be present. Replacement may fail if the new stick has similar design flaws or if installation introduces new issues. Physical damage or contamination in the stick housing may be a fixable cause, but ongoing drift often signals that the joystick module needs replacement or professional repair.
This chart shows the limitations of cleaning and replacing the joystick for Joy-Con drift, and what to expect for a permanent solution.
Will cleaning or replacement change calibration needs and dead-zone behavior
Cleaning or replacement may affect calibration and dead-zone needs primarily by changing the controller's perceived drift rather than its underlying hardware-drift condition.
Software adjustment (calibration and dead-zone settings) and hardware condition are separate factors.
- Software adjustment: Calibration and dead-zone settings can compensate for slight sensor offset after cleaning or replacement, improving perceived accuracy without altering hardware condition.
- Hardware condition: If drift persists after cleaning or replacement, the cause is likely worn or damaged hardware. Calibration typically cannot fix this; component replacement or repair is required.