Joy-Con drift repair kit overview for choosing a kit and setting realistic repair expectations
A Joy-Con drift repair kit is a collection of replacement components and precision tools for addressing analog stick drift in Nintendo Switch controllers. This overview helps you evaluate kit fit and set realistic outcome expectations before attempting a repair. The scope is decision support, not step-by-step execution.
Before selecting a kit, confirm the drift originates from the joystick module rather than from software or other hardware issues. Kit completeness, compatibility with your left or right Joy-Con, and the quality of the replacement stick module influence repair success. Included tools—screwdrivers, opening tools, and a parts tray—affect whether additional purchases are needed.
A common misconception is that any repair kit permanently eliminates drift.
Durability depends on the replacement joystick quality, installation precision, and controller condition. Results vary, and deeper troubleshooting or professional service may be needed if drift persists after a proper replacement.
To set realistic repair expectations, distinguish between issues a Joy-Con drift repair kit can address and those it cannot.
- Scope of kits: Kits can address drift caused by worn or dirty joystick potentiometers, loose internal contacts, or degraded thumbstick housing.
- Non-kit causes: Drift that may result from software calibration errors, mainboard damage, or worn SL/SR button boards that require separate troubleshooting.
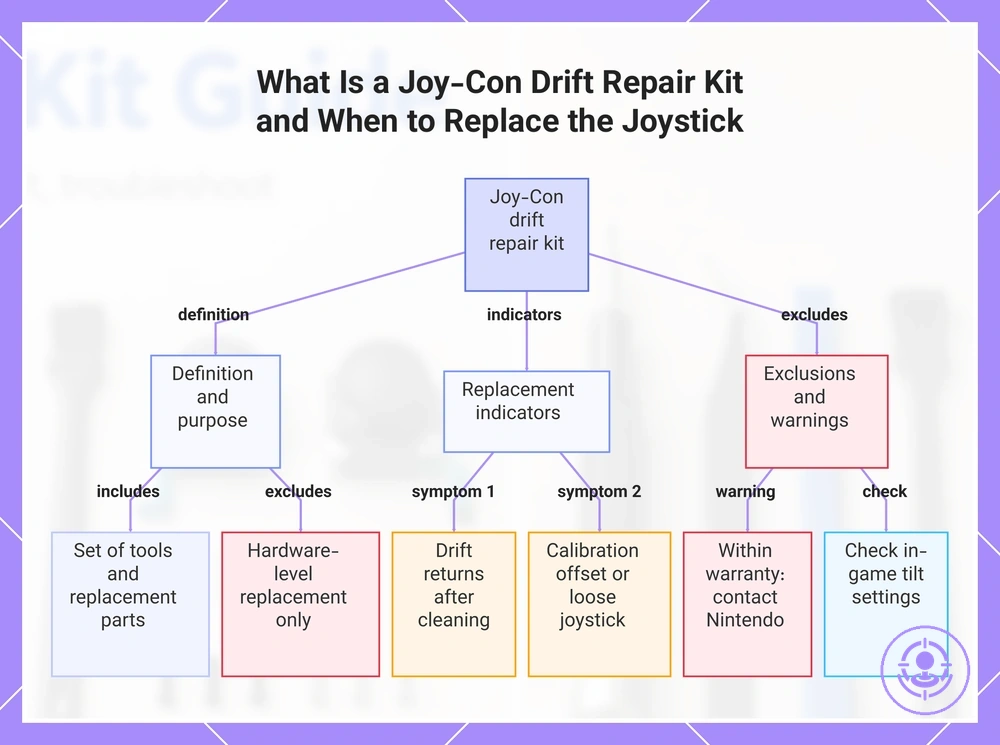
What a Joy-Con drift repair kit is and when joystick replacement is the right fix
A Joy-Con drift repair kit is a set of tools and replacement parts that enables removal and installation of a new joystick module in a Joy-Con controller.
Use a Joy-Con drift repair kit only after simpler measures, such as calibration or cleaning, have been exhausted. A common misconception is that cleaning always fixes drift, but a Joy-Con drift repair kit (what a Joy-Con drift repair kit is) is designed for hardware-level replacement, not for troubleshooting software or contamination issues. These conditions help decide whether to re-check or replace. Confirm drift symptoms first:
- Drift appears only after a calibration test: re-check calibration and test with multiple games before considering replacement.
- Drift stops after cleaning under the joystick skirt with isopropyl alcohol: no replacement needed; continue monitoring.
- Drift returns repeatedly after cleaning: the internal potentiometer wear likely requires joystick module replacement.
- Joystick responds sluggishly or registers false inputs intermittently: replacement is often appropriate when cleaning does not improve behavior.
- Controller is within warranty period: contact Nintendo for free repair before self-replacement.
- Drift occurs in a single game only: check for in-game tilt control settings that may mimic drift.
- Joystick feels physically loose or has unusual friction: replacement may be needed even if drift is not the main symptom.
- You are unfamiliar with opening the Joy-Con or handling ribbon cables: re-check your skill level and consider professional service.
- Drift is accompanied by visible damage to the controller housing or joystick cap: replacement alone may not fully resolve the issue.
- System calibration reports a consistent offset even after recalibration: the joystick module is a likely cause and replacement is appropriate.
This chart explains the purpose of a Joy-Con drift repair kit and the key conditions that indicate joystick replacement is the right fix.
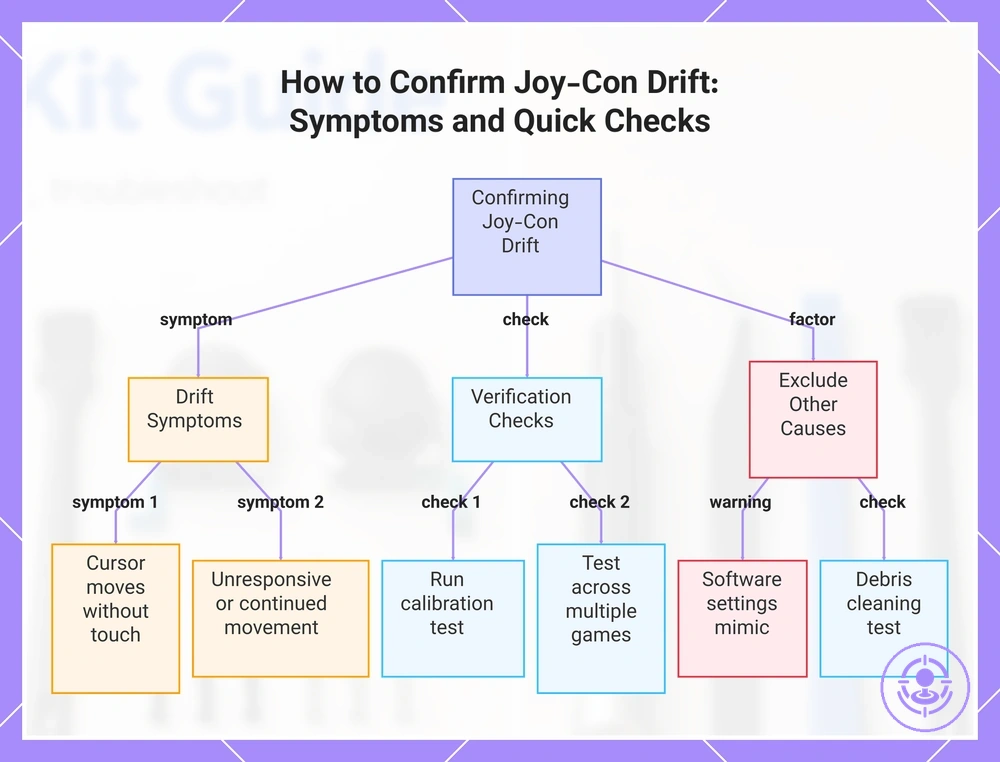
Symptoms and quick checks that confirm you’re dealing with Joy-Con drift
When a Joy-Con joystick registers unintended input without being touched, and that input is repeatable across multiple apps or games, it's Joy-Con drift, not a one-off glitch.
The following symptoms and quick checks help confirm Joy-Con drift:
- Drift symptoms
- Character or cursor moves without touching the stick
- Control feels unresponsive in one direction (dead zone)
- Movement continues after releasing the stick
- Input registers even when stick is centered
- Quick verification checks
- Run the calibration test from System Settings > Controllers and Sensors > Calibrate Control Sticks
- Test for drift across multiple games or apps
- When drift appears in only one game, review its settings for tilt controls or custom mapping
- When drift appears across all titles, the issue is often hardware-related
- Pause and reassess flags
- Software settings (e.g., button remapping or tilt controls) can mimic drift — reset controller inputs to default
- Impact damage or liquid exposure can cause similar symptoms but require different repair paths
- Debris-related drift may resolve with cleaning; persistent drift after cleaning often indicates a hardware issue
This chart shows how to confirm Joy-Con drift by identifying symptoms, performing quick verification checks, and excluding other causes.
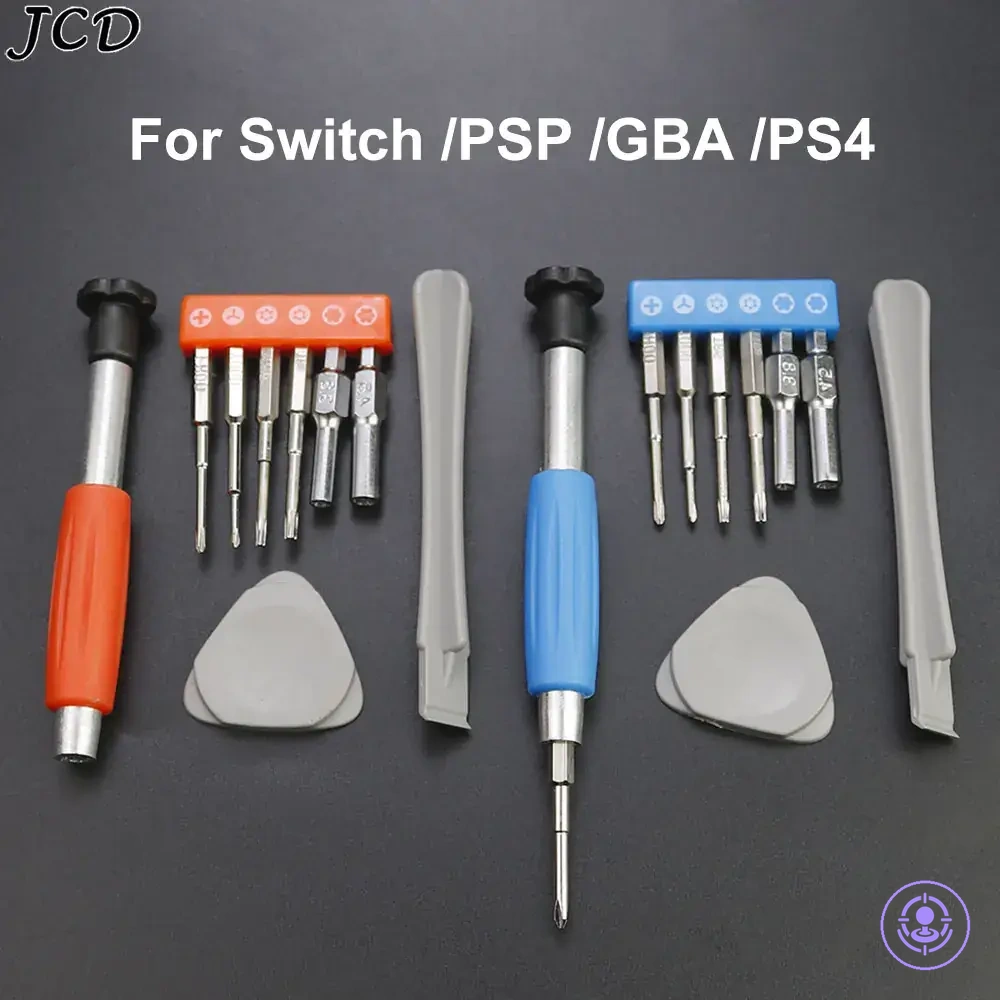
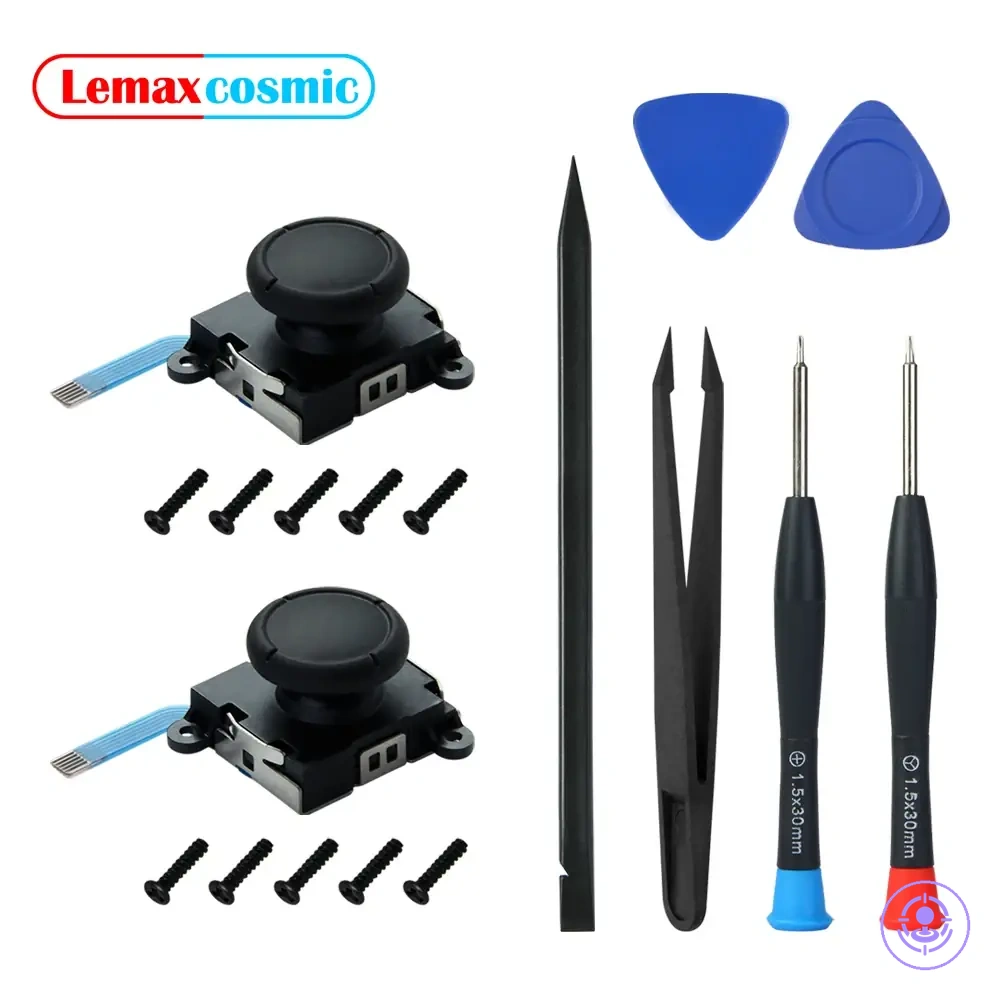
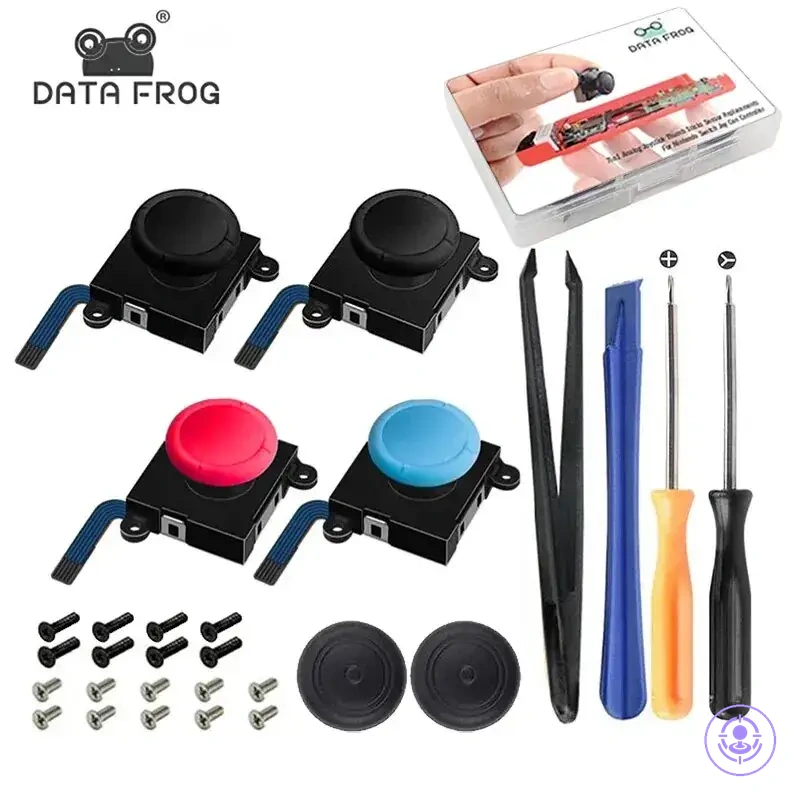
What a complete Joy-Con drift repair kit typically includes
A complete Joy-Con drift repair kit includes the right critical tools and the correct replacement joystick module, not the highest item count. Kits vary, but a functional set typically groups components by their role: opening the shell, removing screws, replacing the stick, and providing spares.
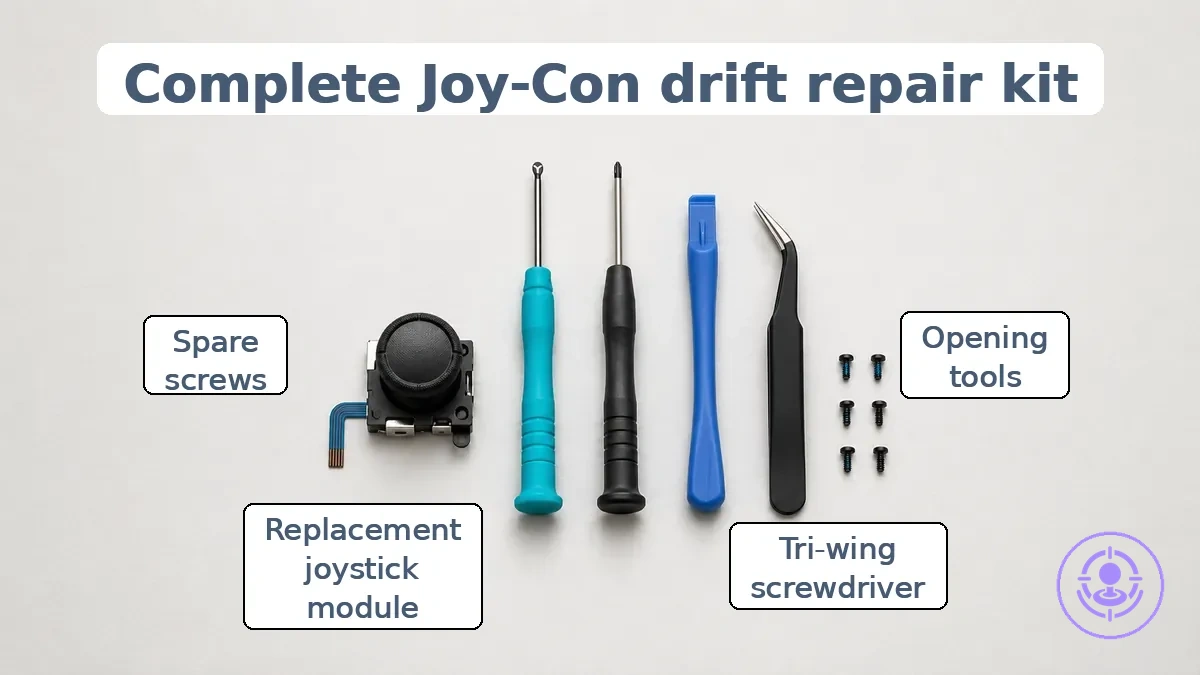
| Component group | Typical items | What it prevents / enables |
|---|---|---|
| Opening tools | Plastic pry tool, spudger | Helps prevent shell damage and cracked clips during disassembly |
| Screwdrivers / bits | Tri-wing (Y00), small Phillips (+1.5), tweezers | Enables removal of Y-type and Phillips screws while helping avoid stripping |
| Replacement modules | Joystick module (compatible with standard Joy-Con models) | Can restore stable input and resolve drift when the original module is worn |
| Spares / consumables | Replacement Y and + screws, thumbstick caps | Reduces the need to reopen the controller if screws strip or caps wear |
Items like extra screws and thumbstick caps are useful but not always required for a first-time repair. The distinction between critical and optional helps avoid buying a kit with unnecessary extras.
A common myth is that a kit with more pieces is better. Focus on whether the kit includes the correct bit sizes and module type rather than the total part count.
- Missing from some kits: Precision bits for both tri-wing and Phillips screws
- Missing from some kits: Spare screws for the shell and joystick mount
- Missing from some kits: A small parts tray or organizer to avoid losing screws
Essential tools and bits that prevent stripped screws and casing damage
Correct bit type, steady downward pressure, and proper driving angle are the key factors that prevent stripped screws and casing damage. When each condition is met, the driver engages the recess fully and torque transfers with reduced slippage.
- Precision tri‑wing (Y00) bit fit: A bit that closely matches the recess geometry reduces cam‑out, preventing stripped screw heads.
- Correct driver hardness: Bits made from heat‑treated steel resist wear and stay sharp, helping prevent the bit from rounding inside the screw recess under moderate torque.
- Magnetized tip: A lightly magnetized bit holds the screw captive, reducing the risk of tilting or slipping during seating.
- Steady downward pressure: Maintaining firm axial force keeps the bit seated in the recess; insufficient pressure allows the driver to climb out and damage the screw head.
- Vertical driving angle: Aligning the screwdriver shaft perpendicular to the screw head promotes even torque transfer; an angled approach concentrates force on one side of the recess and can strip it quickly.
- Controlled torque application: Applying only enough rotation to seat the screw reduces the risk of thread stripping inside the plastic boss, preventing free spinning and housing damage.
- Failure example – wrong bit size: Using a Phillips #0 bit on a tri‑wing screw often causes immediate slippage because the tip contacts only two lobes, gouging the casing plastic.
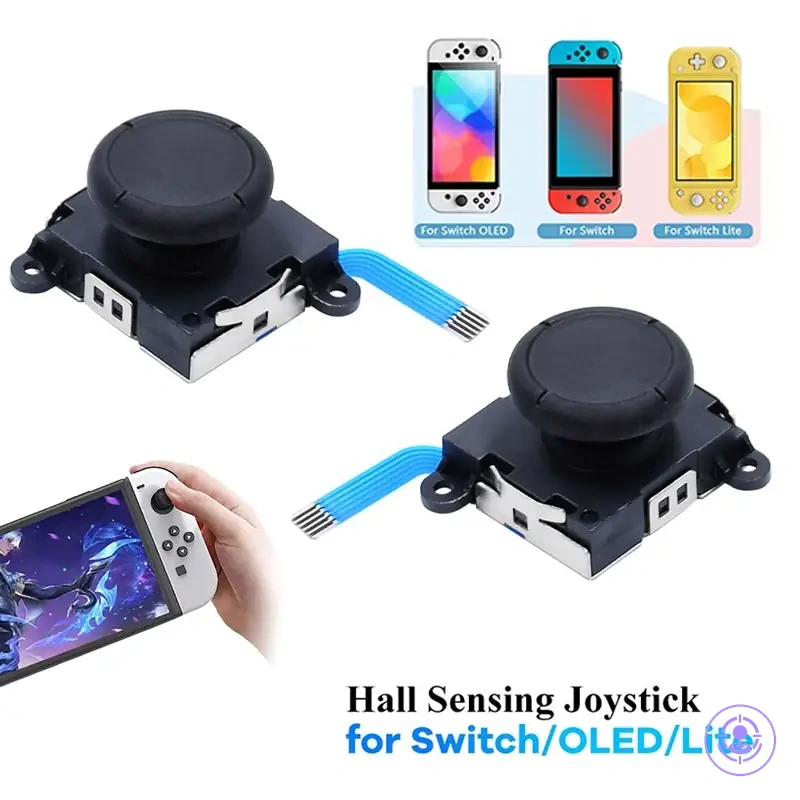
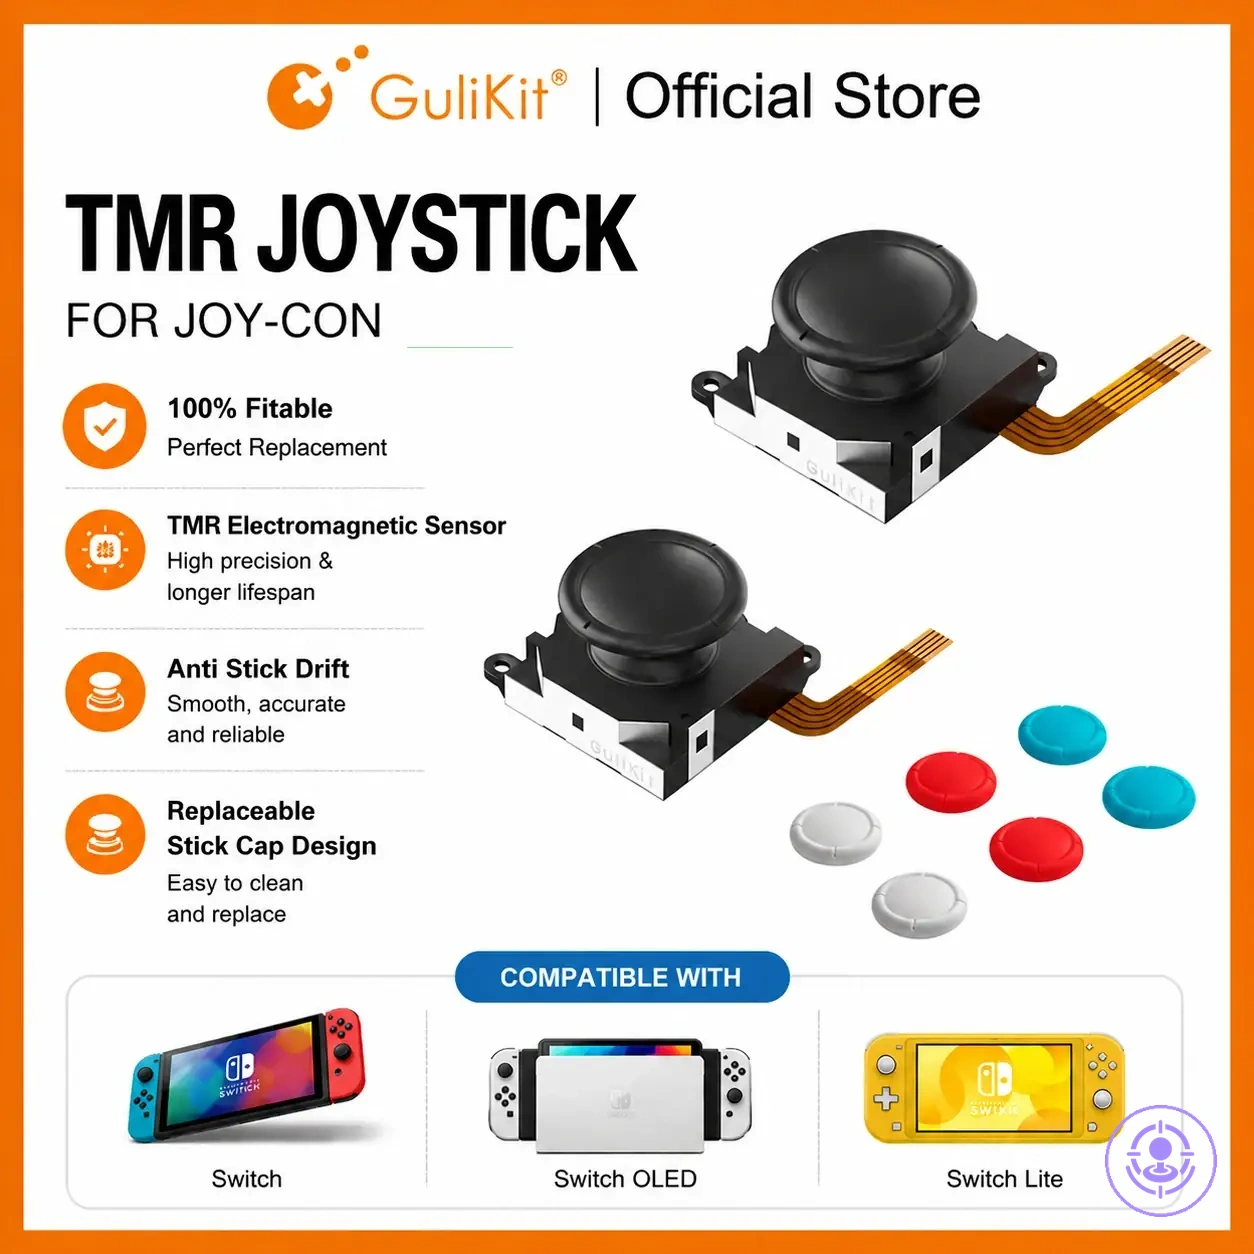
Replacement joystick modules and small parts that determine repair quality
Centering precision, smooth movement, dead-zone consistency, and connector fit of replacement joystick modules and small parts determine repair quality. These attributes affect stick feel during gameplay or testing.
- Centering precision usually determines how reliably the stick returns to neutral; poor centering creates a persistent dead zone or drift that calibration may not fully correct.
- Smooth movement across the full range reduces friction and erratic input spikes, affecting aiming accuracy and fine control.
- Dead-zone behavior reflects internal tolerance; clean, repeatable dead zones after installation produce stable input without false signals.
- Connector fit ensures the module seats fully into motherboard through-holes; a loose or angled fit causes intermittent contact and calibration issues.
- Alignment of the potentiometer housings with the module frame influences centering and linearity; slight misalignment shifts the neutral point and may require recalibration.
- Wiper mechanism quality (in potentiometer-based modules) affects long-term smoothness; uneven or poorly seated wipers can cause scratchy feel or position jumps soon after installation.
- Red flag: Marketing terms like "premium" or "high performance" may not reflect observable fit cues; inspect pin alignment, housing squareness, and solder pad thickness before trusting claims.
How to choose a Joy-Con drift repair kit that matches your Joy-Con model and your current tools
To choose a Joy-Con drift repair kit, first confirm that the replacement module fits your specific left or right controller, then verify that the included tools cover any gaps in your current tool set, and finally judge module quality from design signals such as centering and dead zone behavior. A kit that passes all three factors reduces the chance of mismatched parts, stripped screws, or early drift recurrence. Compare it against a short criteria checklist.
Must-pass checks are non-negotiable filters that eliminate kits likely to cause fit or tool issues. A basic fit check confirms the module matches your left or right Joy-Con model. For a deeper breakdown of compatibility with your tools and controller generation, see how to choose a Joy-Con drift repair kit. Stop considering any kit that fails even one of the following:
- Explicit side compatibility – the kit must state it works with left or right Joy-Con, not just generically.
- Correct screwdriver bits – verify that the set includes a tri-wing (Y00 or Y1) bit and a Phillips #00; without them you may strip screws.
- Proper pry tool – a plastic spudger or opening pick reduces the chance of cracking the shell during disassembly.
- Module connector match – the replacement joystick’s ribbon cable width and orientation should match your original part (common in left/right specific kits).
- Spare screws included – at least one set of screws (especially the tri-wing ones) helps if original heads strip.
- Clear model range – the listing should indicate compatibility with standard Switch, Switch OLED, and/or Switch Lite; avoid vague claims.
For first-time Joy-Con repairs, these nice-to-have refinements can make the process smoother. Experienced repairers may already own separate tools and need only a high-quality module, so these extras become optional.
- Additional module (spare) – having a second joystick on hand reduces downtime if the first install has an issue.
- Metal locking brackets – some kits use alloy locks instead of plastic; these can last longer.
- Thumb stick grips – extra caps can restore texture without replacing the whole stick.
- Magnetic project mat or tweezers – helpful for tracking tiny screws and connectors, especially for first-time repairers.
Question: Do I need a full tool kit if I already have precision screwdrivers?
Answer: Not necessarily. If your screwdrivers include a tri-wing (Y00/Y1) and Phillips #00, you may only need the module and a pry tool. Check that the kit's bits don't duplicate your set.
Question: How do I avoid buying a kit that doesn’t fit my Joy-Con?
Answer: Check that the listing states your controller model (Switch, OLED, or Lite) and side (left/right), and that the ribbon cable connector matches your original. Mismatched connectors are a common fit problem.
This chart shows the key criteria for selecting a Joy-Con drift repair kit, including must-pass checks, optional refinements, and quality signals.

Compatibility and Fit Checks That Prevent Buying the Wrong Kit
A Joy-Con repair kit must match the original part's connector type, module shape, and left/right orientation. Without these checks, a kit that appears compatible may fail to install or cause further issues.
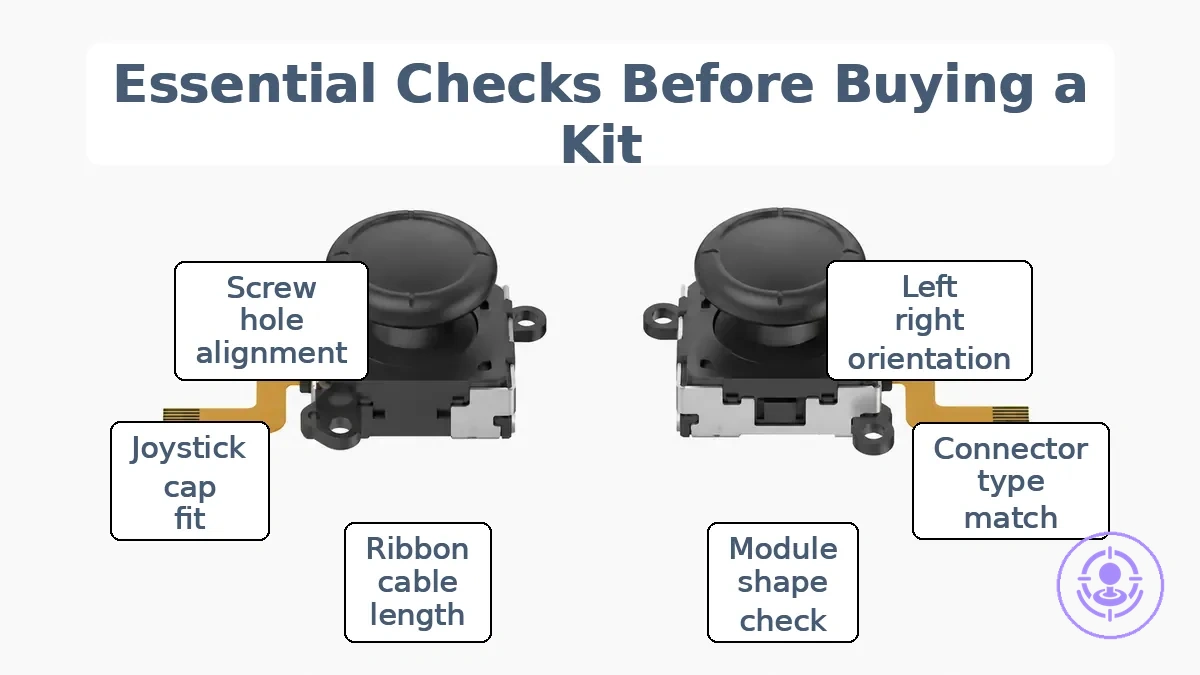
Many assume any replacement module works if it looks similar, but this assumption often leads to mismatches. Confirm each point against the listing photos and description before buying.
The checks below verify the kit matches your Joy-Con model:
- Check left/right orientation – Confirm the module is labeled for the correct side – A reversed module may not align with the mounting holes or ribbon route.
- Verify connector type – Compare the ribbon cable width and pin layout with the original – A mismatched connector can cause intermittent connection or no function.
- Assess module shape – Place the new module next to the old one to check for size and protrusion differences – An incorrectly shaped module may interfere with the shell closure.
- Inspect ribbon cable length and fold pattern – Ensure the cable reaches the motherboard without strain – A too-short cable risks tearing, while an incorrect fold pattern can prevent secure seating.
- Confirm joystick cap compatibility – Check that the analog stick cap fits the new module shaft – A loose cap affects control feel and can detach during use.
- Check for metallic vs. plastic mounting bracket – See if the kit includes or requires a specific bracket – Some modules need a bracket swap, and omitting it can lead to a loose fit.
- Verify screw hole alignment – Compare the screw post positions on the module – Misaligned holes may prevent the board from sitting flat.
Parts-only kits versus full tool kits and who each type suits
Whether to pick a parts-only kit or a full tool kit depends on whether you already own precision screwdrivers and opening tools. If you already have the tools, a parts-only kit costs less; if not, a full tool kit provides convenience and lower risk.
| Kit type | Pros | Cons | Best for |
|---|---|---|---|
| Parts-only kit | Lower cost when you already have tools; no duplicate or unused drivers | Requires you to own or source the correct precision screwdrivers; may delay repair if tools are missing | DIYers who already own a set of precision screwdrivers and opening tools |
| Full tool kit | Includes precision tools commonly needed for the repair; ready to use out of the box | Higher upfront expense; may include extra accessories beyond what you need | First-time repairers or anyone without dedicated precision tools |
Quality signals in replacement stick modules and precision tools
Quality signals in replacement stick modules and precision tools are observable cues such as tolerance, centering accuracy, and wobble. Observing these cues can help evaluate performance and durability without marketing dependence.
- Centering: A module that returns to center cleanly can indicate proper spring tension; weak centering often contributes to dead zone instability.
- Wobble: Excessive lateral play before input registers may increase dead zone size and reduce aiming precision over time.
- Smoothness: Gritty or uneven rotation can signal internal wear or poor lubrication, leading to inconsistent input response.
- Sensor type: Hall-effect or TMR modules typically resist drift longer than traditional potentiometers, though individual unit variance remains.
- Red flag – loose fit: A module that does not seat firmly in the controller housing can cause wobble during use and may indicate poor manufacturing tolerance.
- Tip fit: A driver tip that engages fully with the screw recess can reduce cam-out risk and protect screw heads during module swaps.
- Material hardness: Hardened steel tips can resist wear better than softer alloys, lowering the chance of rounding fastener slots.
- Handle ergonomics: A comfortable grip can improve control when applying torque and help avoid overtightening or stripping.
- Red flag – slippage: A tool that slips under light pressure may strip screw heads, making module removal difficult and risking damage to the controller housing.
Repair kit versus cleaning and other quick fixes for Joy-Con drift
Cleaning a drifting Joy-Con can restore normal function in some cases, but a repair kit replacement becomes appropriate when drift persists or returns after a cleaning attempt. The right path depends on how the drift behaves: occasional symptoms often respond to a quick clean, while recurring or severe drift typically signals worn internal components that need a new joystick module.
| Signal type | What to try | What it suggests |
|---|---|---|
| Drift appears after a long session | Calibrate the controller via System Settings | Calibration may realign the stick; try cleaning if drift remains |
| Drift is mild and occasional | Clean the joystick with a contact cleaner | Temporary improvement is likely; recurrence may need replacement |
| Drift returns after a successful clean | Repeat cleaning attempt | Recurrence often indicates worn contact pads; replacement may offer a more durable fix |
| Recalibration does not reduce drift | Proceed with cleaning or replacement | Drift is likely hardware-related, not a calibration error |
| Drift is severe and constant | Replace the joystick module | Worn components are unlikely to respond to cleaning alone |
| Drift only in specific games | Check in-game sensitivity settings first | Game-specific settings may mask a hardware issue; monitor across titles |
| Cleaning improves function temporarily | Plan for replacement | Temporary improvement suggests cleaning works briefly but the underlying wear remains |
Cleaning with a contact cleaner can temporarily restore normal movement when drift arises from light debris or oxidation on the contact pads. However, the underlying wear on the potentiometer pads means that recurrence is typical. When drift reappears after multiple cleaning attempts, quick fixes are no longer reliable, and replacing the joystick assembly with a repair kit offers a more durable solution.
A common myth is that any household spray or lubricant can fix drift safely, but only products labeled as contact cleaner for electronics are appropriate; other substances can leave residue or damage internal components. For a more detailed comparison, see repair kit vs cleaning methods.
When cleaning can help and when it only delays replacement
Cleaning can help when drift is caused by debris or surface oxidation on the internal contacts. When drift recurs or persists after cleaning, cleaning only delays replacement.
These patterns show when cleaning may help and when replacement is likely.
Cleaning may help when:
- Drift appears gradually and responds to a short burst of contact cleaner or isopropyl alcohol.
- Inconsistent jitter that disappears after drying.
- The issue started after exposure to dust, food, or sticky residue.
- Cleaning resolves the problem for at least a few gaming sessions.
- The joystick shows no physical damage or stiffness when moved manually.
Replacement is likely when:
- Drift recurs after several cleaning attempts, with the same pattern returning within a short period.
- Drift persists after calibration.
- Physical wear is visible on the joystick module or the base feels loose.
- The controller registers inputs even when the stick is untouched, and the behavior does not change after cleaning.
- Cleaning produces no improvement, or the drift worsens after drying.
- The drift appears in multiple games or applications and remains consistent over time.
For example, a Joy-Con that drifts upward only when the stick is tilted forward but returns to center when cleaned may respond to cleaning. If the same drift reappears and persists after calibration, replacement is likely.
Why household sprays and lubricants can create new problems
Household sprays and lubricants can leave conductive residue on sensor contacts or damage plastic parts, leading to inconsistent input and increased damage risk.
- Avoid lubricants that aren't labeled as plastic-safe; they can seep into the sensor area and leave conductive residue.
- Avoid household cleaning sprays that contain solvents or propellants; the residue can interfere with the sensor's electrical contacts.
- Avoid spraying liquid directly into the joystick; moisture can reach the sensor and cause short circuits or corrosion.
- Safer approach – use alcohol-based contact cleaners designed for electronics; they evaporate quickly and leave minimal residue.
- Safer approach – apply the cleaner sparingly to a cloth or swab instead of spraying it directly onto the controller.
- Safer approach – if you disassemble the controller, clean the sensor contacts with a lint-free cloth and a small amount of isopropyl alcohol.
- Safer approach – let the controller dry completely before reassembling it to avoid trapping moisture.
- Safer approach – consider replacing the joystick module if cleaning doesn't resolve the drift, instead of repeatedly applying substances.
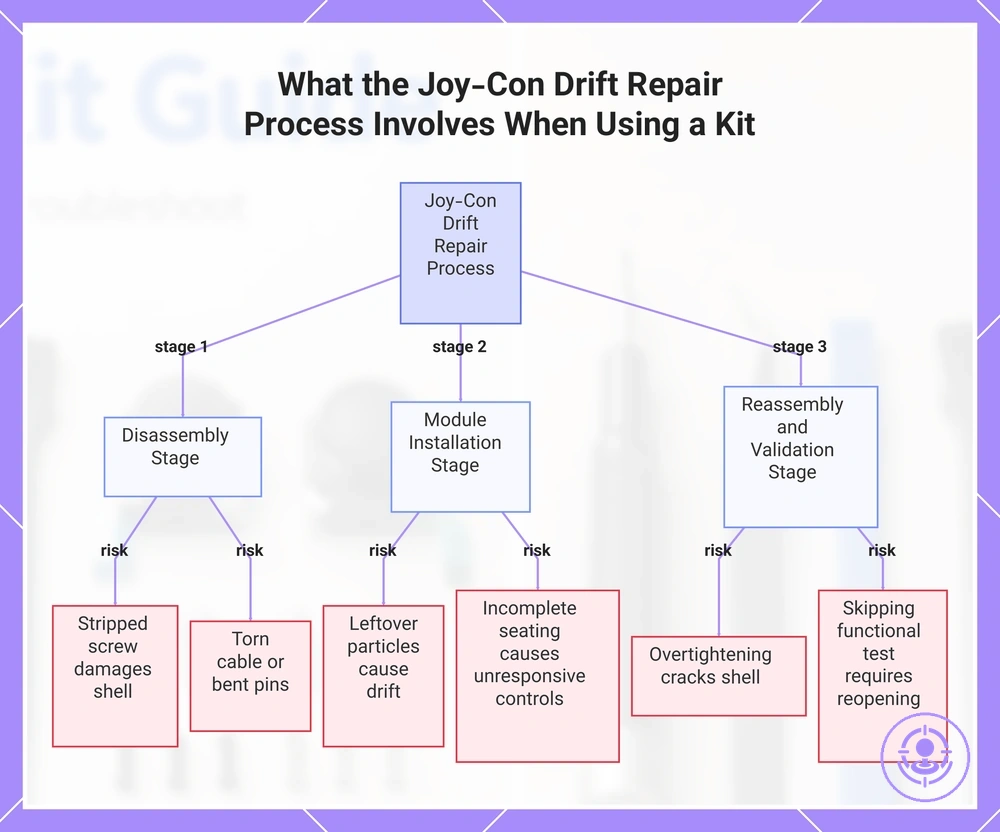
What the Joy-Con Drift Repair Process Involves When Using a Kit at a High Level
When using a kit, the Joy-Con drift repair process involves three main stages: disassembling the controller, swapping the analog stick module, and reassembling with validation checkpoints. The following high-level steps map the workflow and highlight the risk points to watch for.
Stop if a screw is stripped — forcing it can damage the plastic shell.
- Shell disassembly: Remove the back cover and battery. A common risk is stripping the small tri-wing screws.
- Joystick removal: Detach the ribbon cable connector and lift the old module. Risk: tearing the cable or bending connector pins.
- Housing inspection: Clean debris from the joystick housing. Risk: leftover particles can cause recurring drift.
- Module installation: Seat the new joystick module and align the mounting holes. Risk: misalignment can lead to sticking.
- Cable reconnection: Reseat the ribbon cable and close the connector latch. Risk: incomplete seating can cause unresponsive controls.
- Reassembly: Reattach the back cover and tighten screws evenly. Risk: overtightening can crack the shell.
- Functional test: Power on and check stick response before fully closing. Risk: skipping this step may require reopening if drift persists.
Before securing the shell, verify that every connector is fully seated and that the joystick moves freely. The Joy-Con drift repair kit step-by-step repair guide provides a detailed walkthrough of each stage.
This chart shows the three main repair stages using a drift repair kit, with key risks to avoid at each stage.
Workspace Setup and Handling Basics That Reduce Connector and Ribbon-Cable Damage
Setting up your workspace deliberately and following careful handling rules reduces the risk of tearing ribbon cables and damaging connectors. These habits help protect ribbon cables and connectors during disassembly.
- Use a parts tray to keep screws and small components from rolling away.
- Ensure adequate lighting to see connector orientation and avoid forcing a latch.
- Typically, grip ribbon cables by the connector latch rather than the flex cable to reduce tearing risk.
- Practice static caution: ground yourself before touching exposed connectors.
- Place a soft mat to reduce the chance of dropping and damaging connectors.
- Route ribbon cables away from high-traffic areas to reduce accidental pulls and tearing.
- Avoid over-tightening cable ties on ribbon cables to prevent crimping.
- When disconnecting multiple connectors, label cable ends to avoid misalignment.
- Use a dark surface to better see ribbon cable orientation and connector details.
Replacement, reassembly, and the checkpoints that matter most
Checkpoints confirm correct module placement before final closure. They verify attributes such as connector seat, alignment, and screw resistance at the right timing, reducing the risk of rework and preventing dead zones or unresponsive inputs.
These checkpoints cover the attributes and failure points that most commonly need verification:
- Verify the connector is fully reseated. This helps prevent intermittent connectivity that can cause drift after reassembly.
- Verify module alignment matches the housing guides. This helps prevent physical binding that can lead to stuck or unresponsive zones.
- Verify all screws are turned with resistance but don't force screws past that point. This helps prevent stripped threads or cracked mounting points.
- Verify the flex cable is not pinched under the module. This helps prevent short circuits or cable damage that can prevent input registration.
- Verify the backplate or bracket sits flush. This helps prevent uneven pressure that can distort input detection.
- Verify the joystick returns to center when released. This helps confirm the potentiometer is not under strain.
- Verify the device powers on and registers all inputs before final closure. This helps prevent closing a unit with an unresponsive direction.
Even when all checkpoints pass, a faulty module can still cause issues — these checks confirm correct placement but do not guarantee module function.
Calibration and testing after repair to confirm drift is actually resolved
Calibration and repeatable tests on a test screen provide quick confirmation that the repair resolved stick drift.
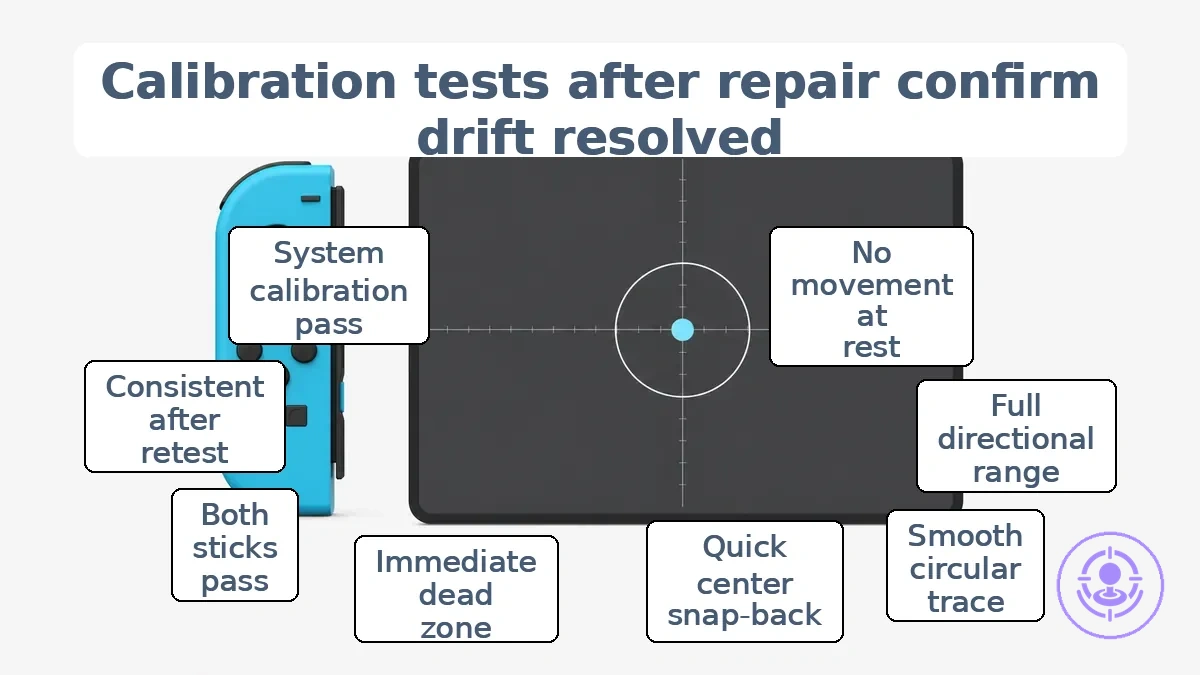
calibration and testing after repair uses the same test screen you used before the repair to compare results. Use this checklist to verify each pass condition.
- Leave the stick untouched for several seconds — a pass shows no movement on the test screen.
- Run the system calibration tool after reassembly — a pass completes without error and resets the center point.
- Gently move the stick in each cardinal direction — a pass reaches the full outer ring without dead spots.
- Rotate the stick slowly in circles — a pass shows a smooth circular trace without jitter.
- Push the stick fully to each edge and release — a pass snaps back to center quickly with no wobble.
- Test the dead zone by applying slight pressure near center — a pass registers input immediately without delay.
- Repeat the same tests on the second analog stick — both sticks must meet the same criteria.
- Re-test after any adjustment or reassembly — consistent results confirm the repair is stable.
If all checks pass, the repair is likely successful. If any test fails — for example, drift still appears on the test screen, or the dead zone feels off — the problem may be a seating issue or a weak replacement module. After re-testing, reseating the module is the next step before deeper troubleshooting.
Pass signals
- Centered at rest.
- Smooth full-range movement.
- Immediate, consistent dead zone.
Fail signals
- Drift when untouched.
- Jitter or skipped values.
- Incomplete directional range.
When drift still happens after repair and how to narrow down the likely cause
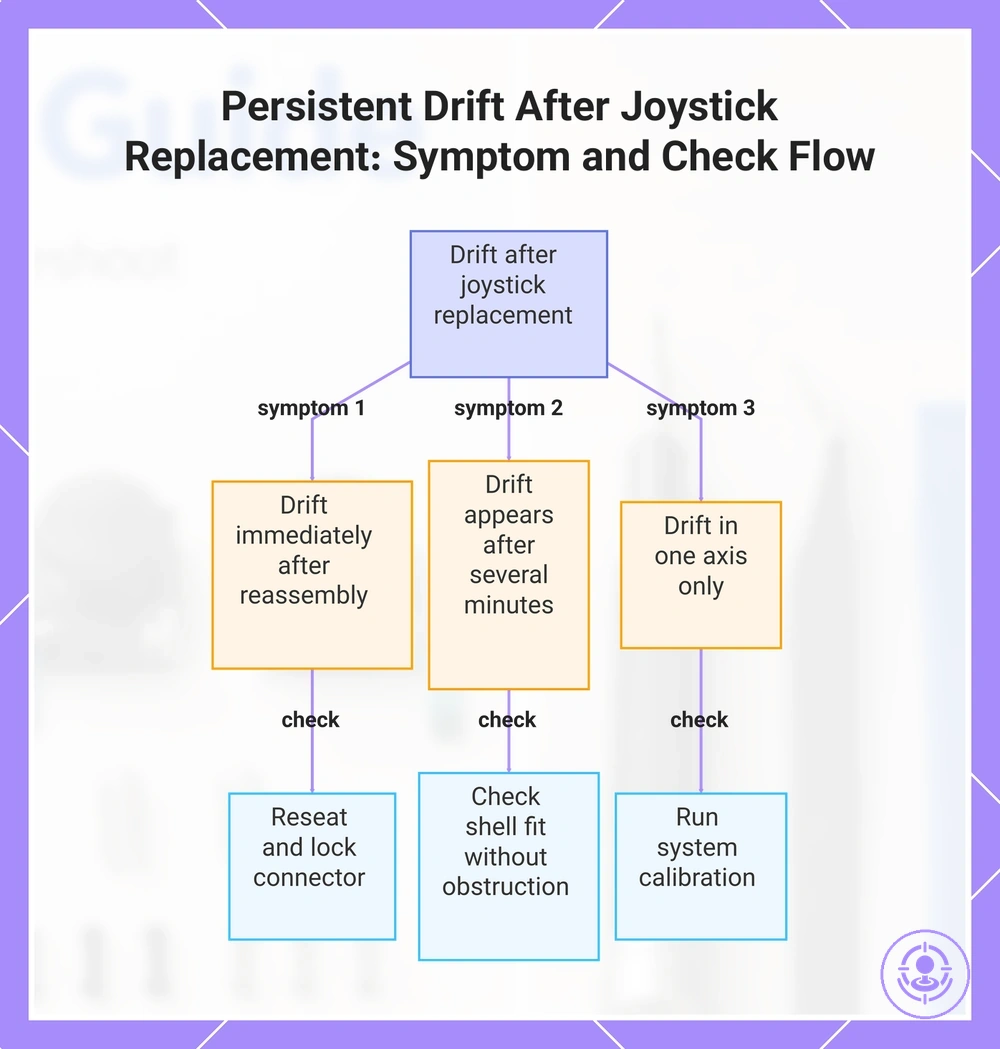
When drift still happens after a joystick replacement, the cause is often a calibration gap, an alignment issue, or a faulty replacement module. This diagnostic flow can help identify which class of problem is causing the persistent drift.
This diagnostic flow maps each symptom to a check and its likely cause.
- Drift immediately after reassembly: Check if the module is fully seated and the ribbon connector is locked. A loose connection often causes erratic input; reseat the connector and retest.
- Drift appears only after several minutes: Check for physical stress from the shell or buttons. Misalignment can be pressure-related; reseat the module and ensure the shell fits without obstruction.
- Drift is present in one axis only: Run the controller calibration from system settings. A calibration offset may need resetting; recalibrate and retest.
- Thumbstick does not return to center: Inspect the spring and hinge for obstruction or damage. Mechanical binding can mimic drift; realign or replace the module if the spring is deformed.
- Drift varies between games: Check if the game has its own dead zone setting. In-game settings can mask underlying drift, so confirm the drift occurs in multiple titles.
- Drift worsens when pressing the thumbstick: Look for debris or damage under the stick cap. Foreign material under the cap can interfere with the sensor; clean and reseat the cap.
- Centered position shows a non-zero reading: Use a controller test app or built-in calibration screen. A faulty module may have a shifted neutral point or a dead zone; consider swapping the module.
Question: Why is there still drift after replacing the joystick?
Answer: Usually due to an incomplete reseat of the connector, incorrect alignment, or a defective module; calibration may also be needed.
Question: What does a dead zone after repair usually indicate?
Answer: Often indicates a module not fully seated, misalignment, or a faulty potentiometer.
If the diagnostic flow does not resolve the drift, the issue may require deeper inspection. More detailed post-repair troubleshooting for drift and dead zones is available on the post-repair troubleshooting for drift and dead zones page.
This chart maps three common drift symptoms after joystick replacement to their likely causes and recommended checks.
Durability expectations and when official repair options make more sense than another DIY attempt
Durability expectations for a Joy-Con repair depend on module quality, installation quality, and usage patterns, so they remain conditional.
Official repair options use standardized parts and procedures from the manufacturer or authorized services. The risk and effort of a DIY attempt vary with specific conditions. The table below compares these factors for another DIY attempt versus a service option.
| Situation signal | DIY again cost/risk | Service option cost/risk | Best next step |
|---|---|---|---|
| First occurrence of stick drift | Low cost, moderate risk if installation is careful | Moderate cost, low risk | DIY if comfortable; service if uncertain |
| Drift returns after a DIY module swap | Moderate cost for new module, risk of repeat failure if module quality or installation caused issue | Moderate cost but includes diagnosis and warranty | Service option to rule out deeper issue |
| Stripped screw heads on controller housing | High risk of further damage, limited options | Moderate cost, professional extraction | Official repair to avoid damaging shell |
| Limited tools (no screwdriver set, no spudger) | Low cost but high effort and risk with improper tools | Fixed cost, no tool investment | Service option if tool cost exceeds repair cost |
| Controller still under warranty | Risk of voiding warranty | Low cost (possibly free) | Official repair to preserve warranty |
When drift reoccurs after a DIY module replacement, evaluate whether the underlying issue was resolved. The cost and effort of a second repair must be weighed against the risk of incomplete fixes. At that point, switching to a service option becomes more practical.
A common assumption is that official repair guarantees better results, but the outcome is situational. The next step is to choose between manufacturer service and a fresh DIY attempt based on your situation.
Here are product examples that may make comparison easier. Before buying, always review the compatibility criteria, essential features, and product details.