Joy-Con Drift Repair Kit Troubleshooting for Persistent Drift, Dead Zones, and Off-Center Sticks
Post-repair Joy-Con stick drift, dead zones, and off-center behavior can have causes beyond the joystick module replacement. This diagnostic brief covers only post-repair stick input behavior, not the replacement procedure itself. Unrelated wireless or pairing issues are not covered unless they directly affect stick test behavior.
Many users assume that replacing the joystick module alone restores normal function, but persistent problems can have multiple origins. A new module may still have slight variations in centering, or the reassembly process may affect connector seating and mechanical alignment. The behavior can also vary by test surface, pressure applied, and time since the repair, so one observation may not be enough to diagnose the issue.
To isolate the cause, examine the problem across several diagnostic dimensions instead of focusing on a single fix. Key diagnostic dimensions include:
- Symptom pattern: Determine whether the issue appears as a consistent drift in one direction, a dead zone near the center, or an off-center resting position.
- Calibration state: Check whether the control stick calibration shows correct neutral readings and responds evenly across its full range of motion during a stick test.
- Mechanical feel and centering: Note any stiffness, looseness, or uneven resistance when moving the stick, and observe whether the stick returns to center smoothly.
- Connector integrity: Verify that the ribbon cable and connector are fully seated and undamaged, as poor contact can cause erratic input readings.
- Recurrence timing: Record whether the problem occurs immediately after reassembly, appears only during certain games, or worsens over time.
This classification applies only to post-repair stick input behavior; other issues may require separate diagnosis.
Troubleshooting Scope for Post-Repair Joystick Behavior
Post-repair joystick behavior covers input symptoms that remain or appear after a Joy-Con stick has been cleaned, adjusted, or replaced. This page diagnoses those symptoms to identify the likely fault domain.
If you replaced a joystick module and the stick continues to drift, that is a drift-like movement after repair. In contrast, if the stick produces no input at all — the character never moves — that signals a different class of issue, such as a disconnected ribbon cable or a faulty solder joint. A broader overview of components and repair options is available at the Joy-Con drift repair kit hub.
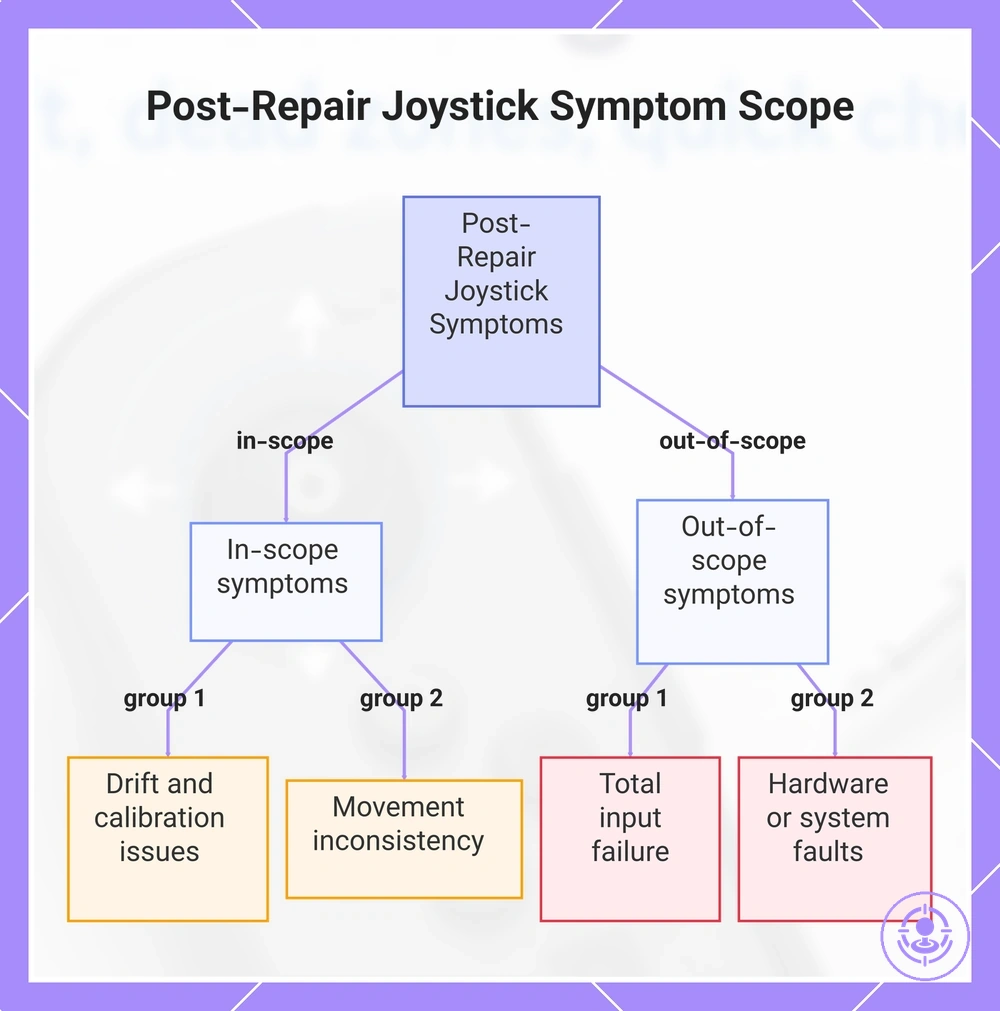
In-scope symptoms are those that can be further diagnosed through calibration checks, while out-of-scope symptoms point to a different fault class. The list below separates post-repair stick symptoms into in-scope and out-of-scope categories to prevent wasted checks and guide your next diagnostic step.
- In scope
- Post-repair drift persists (drift-like movement)
- Stick has a noticeable dead zone or off-center position
- Stick input is intermittent (registers movements inconsistently)
- Stick does not return to its neutral position smoothly
- Calibration offsets persist after reassembly and software reset
- Out of scope
- No joystick input is detected at all (dead stick area) (different fault class)
- Joystick is locked in one direction and does not respond to manual movement (different fault class)
- Ribbon cable or connector is visibly damaged, loose, or disconnected (different fault class)
- Battery or power supply issues prevent the controller from turning on or staying on (different fault class)
- Pairing, Bluetooth, or firmware issues: classify these as non-stick symptoms (different fault class)
This chart separates post-repair joystick symptoms into in-scope and out-of-scope categories to guide diagnosis.
Map Your Symptom Pattern Before You Change Settings or Reopen the Joy-Con
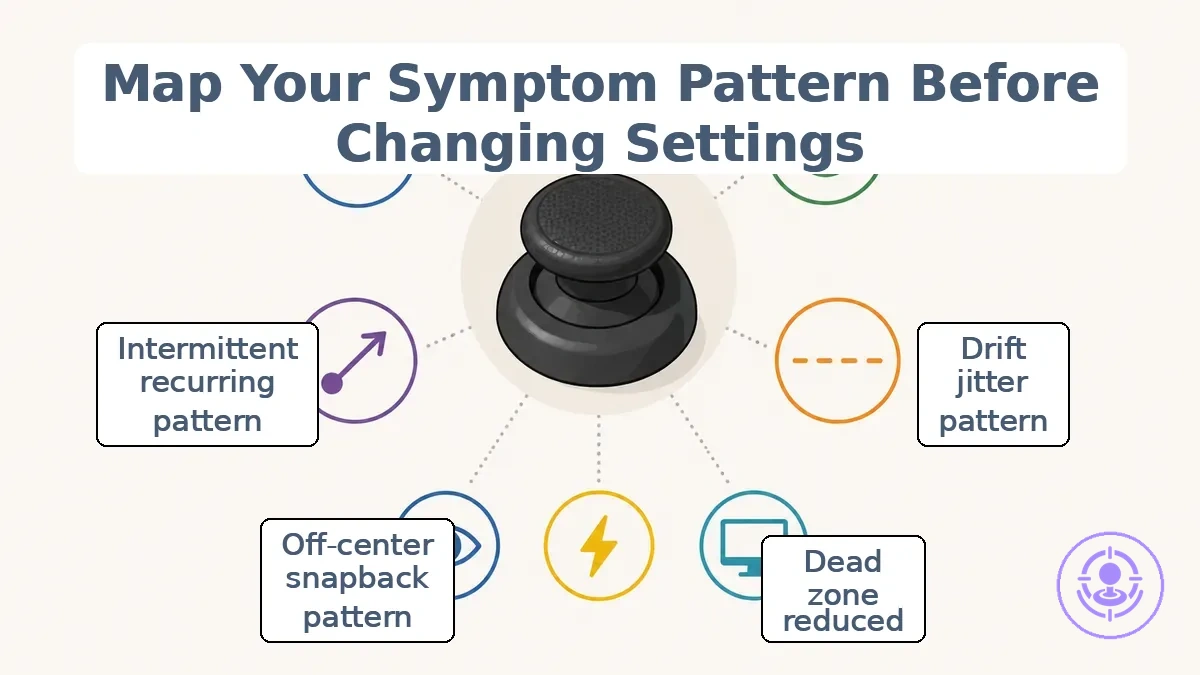
Start by classifying the symptom pattern—stick drift, dead zone, off-center, or intermittent behavior—since the next troubleshooting steps depend on the specific type. Checking settings or reopening the controller without classifying the symptom risks unnecessary rework. Mapping the pattern helps narrow the cause and points toward calibration, connector fit, or recurrent hardware wear.
Symptom mapping uses three axes: observed behavior, trigger condition, and test surface.
- Observed behavior: describes the stick's behavior—drift, jitter, instability, or failure to center.
- Trigger condition: records when the behavior appears—during gameplay, on the test screen, or only after certain movements.
- Test surface: refers to where you verify the symptom, such as the system's controller test screen or in-game menus.
Use the checklist below to group the symptom class and test context. Each group corresponds to a common user-reported pattern.
- Still drifting or jittering
- Observed behavior: stick moves without input or shows rapid instability.
- Trigger condition: appears on test screen and during gameplay.
- Test surface: system's controller test screen.
- Interpretation: likely calibration drift or sensor wear; if unstable across tests, proceed to calibration verification.
- Dead zone or reduced range
- Observed behavior: stick does not register small movements or requires extra travel.
- Trigger condition: often limited to certain directions.
- Test surface: test screen to confirm edge travel and response.
- Interpretation: possible obstruction or worn contact surface; check connector fit and housing alignment. If range is consistent, calibration may help.
- Off-center or snapback
- Observed behavior: stick returns to a point that is not true center, or snaps back after release.
- Trigger condition: after releasing the stick.
- Test surface: test screen using centering tests.
- Interpretation: mechanical off-center or snapback often relates to spring tension or centering feel; reassembly verification may be needed.
- Intermittent or recurring behavior
- Observed behavior: symptom appears sporadically, not always reproducible.
- Trigger condition: may depend on angle, temperature, or vibration.
- Test surface: repeated tests across sessions.
- Interpretation: recurrence suggests connector or intermittent contact; verify connection without assuming permanent damage.
When behavior is stable across tests and matches a calibration pattern, proceed to calibration verification. For inconsistent or mechanical-seeming behavior, reassembly and connection verification are more appropriate.
For example, a stick that drifts only during intense gameplay but passes the test screen may be misclassified as calibration drift. Without mapping the trigger condition, recalibration would be unnecessary. Using the checklist, the intermittent pattern points to a connection or fit issue, not calibration.
Drift, dead zones, and off-center input are different failure signals
Drift, dead zones, and off-center input are three distinct stick signal patterns. Drift is unwanted movement when the stick is at rest, indicating a stability issue near the center point. A dead zone is loss of response near the edges of the response range, causing small inputs to feel unresponsive. Off-center input occurs when the stick does not return to true neutral, resulting in a directional bias. These patterns help identify which stick test aspect—centering, range, or stability—needs verification.
After a repair or replacement, the following bullets separate how each signal appears in a stick test and what to verify:
- Drift: In a stick test, small, jittery movements appear near the center without physical touch. This points to checking stability and jitter in the sensor response.
- Dead zone: The stick shows reduced or missing input along the edge of travel, often felt as a gap before full travel. This points to checking range calibration and edge travel.
- Off-center input: The stick's neutral position is shifted, so the controller reads a constant bias when centered. This points to verifying centering calibration and the stick's physical return to neutral.
Do not mistake a large dead zone for drift until calibration is confirmed; a dead zone after a module swap may be an uncalibrated range rather than ongoing unwanted movement.
No input, stuck directions, and intermittent input indicate a different fault class
No input, stuck directions, and intermittent input are connection-class or assembly-class faults, not classic drift. Unlike drift—where the joystick registers constant movement without touch—these symptoms point to a break or instability in the signal path between the joystick and the console. A missing or intermittent signal can stem from loose connector seating, damaged ribbon cables, or debris interfering with contact points. When you see any of these three patterns, start by checking the assembly and connection domain before assuming the hardware needs replacement.
This checklist helps confirm whether no input, stuck directions, or intermittent input belong to this fault class and points to the next domain to verify:
- No input (unresponsive): Check connector seating and signal continuity. A loose or misaligned connector often causes a complete loss of response.
- Stuck direction (constant input): Verify reassembly and look for foreign material under the joystick. A stuck signal may indicate a physical obstruction or an improperly seated component.
- Intermittent input (dropouts): Inspect the connector and ribbon cable for unstable contact. Dropouts that come and go often point to a loose connection rather than a faulty joystick.
- Hardware signal absent: Confirms a connection-class fault—cross-check connector seating and cable condition before replacement.
- Hardware signal unstable: Indicates an assembly-class fault—inspect connector and flex cable for intermittent contact.
If any symptom remains ambiguous after these checks, return to the main symptom mapping before guessing at causes—this helps prevent unnecessary part swaps or misdirected repairs.
Quick checks that rule out simple causes before blaming the new joystick module
Before blaming the new joystick module, a few quick checks can rule out simpler causes.
Apparent drift after a module replacement can sometimes come from debris, software quirks, or the way testing is performed rather than from the component itself. These checks help separate interpretation errors from hardware issues by focusing on repeatability and the test environment.
Each low-risk check follows a consistent pattern: a test action, what stable behavior looks like, what failure looks like, and the next diagnostic direction.
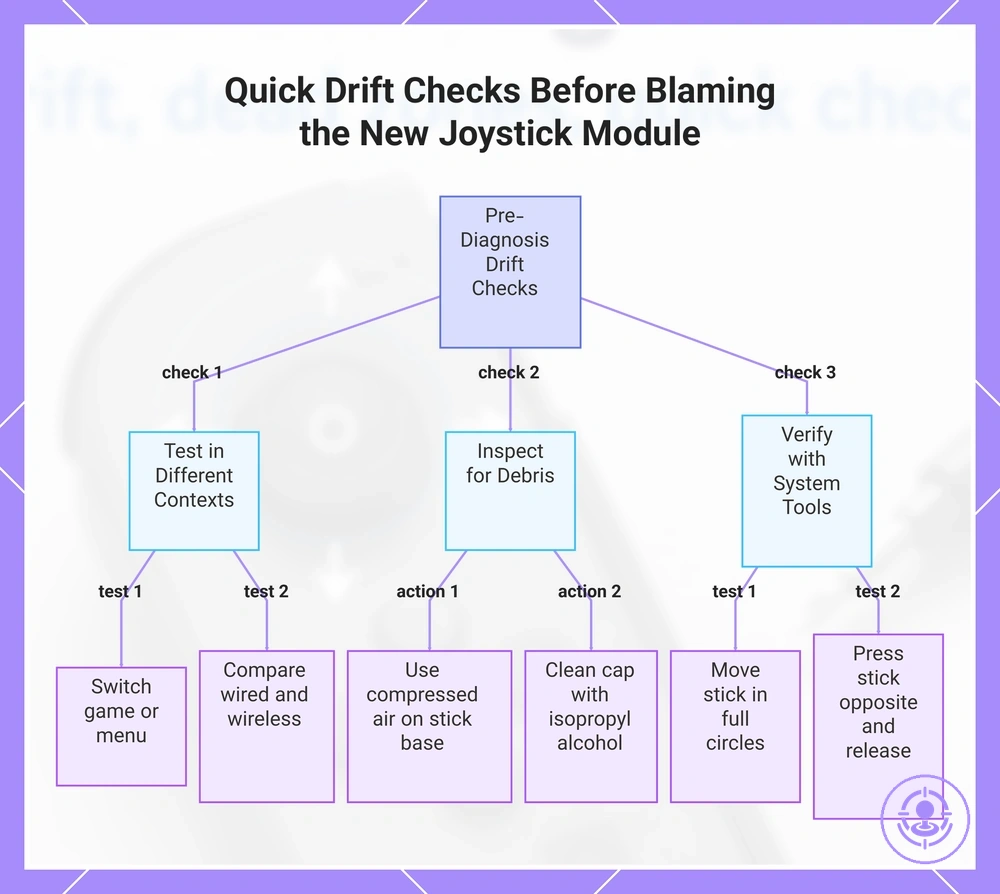
Test the controller in different contexts
- Play a different game or switch to the system menu. If the drift disappears, the issue is likely a game-specific deadzone setting rather than the module.
- Test the controller in wired mode versus wireless. A change in drift behavior suggests interference or a power-related anomaly, not a module defect.
- Restart the console and retest immediately. Drift that does not reappear after a reboot points to a temporary software state.
Inspect for debris or physical obstruction
- Use compressed air to blow around the base of the analog stick. A piece of dust dislodged during the replacement can cause an apparent dead zone or phantom movement.
- Gently clean the joystick cap and the gap between the cap and the shell with a cotton swab lightly dampened with isopropyl alcohol. Sticky residue from handling can mimic drift.
- Observe whether the drift direction changes when you tilt the stick and release it. Inconsistent drift that does not repeat in the same direction suggests temporary obstruction rather than a worn component.
Verify stick behavior with system tools
- Open the console’s controller calibration or test screen. Slowly move the stick in full circles and watch for jitter, jumps, or a stick that never returns to the center line.
- Repeat the circular test three times. If the drift pattern is the same each time, the issue is likely a consistent offset that calibration can address.
- Press the stick in the opposite direction of the drift and release. A quick return to the neutral position suggests the sensors are working; persistent offset suggests a calibration need.
When the drift is not stable across these checks—for example, it appears with one game but not another, or it changes when the controller is rotated—the problem is more likely a test-surface or interpretation error than a module fault. If the drift is repeatable and yields a consistent result, the next diagnostic step is calibration verification before any reassembly decision.
This chart shows three quick check categories to rule out simple causes of drift before diagnosing a new joystick module.
System Calibration and Stick-Test Checks That Can Resolve Apparent Drift or Dead Zones
Running a system calibration or a built-in stick test can either resolve a post-repair drift or dead zone symptom or clarify whether the issue is real and whether further attention is needed. Calibration resets the stick's neutral position, and the test screen shows raw axis movement in real time.
Run through this calibration and testing checklist, which uses the controller's calibration routine and stick test screen to verify centering, range, and stability.
- Open the system's controller settings or stick test screen with the controller connected.
- Leave the stick untouched and watch the on-screen indicator. Note whether it stays at the center point or moves on its own.
- Move the stick slowly to each edge and confirm the response covers the full range.
- Release the stick and observe how quickly and precisely it returns to center.
- Repeat the same checks for the other stick.
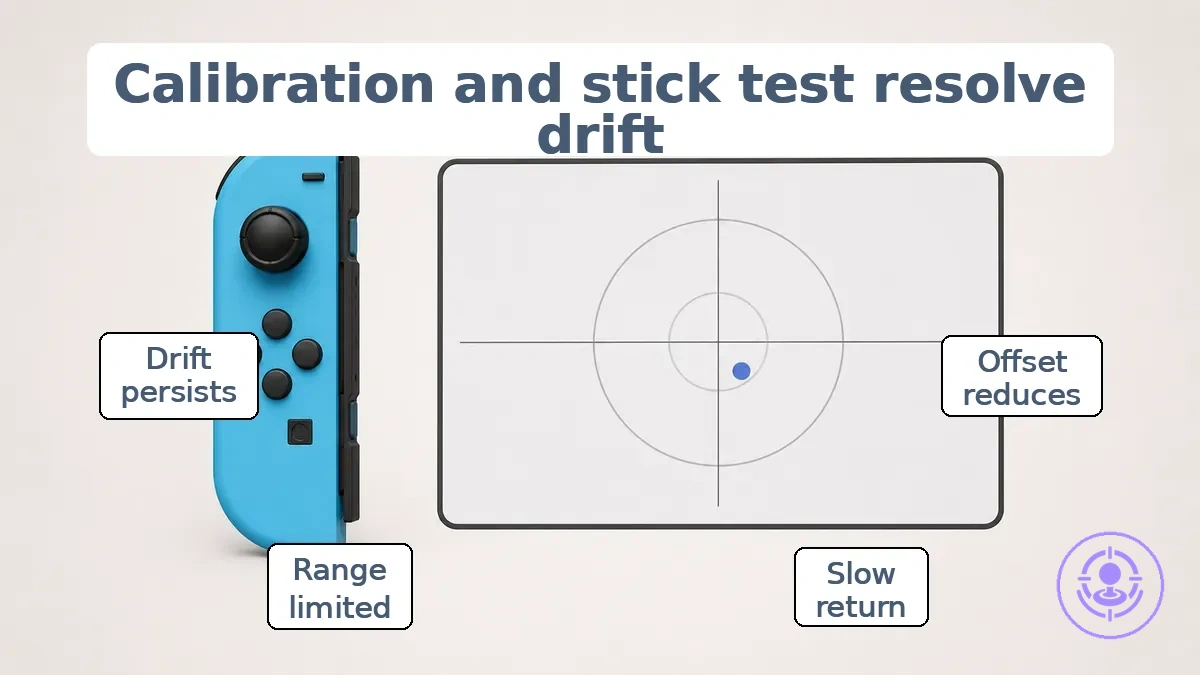
If the values return to a stable center and reach full range, the post-repair calibration is likely correct. A centered reading with no jitter suggests the stick is operating within its expected neutral position. An offset reading that drifts without input may indicate a misaligned or worn component.
When the symptom improves after calibration (the center offset shrinks), the issue was likely a temporary neutral shift. When the symptom does not change, the stick module may have physical wear or debris that calibration cannot correct.
| After calibration | What it suggests |
|---|---|
| Center offset reduces | Calibration realigned the neutral position |
| Stick returns to center slowly | Spring or potentiometer response may be degrading |
| Full range not reached | Physical obstruction or sensor wear |
| Drift persists unchanged | Likely hardware issue, not calibration |
One test screen does not guarantee a full diagnosis. A single off-center reading could reflect temporary jitter or a loose connection. When test results are inconsistent, run the calibration and testing checklist again before moving to hardware inspection.
When the stick will not center or returns unevenly after replacement
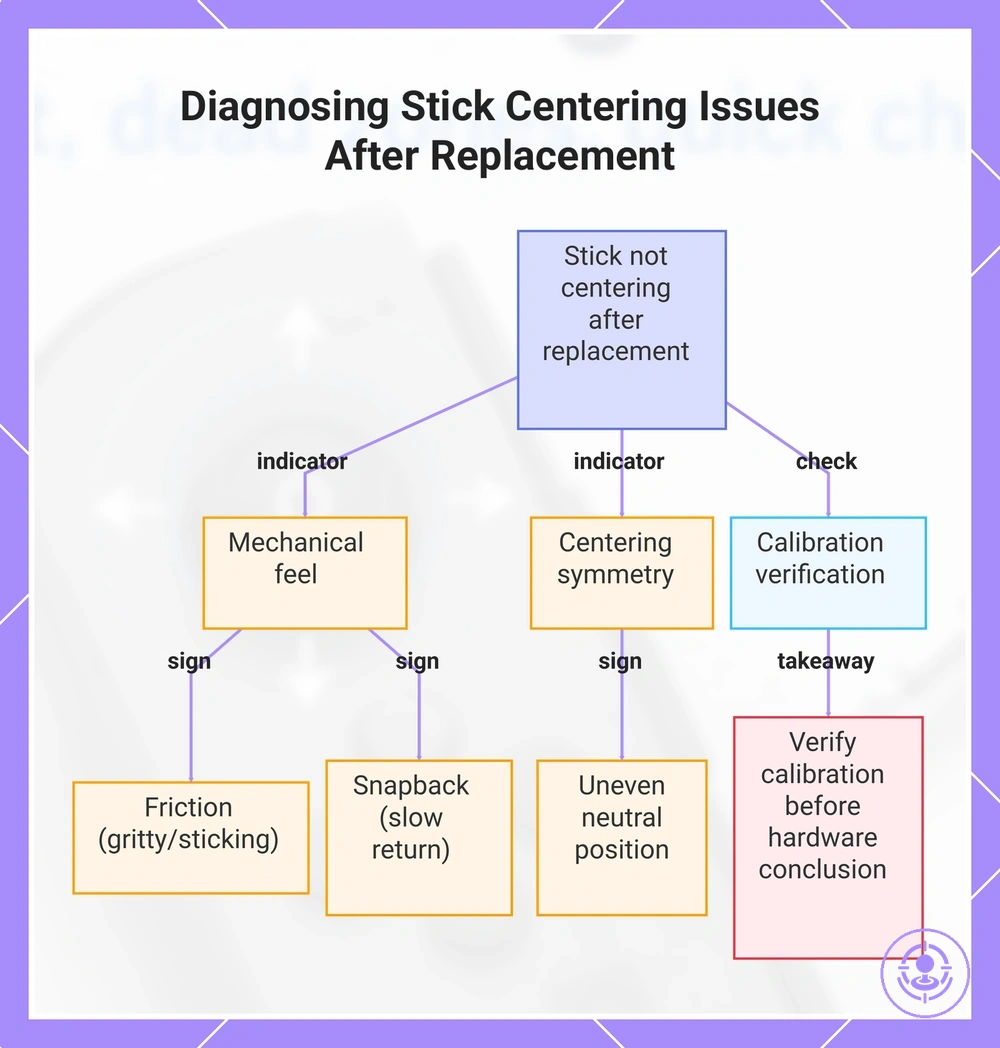
When a stick does not return to its neutral position or springs back unevenly after replacement, the issue is often a mechanical or seating signal rather than classic electronic drift. This behavior usually points to how the module sits in the housing or how the internal components align, not necessarily a faulty potentiometer. That distinction helps avoid misdiagnosis and unnecessary rework.
Centering symmetry, friction, and snapback are the key attributes that separate a mechanical feel from a signal interpretation. Centering symmetry describes whether the stick returns to the same neutral position from every direction. Friction refers to any roughness or resistance felt when moving the stick, while snapback is the speed and consistency of the spring-back to center. When these attributes feel off, the cause is more likely related to seating or fit than to the electrical output of the module.
The following attributes separate mechanical feel from signal interpretation. Each maps an attribute to what to look for and what it suggests to verify.
- Centering symmetry — The stick landing in a different neutral position after being pushed left versus right can indicate that the module may be seated unevenly or the housing may be applying uneven pressure.
- Friction — A gritty or sticking feel during movement often suggests debris, a tight fit, or a misaligned component rather than a worn potentiometer.
- Snapback — A slow or incomplete spring-back to center can indicate that the return spring is not engaging correctly or that the module is not fully seated.
- Off-center in tests — The stick showing an offset only in software calibration tools but feeling mechanically centered can indicate a calibration offset rather than a mechanical problem.
- Off-center only in gameplay — The stick feeling centered in menus but drifting during gameplay is more likely caused by a sensitivity or deadzone setting than a seating issue.
- Uneven return after movement — The stick returning to a different position depending on the direction it was pushed can indicate that the module may be tilted or the mounting points may be uneven.
- Pressure on the module — Excessive pressure from the housing or a tight screw can distort the stick’s neutral position and cause uneven return.
Calibration can still affect perceived centering in tests and should be verified before concluding that the hardware is at fault.
This chart shows the key symptoms and checks to distinguish mechanical seating problems from calibration factors when a stick does not center or returns unevenly after replacement.
Installation and reassembly problems that mimic drift
Stick drift that appears right after a Joy-Con repair often comes from a reassembly or seating mistake, not a faulty joystick module. A mis-seated ribbon cable or a connector that isn't fully locked can produce inconsistent readings that feel like sensor wear. These post-repair issues are common when drift appears after a module swap instead of developing gradually.
The image clarifies where installation and reassembly issues typically happen and why they can mimic drift.
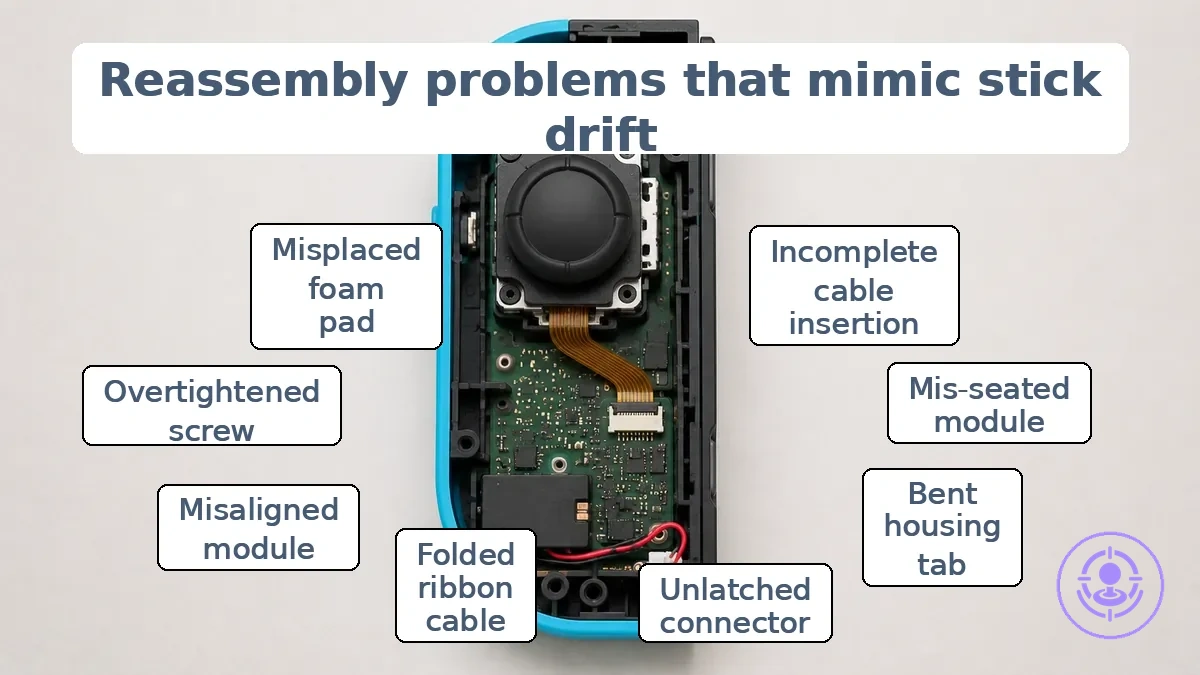
Recognizing which reassembly condition leads to which drift-like symptom helps narrow the fix. The mistakes that cause post-repair issues typically involve pressure points, off-center seating, or partially engaged connectors—each producing a distinct pattern of erratic input.
- Incomplete ribbon cable insertion → Intermittent or drifting input on one axis → Re-seat the cable and ensure the lock is fully closed.
- Mis-seated joystick module → Off-center resting position or constant drift in one direction → Remove and reinstall the module, verifying it sits flush in the housing.
- Pressure from a bent housing tab → Erratic input that changes when the controller is squeezed → Inspect the inner shell for deformed tabs and gently bend them back. For a full walkthrough, see the joystick replacement steps.
- Connector latch not fully engaged → No response or intermittent drift on a single axis → Push the connector until the latch clicks into place.
- Ribbon cable folded or pinched → Random spikes or dead zones → Check the cable path for sharp bends and re-route if needed.
- Stick module not aligned to the outer shell cutouts → Drift that appears only when the thumbstick is moved to the edge → Loosen screws, reposition the module, and tighten evenly.
- Back shell screw too tight → Drift that appears or worsens when the back shell is secured → Loosen the four corner screws slightly and test.
- Foam or adhesive pad misplaced under the module → Off-center neutral position → Remove the pad or reposition it so the module sits flat.
This section covers only common reassembly faults; for deeper connector or mechanical diagnosis, continue to the subsections that follow.
If drift appears right after reassembly and no obvious mis-seat is visible, pause before reopening. A quick check of all ribbon cables and connectors—without removing the module—often reveals the issue without risking additional damage.
Mechanical seating and fit issues around the joystick module
Mechanical seating and fit refer to how the joystick module sits in its housing. Both factors affect centering accuracy and can produce drift-like readings or uneven return after reassembly.
A quick fit check using these indicators can reveal whether the module's position or pressure is contributing to the issue:
- A visible gap between the module edge and the housing may indicate incomplete seating, which can affect centering.
- A module that is not flush with the mounting surface creates uneven pressure that can cause the joystick to return off-center.
- Uneven screw tension around the module can create lateral pressure that may alter the alignment and may produce uneven return.
- Gentle pressure on the module that changes the joystick reading indicates poor fit or loose seating.
- A newly installed module that does not snap back to the same center position suggests a seating problem rather than internal sensor wear.
If the fit remains ambiguous after these checks, return to the parent reassembly steps for a broader review.
Connector, flex, and cable seating issues that create unstable stick readings
Unstable, jittery, or intermittent dropouts in stick readings often point to connector or ribbon cable seating issues, not mechanical centering problems. Such unstable readings typically appear as sudden jumps, short signal losses, or erratic responses that do not repeat consistently.
The following cues help confirm a connection integrity pattern:
- Loose connector – suggests incomplete lock engagement – a safe next step: reseat the connector and ensure the lock clicks into place.
- Ribbon cable not fully inserted – suggests the flex cable is not seated to the depth mark – a safe next step: remove and reinsert the cable, verifying full insertion.
- Lock not engaged – suggests the clamping mechanism is open – a safe next step: close the lock fully and confirm it holds the cable firmly.
- Intermittent dropouts when the cable is moved – suggests a poor contact inside the connector – a safe next step: hold the cable steady and test reading stability; if dropouts stop, reseat or replace the cable.
- Jitter that appears only after reassembly – suggests the flex cable was pinched or misaligned during installation – a safe next step: open the connector, realign the cable, and re-lock.
- Unstable readings that disappear when pressure is applied to the connector – suggests a compromised seating – a safe next step: check the lock mechanism for damage or debris.
However, avoid over-interpreting one sign alone; a single cue may mislead without a consistent pattern to confirm.
Post-repair input problems beyond drift and dead zones
Some post-repair input problems are a different fault class from drift or dead zones. Each needs its own diagnostic path.
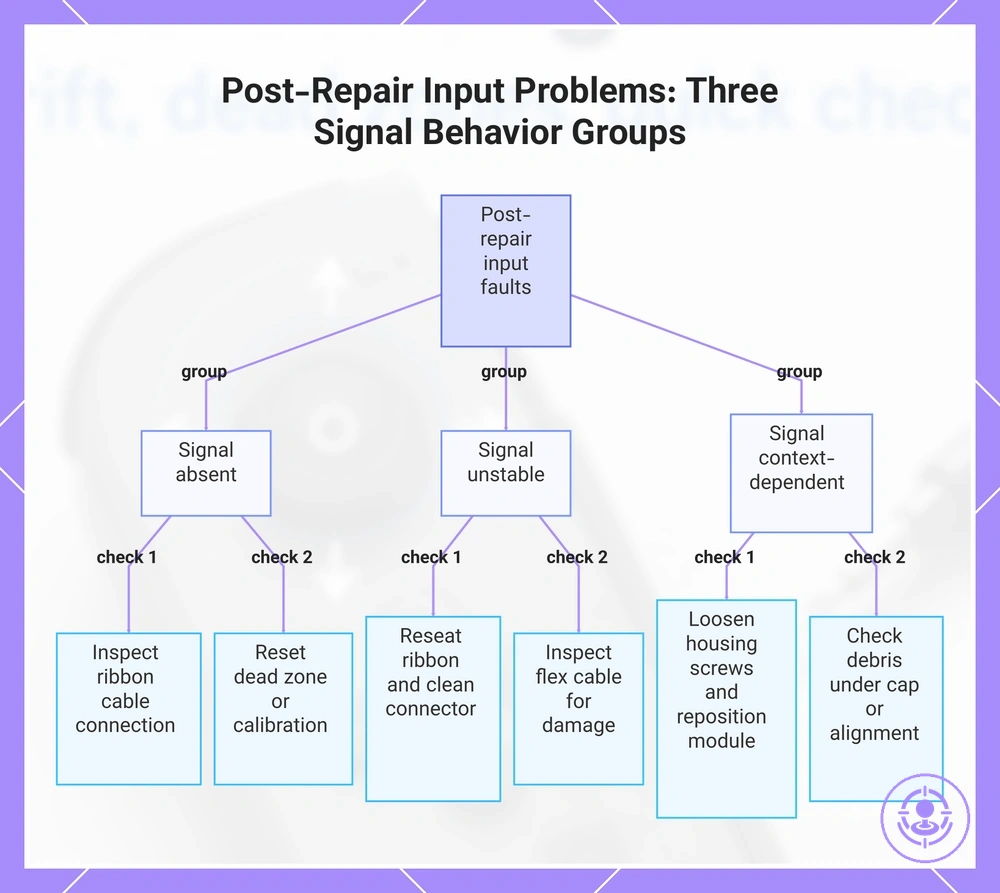
These input problems fall into three groups by signal behavior: absent, unstable, or context-dependent. Each group includes the symptom, affected attribute, likely fault domain, and next check.
Signal absent – no movement or unresponsive
- No movement on one axis → analog sensor not detected → likely ribbon cable connection or solder joint → inspect connector seating.
- No movement on any axis → input not detected → likely internal cable connection issue after reassembly → inspect and reseat all internal connectors.
- Button works but stick gives no response → dead zone setting too high or calibration lost → reset dead zone to default or re-calibrate in Steam settings.
Signal unstable – intermittent or erratic response
- Movement jumps or cuts out during use → intermittent contact → likely debris or loose ribbon cable → reseat the ribbon and clean the connector.
- Response is delayed or inconsistent → possible timing issue in the digital signal → possible damage to the flex cable during replacement → inspect cable for creases or tears.
- Intermittent drift after repair → possible sensor noise from grounding issues → check that the joystick module is fully seated and shield foil is intact.
Signal context-dependent – stuck or constant input
- Stick registers constant movement in one direction → stuck direction or constant input → likely reassembly error pressing the joystick against the shell → loosen housing screws slightly and reposition the module.
- Input registers only when stick is pushed hard → over‑travel or physical obstruction → check for debris under the joystick cap or misaligned thumbstick.
- Movement works in menus but not in game → software dead zone override conflicting with Steam Input → set per‑game controller configuration to use default dead zone from calibration.
These groups focus on input behavior from the repair interaction. They are not a substitute for the following H3 symptom branches, but offer quick routing to avoid misdiagnosing drift.
Scenario: After replacing a Joy-Con stick, the left thumbstick becomes unresponsive in menus, although button presses work normally. A quick check shows the ribbon cable was not fully inserted into the ZIF connector. Re‑seating it restores full stick function, confirming the problem was a loose connection, not a dead zone or drift issue. This example demonstrates a non-drift symptom pointing directly to a mechanical reassembly step (detailed in the following sections).
This chart groups post-repair input problems beyond drift and dead zones by signal behavior, with key checks for each group.
Intermittent input, no movement, or stuck directions after reassembly
After reassembly, intermittent response, no movement, or a stuck direction usually indicates a physical assembly error, not a defective joystick. Reassembly-class causes include misaligned components, pinched ribbon cables, and improperly seated connectors.
Use this checklist to confirm basic response patterns and identify reassembly-class causes after a joystick swap.
- No movement or unresponsive input: Verification cue – Check that the ribbon cable latch is fully closed and the module is pressed flat against the housing.
- Stuck direction or constant input: Verification cue – Verify the module is not installed upside down; the alignment notch should match the housing guide.
- Intermittent response: Verification cue – Inspect the ribbon cable for pinching or creases along the full length, and reseat both connector ends.
- Movement only in one direction or erratic: Verification cue – Confirm the small retaining clip is fully engaged around the module and the module is not tilted.
- Reversed or swapped input: Verification cue – Check that the module is rotated correctly (not 180°) and that the orientation matches the housing notch.
If new symptoms appear during these checks, stop and recheck each assembly step before proceeding.
Erratic Movement in Games but Stable Behavior in System Test Screens
When erratic movement occurs only during gameplay but system test screens show stable behavior, the issue is likely a context-dependent sensitivity interpretation problem rather than a consistent hardware signal failure. The comparison helps isolate whether the cause relates to calibration interpretation, dead zone behavior, or repeatability of the input.
The contrast below separates test context from gameplay behavior and indicates what to check next.
| Observation | What to Check Next |
|---|---|
| Stable behavior in system test screens | Verify calibration interpretation and dead zone settings |
| Erratic movement in games | Check sensitivity and response curve adjustments |
| Inconsistent repeatability across sessions | Assess whether the issue is tied to specific in-game conditions |
| Mismatch between test and gameplay | Focus on context-dependent factors before revisiting physical checks |
When erratic movement is not repeatable in tests, focus on calibration interpretation and dead zone behavior rather than hardware replacement.
For example, a stick that moves smoothly in a system test screen may exhibit sudden jumps or delayed response during fast-paced gameplay due to the game's sensitivity curve interpretation. If the same behavior does not appear in the test screen, examine the game's dead zone and response curve settings before considering hardware issues.
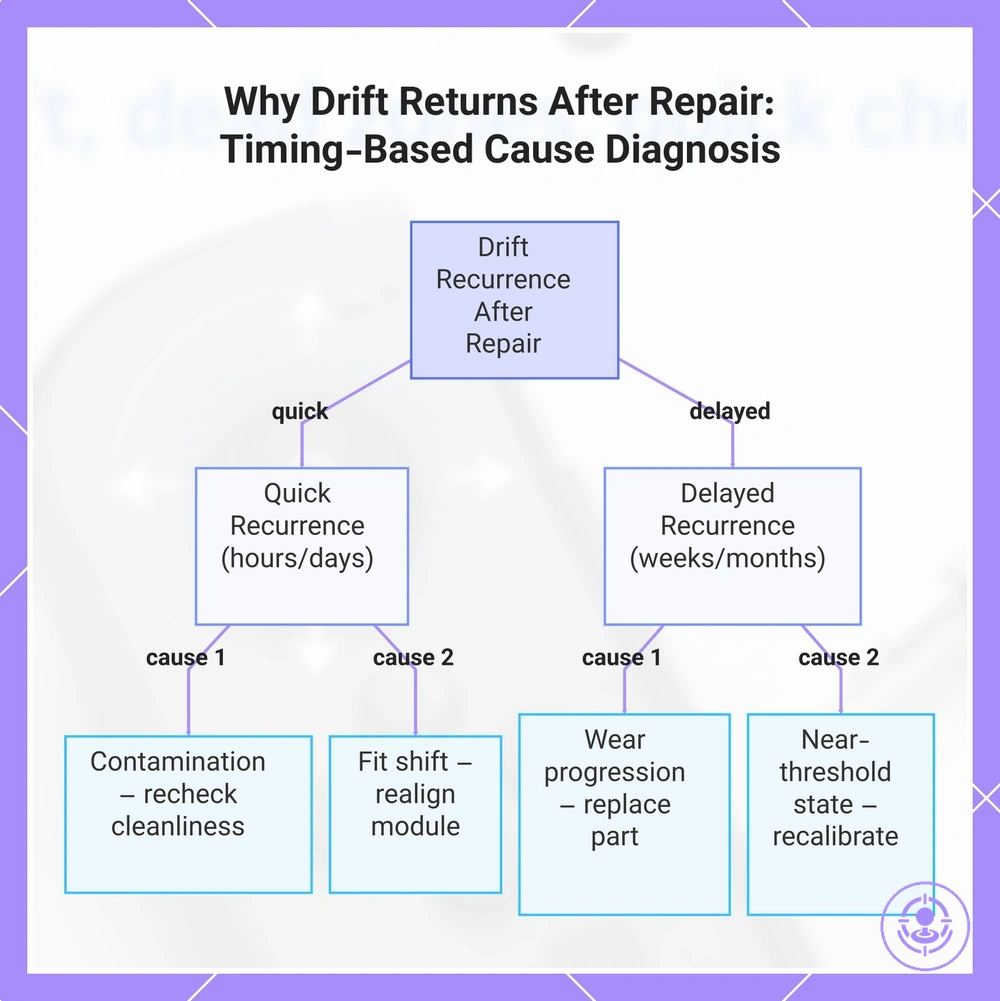
Why drift can return after a repair that initially seemed successful
Drift can return after a repair that initially seemed successful due to conditions such as contamination, wear progression, fit shift, or an initial near-threshold state. That does not necessarily mean the repair was flawed. Instead, it points to conditions that may not have been fully resolved or that arose during reassembly. These cause classes organize why drift can return and provide a re-check approach without assuming a single cause.
If drift returns shortly after repair—within hours or days—contamination or fit shift introduced during the process is often the cause. If it reappears after weeks or months of use, wear progression or a component already near its operational threshold is typically the reason. The timing of recurrence helps narrow which cause class to investigate first.
The following cause classes explain why drift can return, each with a clue and re-check direction:
- Contamination — If drift returns quickly after repair, the area may have been exposed to dust, moisture, or debris. Re-check cleanliness of contact surfaces and verify seals are intact.
- Wear progression — If drift reappears after a period of normal use, the original potentiometer or mechanism may have been near failure. Re-check component wear and consider replacing the specific worn part.
- Fit shift — If drift returns after reassembly without additional use, the module may not be seated securely. Re-check alignment and tighten mounting points.
- Near-threshold state — If drift was borderline before repair, even a small change can push it back. Re-check baseline calibration and compare with known good values.
- Incomplete cleaning — If drift returns in the same axis, residual flux or corrosion may remain. Re-check the cleaning procedure and inspect contact points.
- Component damage — If drift returns with new symptoms like sticking or noise, a component may have been damaged. Re-check the module for physical damage and test continuity.
Based on timing and cause class, re-checking the specific area gives a clearer direction, and taking steps to prevent recurring drift after repair can address the underlying issue.
Drift recurrence does not necessarily mean a permanent fault. In most cases, it points to a specific, addressable cause.
This chart shows how the timing of drift recurrence points to specific cause classes and suggests a re-check action for each.
When to redo the repair, replace the module again, or escalate to a different fix path
After a repair attempt, decide whether to redo, replace, or escalate only after classifying the symptom and verifying calibration. This two-step check determines if the problem is persistent, intermittent, or new, and whether the module is still likely functional, so the next action aligns with the most probable cause based on those checks.
Decision signals here are organized by risk, repeatability, and likelihood. Each entry states the signal, what it implies, and the next step to take.
- Signal: Symptom repeats immediately after reassembly and calibration check fails. Implication: likely misalignment or poor component seating. Next action: redo the reassembly step, verifying alignment.
- Signal: Symptom appears intermittently after reassembly. Implication: a partial connection, loose screw, or component that shifts during use. Next action: redo the repair with emphasis on securing all fasteners and connectors.
- Signal: Symptom unchanged after multiple repair attempts with proper calibration. Implication: component failure rather than an alignment issue. Next action: replace the module.
- Signal: Symptom changes to a new behavior (e.g., additional sticking, unusual noise). Implication: new damage introduced during repair. Next action: stop and escalate to a different fix path.
- Signal: Calibration passes after reassembly but symptom returns after short use. Implication: wear or design limitation in the module. Next action: replace the module.
- Signal: Visual inspection shows cracked housing, stripped threads, or bent pins from prior reassembly. Implication: physical damage beyond simple repair. Next action: replace the module.
- Signal: Repair involves soldering or delicate disassembly and user lacks experience or proper tools. Implication: high risk of introducing new faults. Next action: stop and escalate.
- Signal: Repeated reassembly attempts that produce new symptoms each time. Implication: damage is accumulating. Next action: stop and escalate (stop-signal condition).
For example, if a module shows the same drift after multiple calibration attempts and reassembly introduces a new sticking sound, the combination of failed checks and new signs points to physical damage. In that case, replacing the module is typically safer than attempting a third redo.
Troubleshooting FAQ for fast checks and edge cases
This FAQ covers edge cases and quick clarifications for issues that may persist after repair or replacement. The answers are brief and avoid repeating earlier diagnostic steps.
Why is the Joy-Con still drifting after repair?
Drift may persist after repair due to an unaddressed component or a reassembly error. Check the analog stick module alignment and ensure the connection is fully seated.
What does a dead zone after replacement mean?
A dead zone after replacement may indicate a calibration mismatch or a misaligned sensor. Running the built-in calibration test can help confirm whether the stick registers movement correctly across the full range.
Why is the stick not centered after reassembly?
An offset center may be caused by physical misalignment of the stick module. Testing on the switch's calibration screen can reveal whether the offset is slight and adjustable or requires reopening.
Does calibration change how I interpret drift symptoms?
Calibration can mask or exaggerate drift readings, so test the raw input before and after calibration to see whether the symptom changes or stays.
When should I stop reopening the Joy-Con?
Stop reopening when the same symptom appears after multiple reassemblies and all common checks pass, since the fault may then lie in the main board or cable rather than the stick module. Further reopening is unlikely to help.
How do I know if the problem is drift or something else?
Drift typically shows as continuous movement without input, while intermittent jumps or drops may point to a loose connection or a failing sensor. Quick checks with different games or the test screen can help differentiate.
Should I worry about a small offset that does not affect gameplay?
A minor offset that disappears during gameplay may not require action, but if it grows or becomes constant, it may indicate a developing issue that should be checked before it worsens.
Can a dead zone appear after replacement even if the repair was done correctly?
Yes, because new modules can have slight variations in their neutral position. Calibration may resolve this; if it does not, the module may need to be reseated or replaced.