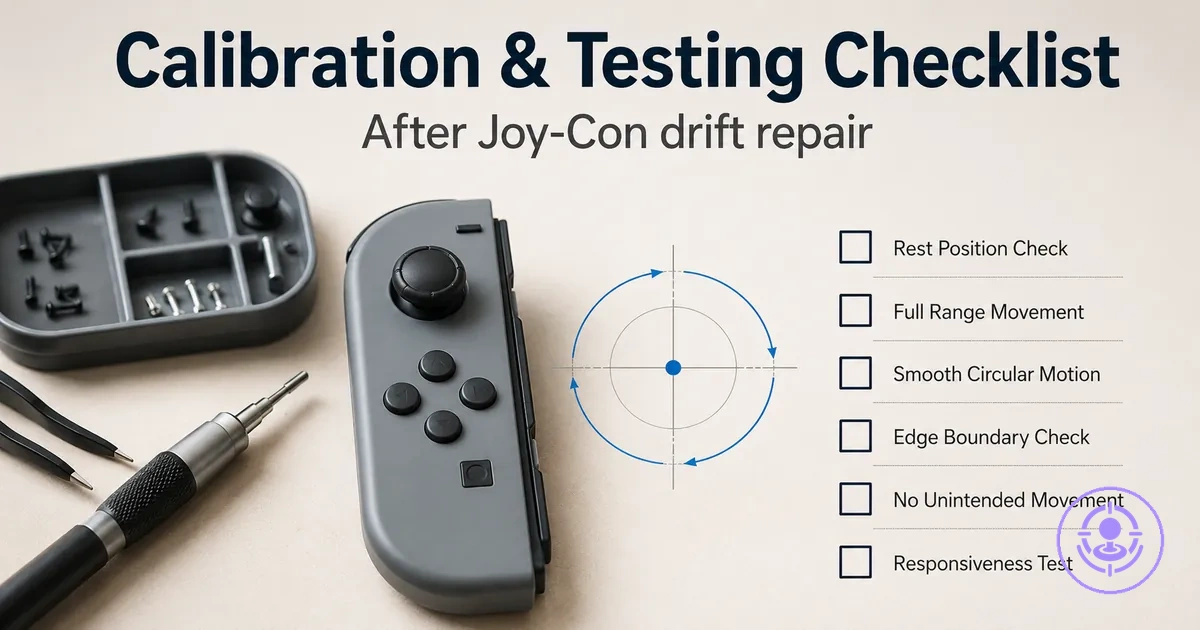
Joy-Con drift post-repair calibration and testing checklist
A post-repair calibration and testing checklist is a structured process used after a Joy-Con joystick replacement to verify that drift is resolved and the thumbstick returns to a stable center. The checklist keeps validation separate from repair work, so input issues are identified before regular use.
After a joystick replacement, tests should be repeatable to confirm that any observed behavior is not a one-time event. Consistent results indicate the repair is effective and the controller is ready for normal gameplay.
A common misunderstanding is that calibration can fix mechanical friction inside a joystick module. Calibration adjusts only the software reading of the stick's position and does not correct physical binding or debris. Before calibrating, ensure the hardware is clean and properly seated.
Pass or fail cues during testing depend on how the thumbstick behaves. A pass means the stick returns to center without drifting.
Verify the following aspects of Joy-Con drift post-repair calibration and testing:
- Center stability – The thumbstick should return to a neutral position without drifting when released. Any persistent movement away from center indicates a potential issue.
- Range consistency – Inputs should be detected evenly across the full range of motion in all directions. Uneven or missing inputs may point to incomplete seating or debris.
- Dead zone behavior – The controller should not register movement when the stick is untouched. A small dead zone is normal, but any unintended input suggests drift remains.
- Repeatability – The same test should produce the same result each time. Inconsistent behavior can indicate an intermittent problem that needs further investigation.
- Real-use confirmation – Brief gameplay or menu navigation can reveal subtle drift that may not appear in the calibration screen alone. This step helps confirm the repair holds under normal conditions.
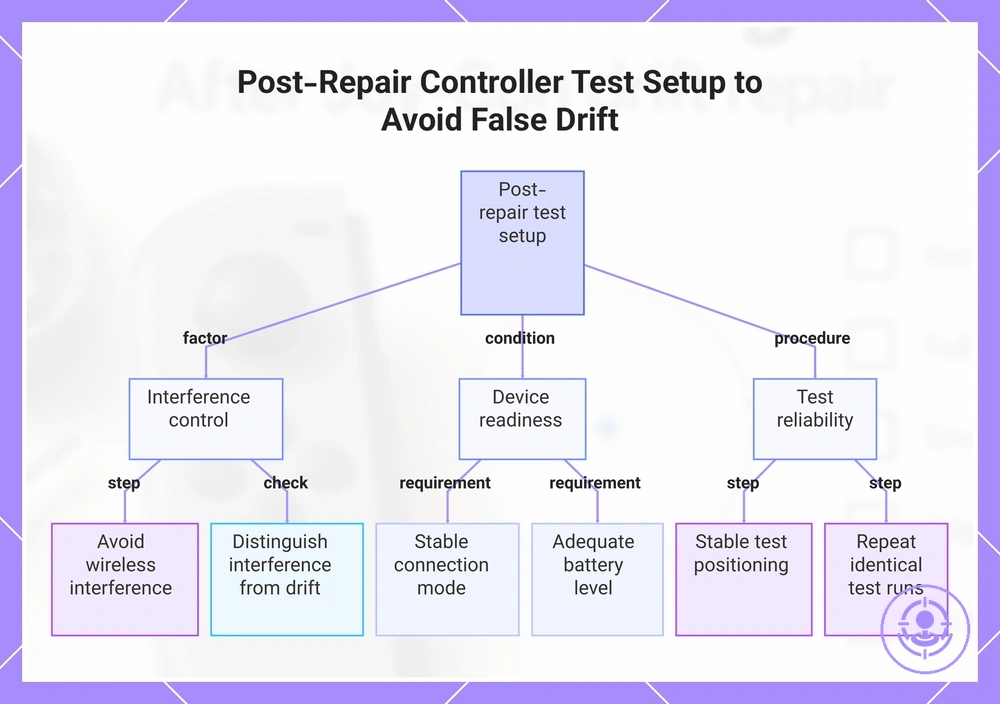
Post-repair scope check and test setup before calibration
Testing setup controls false drift by isolating the controller from environmental noise. Stabilize setup before judging results.
To establish a reliable baseline, confirm each of the following setup variables before running any calibration test.
- Connection mode: Use wired or stable Bluetooth; intermittent wireless can produce input dropouts.
- Battery/charge: Ensure charge level is above a stable threshold; low battery may cause erratic input.
- Interference: Move away from other wireless devices; nearby signals can introduce noise.
- Drift symptoms vs. testing noise: Interference can cause sporadic jumps that mimic drift; distinguish before concluding.
- Distance: Keep the controller within the recommended range from the console; excessive distance can cause dropouts.
- Posture: Hold the controller in a neutral, supported position; inconsistent handling can introduce unintended inputs.
- Surface: Place the controller on a flat, stable surface during static testing; movement can misrepresent drift.
- Environment: Test in a low-interference area; metal objects or dense walls can affect signal.
- Repeatable conditions: Perform multiple test runs under identical settings to confirm consistency.
Sporadic jumps often come from interference, not stick drift. For the step-by-step repair process, see the dedicated guide.
This chart outlines the environmental factors, device conditions, and testing procedures needed to set up a reliable controller test after repair and distinguish real drift from interference-induced noise.
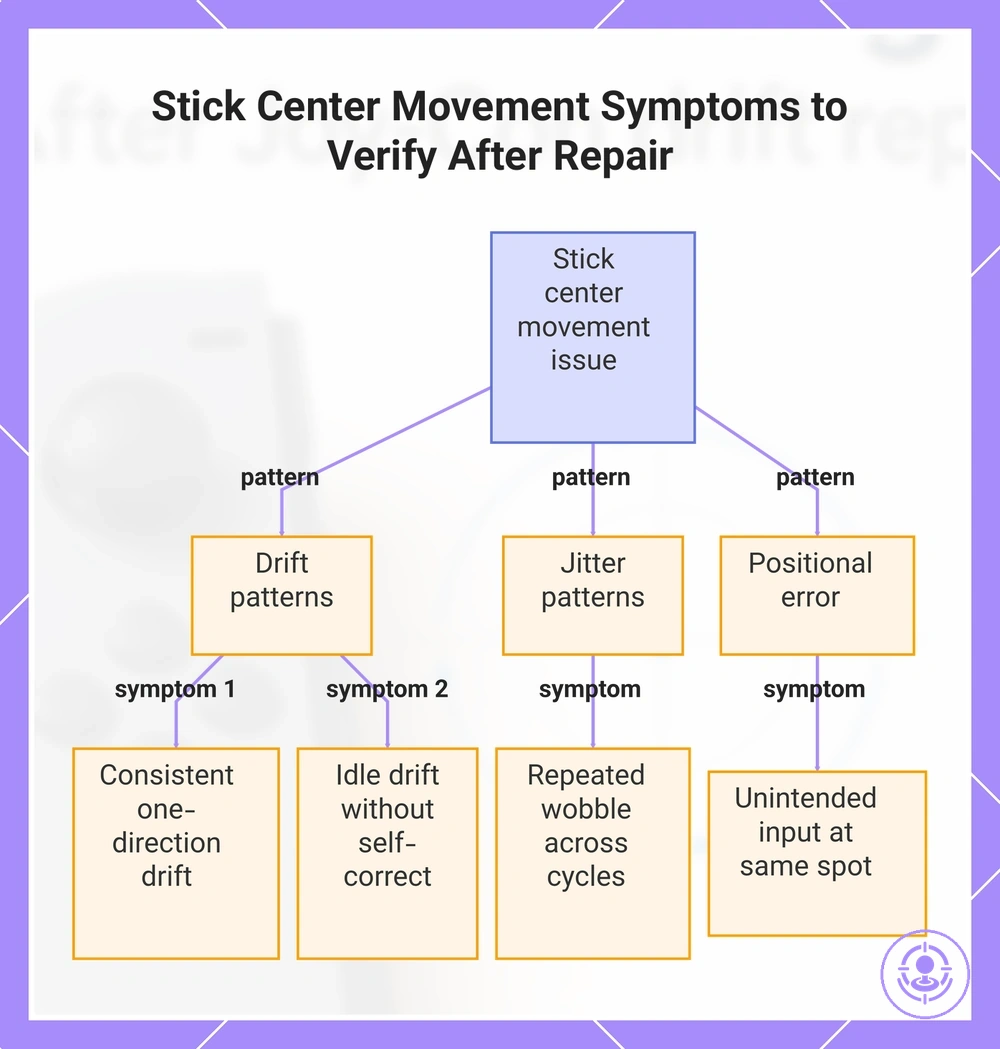
Confirm the stick issue you are validating after repair
The symptom you are verifying is any unintended center movement that occurs when the stick is at center. Test the same symptom each time to keep checks repeatable.
Check for these observable behavior patterns:
- When the stick is released to center, the input registers a consistent drift in one direction for more than a few seconds.
- When the stick returns to neutral, small jitter or wobble appears repeatedly and lasts across multiple test cycles.
- When the stick is moved slowly across the center point, unintended input occurs at the same position in every test.
- When the stick is left untouched for a set period, the input drifts away from center and does not self-correct.
Continuous drift stays active as long as the stick is centered, while occasional input noise appears briefly and then returns to neutral without repeating.
This chart shows the key observable behavior patterns to check when validating a stick center movement issue after repair.
Prepare the Console, Joy-Con, and Environment for Repeatable Input Tests
Repeatable input tests require controlled conditions.
Use these grouped setup controls to keep each test comparable for repeatable input tests:
- Device state:
- Set the console to the same mode (handheld or docked) for each test.
- Confirm the Joy-Con battery is charged or on a charger.
- Restart the console if a test follows a previous calibration or firmware update.
- Connection stability:
- Pair the controller wirelessly or attach it physically, then verify consistent pairing.
- Check for wireless dropouts or connection issues before starting the sequence.
- Keep the console and controller close together during wireless tests.
- Handling posture:
- Hold the controller in the same resting position for every button press.
- Place the console on a stable, level surface when testing in docked mode.
Inconsistent results often indicate unstable test conditions rather than a failed repair. If a retest shows different behavior, check the pairing and resting position before concluding that the hardware is defective.
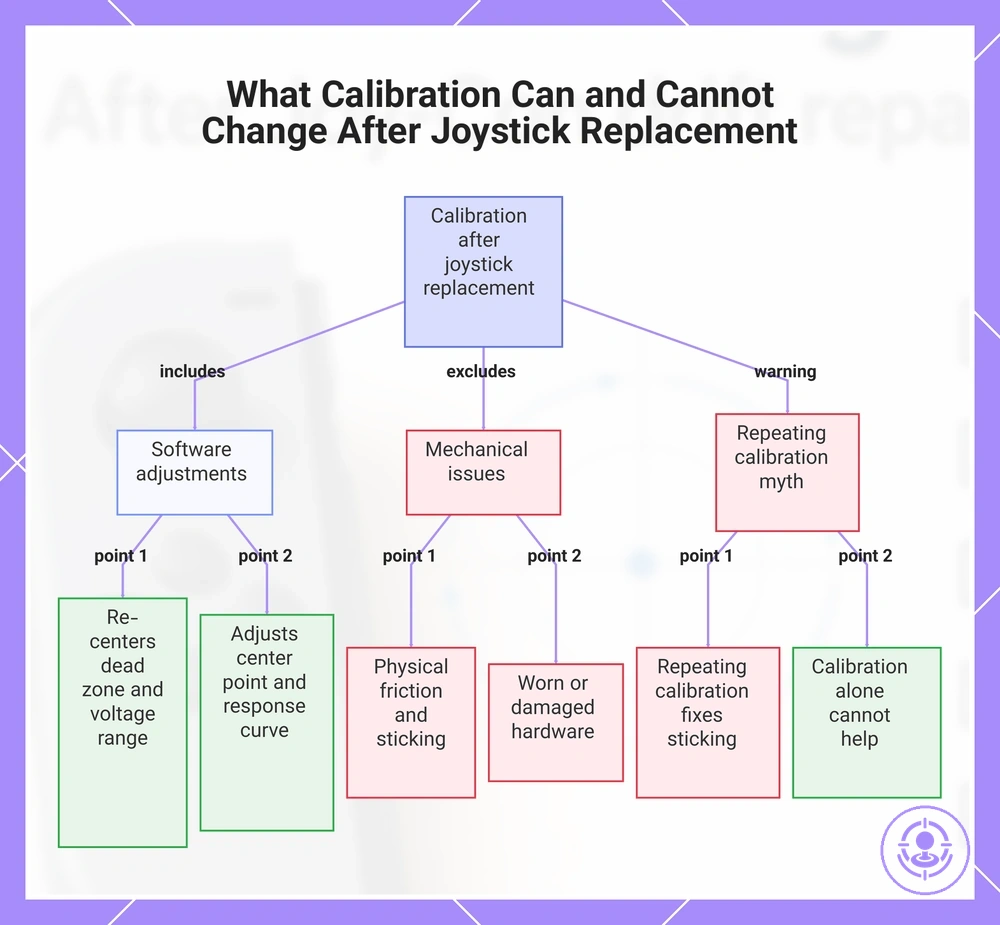
What calibration can and cannot change after joystick replacement
Calibration re-centers the dead zone and normalizes the voltage range reported by the sensors, changing how the controller interprets stick movements. It cannot fix physical friction, sticking, or worn-out potentiometers.
Input interpretation is the software process of mapping analog signals to directional values; mechanical movement is the physical stick travel. The boundary between them determines what calibration can and cannot change and depends on installation quality and component condition: if the stick feels gritty or sticks, calibration will not smooth that feel.
- Software (settings): Adjusts the center point and response curve to correct minor drift caused by sensor offset, and can improve consistency when the hardware is mechanically sound.
- Mechanical (movement): Usually does not reduce friction or sticking caused by debris or worn bushings, nor fix a loose or misaligned pivot if the housing is damaged.
A common misconception is that repeating calibration fixes mechanical sticking. It does not—the cause is physical, so calibration alone cannot help.
This chart shows the software adjustments that calibration performs and the mechanical issues it cannot fix, along with a common misconception about repeating calibration to resolve sticking.
Nintendo Switch Stick Calibration in System Settings
After a repair, use the Nintendo Switch stick calibration in system settings to verify the stick returns to neutral center and registers full range. The calibration tool is located in the System Settings menu, under Controllers and Sensors, labeled Calibrate Control Sticks.
This image shows the Nintendo Switch stick calibration in system settings screen, with the Calibrate Control Sticks option and the center indicator. Use the on-screen prompts to test stick movement.
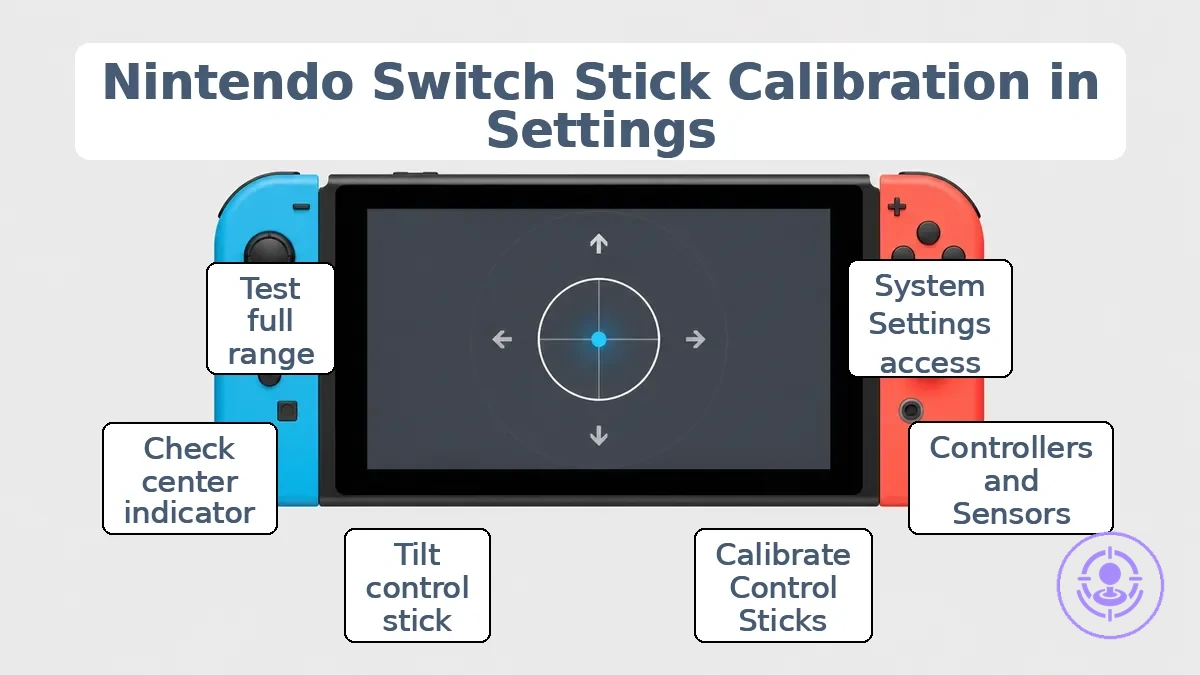
Follow these steps to use the Nintendo Switch stick calibration in system settings:
- From the HOME Menu, open System Settings and locate the Controllers and Sensors section.
- Select Calibrate Control Sticks to enter the calibration screen.
- Tilt the control stick on the controller you want to test in any direction for a few seconds.
- Follow the on-screen prompts to check stick response, noting the center indicator and the prompt to test full range.
- If the stick does not move as expected, follow the on-screen calibration prompts until they confirm completion.
Normal feedback includes smooth movement through the full range and a stable center position. If the stick feels stiff or does not recenter reliably, stop the calibration and verify the hardware assembly. Calibration works only if movement feels normal.
Run stick calibration and verify stable center return
Run stick calibration and immediately verify stable center return.
Follow these steps:
- Open the calibration tool through your controller settings or manufacturer software.
- Follow the on-screen prompts, moving each stick through its full range in both directions while rotating slowly.
- Complete the calibration and save the settings to the controller.
- Unplug and reconnect the controller, or restart the testing tool.
- Open a controller test page or built-in tester and let both sticks rest untouched for several seconds.
- Check the center offset values for each axis and see if they stay steady.
After calibration, use these pass/fail criteria to check if the center return is stable:
- Pass at rest: Both sticks show axis values that remain stable near zero and do not drift on their own. A small, consistent offset can be normal depending on the controller model and software.
- Fail at rest: One or both sticks show a persistent offset, or the values slowly fluctuate even when the stick is untouched.
- Pass on release: After moving a stick and letting go, it returns to the same neutral position each time and stabilizes quickly.
- Fail on release: The stick lands in a different position each time, takes longer to settle, or drifts from center soon after release.
If the same fail pattern appears after recalibrating under identical conditions (same cable, same USB port, same testing tool), repeating the calibration may not produce a different result. A persistent center instability usually points to hardware wear or debris inside the stick module rather than a calibration issue.
Read calibration feedback and identify abnormal behavior signals
Calibration feedback indicates stability and range issues, not exact causes. Understanding each signal's implication helps decide whether to proceed or re‑check the test conditions.
To read calibration feedback and identify abnormal behavior signals, evaluate the following indicators:
- Consistent offset in a single direction may suggest a calibration baseline error; retesting after recalibration is recommended.
- Small fluctuations within a narrow range may suggest acceptable limits; repeating the test confirms stability and helps rule out interference.
- Random spikes or jumps in the reading may suggest intermittent signal noise; repeating the test in a different environment may clarify the condition.
- Large erratic movements without user input may suggest abnormal behavior, warranting a full recalibration cycle before concluding hardware issues.
- Readings that drift gradually over time may suggest thermal or wear‑related variance; a conditional retest after a cooldown period can help isolate the cause.
- Normal minor variance appears as small, consistent back‑and‑forth changes, while abnormal patterns appear as sudden, sustained deviations that persist across multiple test runs.
Dead Zone and Drift Verification Tests After Repair Kit Installation
Dead zone and drift verification after repair kit installation checks whether the thumbstick returns to a stable neutral position and produces consistent output across its deflection range. It distinguishes a successful repair from one that still allows unintended movement. Repeat each check using the same test setup to ensure repeatable results; any changes should come from the repair itself, not from shifting conditions.
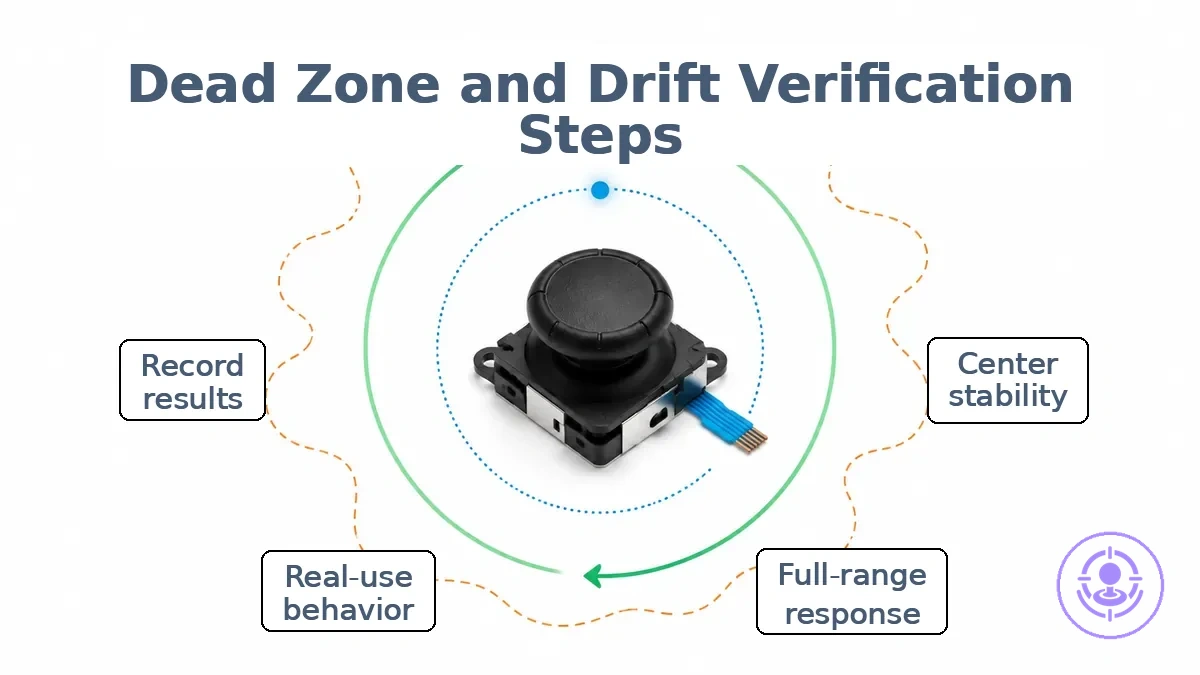
Dead zone and drift verification tests after repair kit installation cover three areas: center stability, full-range response, and real-use behavior. The diagram shows these zones, and the checklist organizes checks by test phase.
- Verification – Measures whether the thumbstick behaves as intended after repair. Pass or fail is based on observable stability and consistent output. No adjustment or preference applied.
- Tuning – Adjusts sensitivity or dead zone size to compensate for wear or personal preference. This does not confirm repair quality and may mask remaining drift.
- Center stability – Center neutral – Place the thumbstick in its natural rest position. Confirm that the controller reports no unintended movement in any direction.
- Center stability – Small deflection – Apply very light pressure outward. Confirm that the input returns to zero when released with no lag or offset.
- Center stability – Release and edge tests – Rapidly move and release the stick from multiple angles and each edge; confirm it settles to the same neutral point without bounce.
- Center stability – Subtle drift check – Hold the stick at rest for several seconds. Note any reading that appears after an initial stable moment. If observed, retest after rechecking assembly.
- Full-range – Circular sweep – Rotate the thumbstick along its outer edge. Confirm the displayed input follows a smooth, consistent circle without sudden jumps or flat spots.
- Full-range – Cardinal direction test – Move to each extreme (up, down, left, right) and confirm that the controller reaches the expected maximum input value without overshooting.
- Full-range – Diagonal consistency – Move slowly along diagonals and confirm that both axes scale together without one axis falling behind.
- Full-range – Speed variation – Test at different speeds (slow, moderate, fast) to confirm consistent output regardless of input rate.
- Real-use – Quick stick flicks – Perform short, rapid movements similar to in-game actions. Confirm no unintended drift or delayed return.
- Real-use – Sustained hold – Hold the stick at a slight offset for a few seconds, then release. Confirm the output returns cleanly.
- Real-use – Combined movement – Move the stick in irregular patterns (e.g., small circles, figure-eights). Observe that the tracked path stays smooth and predictable.
- Real-use – Game-like scenario – If possible, test with a game or application that shows raw input. Note any unexpected character movement or aiming drift.
After completing the checks, record the results for each test with simple notes (e.g., "pass" or "fail with description"). This record allows comparison later if drift reappears. If any test fails, inspect the repair and repeat the full verification before reassembly. Move to the center stability test to begin the verification sequence.
Center Stability Test to Confirm Drift Is Resolved
A center stability test passes when the neutral input remains steady throughout a brief observation window, with no unintended movement detected.
During a center stability test, perform these checks:
- Release both sticks and note whether the on-screen crosshair or cursor remains centered without drifting.
- Watch the live X/Y readings for a brief period; they should remain near zero with only minimal fluctuation.
- After moving the stick to its full range, release it and confirm it returns to the neutral position without overshooting.
- Check stability at rest on a flat, stable surface to rule out environmental interference.
If results appear inconsistent, retest after stabilizing the setup under the same conditions.
Full-Range Motion Test for Smooth Travel and Consistent Output
A full-range motion test verifies that the stick moves through its entire travel arc without interruption, uneven resistance, or irregular output.
Perform the test using a consistent routine for repeatable observations:
- Hold the stick gently at the edge and prepare to move it slowly.
- Move the stick through its full range in each axis at a consistent speed.
- Observe the feel for smooth travel and any changes in resistance throughout the motion.
- Check continuity of output by monitoring the on-screen response or a diagnostic reading.
- Release the stick and note whether it returns cleanly to return-to-center without drift or hesitation.
- Repeat the cycle at different speeds to confirm the findings.
Classify the results based on the following observations:
- Smooth travel and consistent output across the full range — pass
- Uneven resistance, scraping, or sticking at any point — fail
- Intermittent or missing output signals during movement — fail
- Stick does not return cleanly to center after release — fail
- Uneven feel often suggests physical interference rather than a calibration need; retest after cleaning to confirm.
Controller input tests that reveal subtle drift in real use
Subtle drift often becomes noticeable only during real use. Small deflections within a static deadzone may still cause unintended movement in gameplay.
- Camera or pointer control during exploration: After releasing the thumbstick, the camera or cursor drifts slowly in one direction. This small deflection may indicate drift.
- Navigating menus or selecting items: The selection moves a short distance without any input. This unintended movement may be subtle drift, but repeating the observation helps distinguish it from normal stick return behavior.
- Steady aim or position holding: The in-game perspective slowly drifts away from the intended target. This signal, even if minor, suggests drift that may need further diagnosis.
Before adjusting sensitivity settings, confirm drift by repeating the same scenario after stable calibration. Interpret real-use results only after retesting to rule out temporary factors.
Physical fit and feel checks that affect calibration outcomes
Physical fit and feel issues — such as shell interference or tight cap fit — can distort calibration results. Friction, scraping, or restricted movement can prevent the stick from returning to its true center. These external conditions should be ruled out before assuming an internal sensor fault.
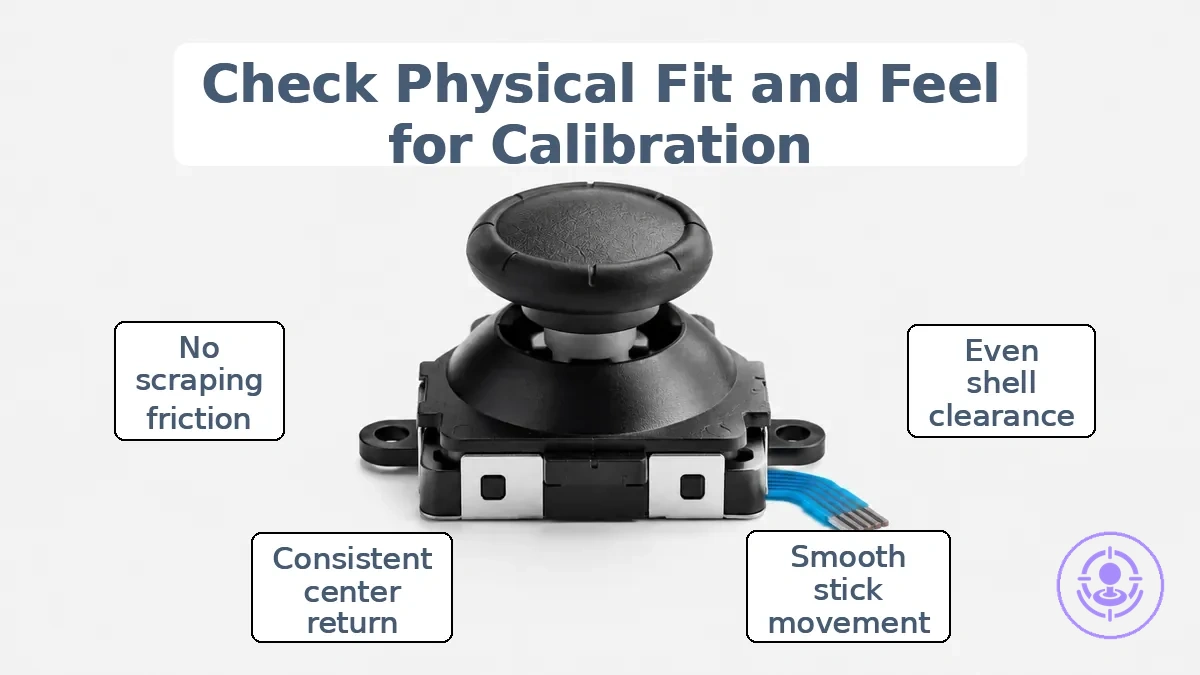
Physical fit and feel checks that affect calibration outcomes fall into two groups: clearance checks and movement feel checks. Use this checklist to determine if the controller is ready for calibration or needs mechanical attention first.
- Calibration-ready feel:
- Shell clearance is even around the cap.
- Cap sits flush with no tilt.
- Stick moves freely without scraping.
- Return-to-center feels smooth and consistent.
- No resistance when rotating the cap.
- Calibration-not-ready feel:
- Cap rubs against the housing during movement.
- Shell clearance is visibly uneven.
- Stick feels stiff or grainy.
- Stick does not return to the same neutral position.
- Scraping sound when moving the stick.
- Friction changes depending on direction.
Repeating calibration when the stick feel is abnormal is a common mistake. Calibration cannot compensate for mechanical binding.
Thumbstick Cap Fit and Shell Clearance Check
Confirm that the thumbstick cap does not contact the shell at center or during full-range movement.
Check clearance in both zones using these observation and action pairs:
Center clearance
- Observation: The cap rests evenly without tilting. Action: Press the cap straight down and release it gently. Suggests: No binding at the neutral position.
- Observation: There is a visible gap between the cap edge and the shell opening all around. Action: Slowly rotate the cap while looking from the side. Suggests: Uniform clearance can prevent friction during small movements.
- Observation: The cap does not scrape or produce a rubbing sound when moved slightly off center. Action: Move the stick in a small circle near the center. Suggests: The lower stem and cap rim remain free of interference in small circular motions.
Full-range clearance
- Observation: When pushed to the outer travel limit, the cap rim stays inside the shell opening. Action: Push the stick fully to each direction and check the gap. Suggests: No contact at the edges can prevent a notchy feel.
- Observation: The cap does not lift or tilt when the stick is rotated at full tilt. Action: Rotate the stick slowly along the outer perimeter. Suggests: Consistent clearance throughout the travel arc.
- Observation: No audible scrape or vibration is felt when sweeping from edge to edge. Action: Sweep the stick quickly from one side to the other. Suggests: The cap shape and shell cutout are compatible for rapid inputs.
For example, a cap that rubs gently against the left edge of the opening can produce a slight resistance that can mimic drift, even when the sensor is functioning correctly.
Stick movement feel check for sticking, scraping, or uneven resistance
Abnormal stick movement feel means consistent or intermittent sensations of sticking, scraping, or uneven resistance when moving the joystick through its range.
It may indicate mechanical interference that calibration usually cannot correct and that can sometimes reintroduce drift-like symptoms.
Move the stick slowly in each direction and repeat each movement several times to distinguish consistent issues from occasional ones.
- Move the stick slowly to the right edge. Feel for scraping or uneven resistance. Repeat and compare feel.
- Move the stick slowly to the left edge. Check for sticking or hesitation. Repeat and see if drag appears at same spot.
- Move the stick upward to its limit. Feel for grinding or inconsistent resistance. Repeat and note if roughness is repeatable.
- Move the stick downward to its limit. Check for scraping or sudden catch. Repeat and compare feel.
- Move the stick diagonally (e.g., upper-right). Feel for uneven resistance across the arc. Repeat and see if interference is consistent.
- Release the stick from an outer position and watch the return-to-center. Feel for hesitation or slow return. Repeat from each direction and compare speed and smoothness of return.
- Move the stick in a slow circle around the outer edge. Feel for scraping or sticking. Repeat and note if interference is localised to one area.
Settings rarely fix scraping or sticking; intermittent sticking often relates to fit or alignment rather than configuration issues.
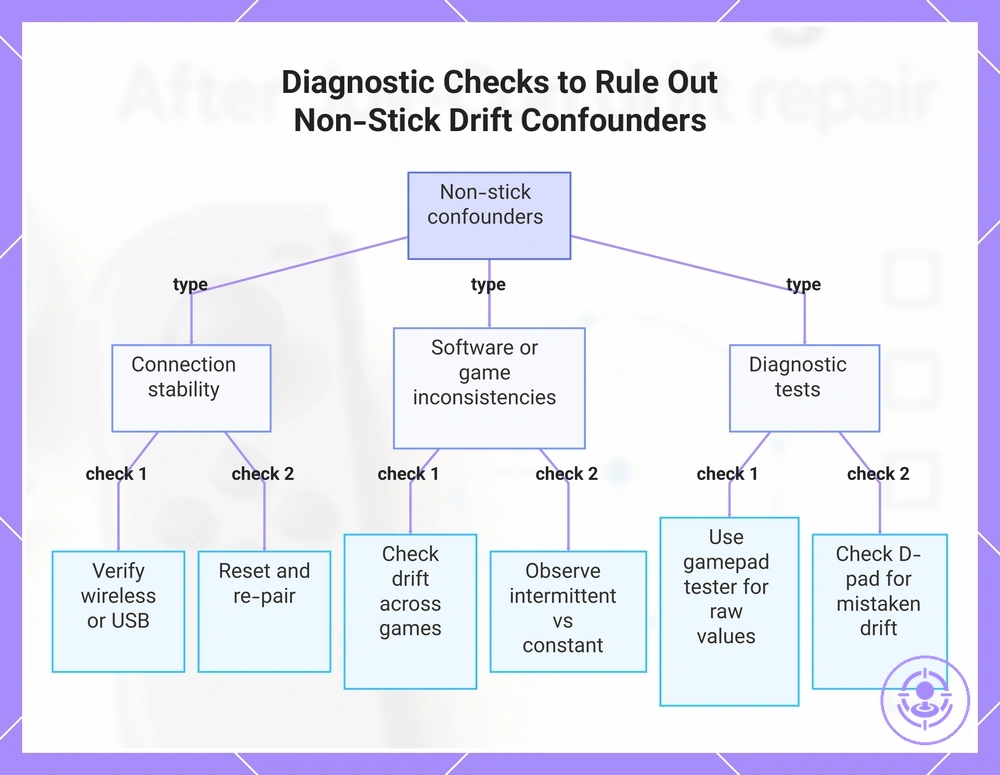
Related Control Checks That Can Be Mistaken for Stick Problems
Non-stick issues—such as connection dropouts, button click inconsistencies, or intermittent input lag—can mimic drift. Ruling out these confounders first prevents unnecessary repeated calibration.
The related control checks that can be mistaken for stick problems help distinguish between stick behavior and system or connection anomalies:
- Verify that the controller’s wireless or USB connection is stable; a weak signal can produce phantom inputs that mimic drift.
- Check if the drift appears consistently across all games or only in specific software titles—inconsistent drift often points to a software or connection confounder rather than the stick itself.
- Press each face button and shoulder button briskly to detect any unintended double-clicks or missed actuations that could create drift-like symptoms.
- Observe whether the drift is constant or intermittent; intermittent symptoms are more likely caused by connection instability or component wear than by a failed stick module.
- Reset the controller and re-pair it with the console to rule out temporary communication errors that can mimic drift.
- Use an online gamepad tester to view raw stick values; a centered stick that shows zero input typically indicates the problem is elsewhere.
- Check the D‑pad and other directional controls; some users mistake D‑pad issues for stick drift when the input appears as unintended movement.
If all non-stick confounders are ruled out and drift persists, then the stick itself likely requires attention.
This chart groups the key control checks that help distinguish actual stick drift from non-stick issues like connection drops or software anomalies.
Stick click and directional consistency check
This check verifies that stick click and directional input are consistent, so any drift or performance issue found later is not caused by an unrelated input fault.
Use these checks to compare actual stick behavior against expected signals and identify fail cues:
- Press the stick down and release. Expected: a distinct tactile and audible click registers each time. Fail sign: no click, double click, or inconsistent actuation.
- Slowly tilt the stick in each cardinal direction. Expected: directional input registers smoothly without jumps or dropouts. Fail sign: input skips, snaps to a different direction, or requires excessive force.
- Rotate the stick in a full circle while keeping slight outward pressure. Expected: the on-screen cursor or test value moves along a consistent circular path. Fail sign: the path becomes oval, square, or shows flat spots (circularity error).
- Quickly flick the stick from center to a direction and release. Expected: a single clean input registers per flick. Fail sign: multiple inputs register from one flick, or the return to center is delayed.
- Hold the stick at a partial deflection (e.g., 50%) and release. Expected: the input value returns to zero without overshoot. Fail sign: the value lingers or drifts after release.
- Test each direction multiple times in sequence. Expected: consistent repeatability across all attempts. Fail sign: the direction fails to register on some attempts or registers inconsistently.
Edge-case note: Inconsistent click behavior can be mistaken for drift during gameplay — for example, a click that fails to actuate may cause the character to keep moving in one direction after a flick, mimicking a drift symptom. Isolating this confounder early helps prevent wasted troubleshooting on the stick module itself.
Connection stability check for intermittent input anomalies
This check rules out connection instability as a cause of intermittent input anomalies that might be mistaken for drift.
Check consistency under controlled conditions:
- Wireless interference: Hold other devices at a fixed distance; note whether dropouts coincide with interference changes.
- Distance: Keep controller at constant distance; note whether anomalies occur only beyond a range.
- Signal strength: Keep controller in same position; check whether delays increase when signal bars fluctuate.
- Network congestion: Test at same time with similar load; note whether intermittent behavior worsens during peak.
- Connection medium: Compare wired and wireless modes under identical conditions; look for stability differences.
- Environmental factors: Keep room layout unchanged; note whether dropouts occur near specific appliances or materials.
Dropouts can look like drift.
Unstable connection must be resolved before evaluating calibration or dead zone tests.
When calibration is not working after a Joy-Con drift repair kit install
Calibration failure after a Joy-Con drift repair kit install usually comes from either unstable input conditions or a physical constraint. When calibration is not working, the table below groups symptoms, quick checks, and what each result suggests.
| Symptom | Quick check | What it suggests | Next safe step |
|---|---|---|---|
| Joy-Con still drifts after calibration | Update controller firmware; press SYNC button once and wake the controller | Unstable conditions like outdated firmware or a sync error may prevent calibration from taking effect | Update firmware and reset, then retest calibration |
| Calibration cannot be started or ends prematurely | Inspect for obstruction over the IR motion camera or Joy-Con shell | A physical constraint such as a cover, case, or debris may block the sensor or restrict stick movement | Remove any protective covers; ensure nothing covers the camera and that the stick moves freely |
| Calibration completes but stick does not return to center | Gently move the stick in all directions; feel for rubbing or resistance | A physical interference from the ribbon cable or shell alignment after repair can prevent full range | If physical interference is suspected, do not repeat calibration; proceed to deeper post-repair troubleshooting |
If the quick check reveals a correctable condition—such as a firmware update or an obstruction—address that before repeating calibration. If symptoms persist without a clear cause and all checks point to a physical interference you cannot resolve with simple adjustments, do not repeat calibration; instead troubleshoot drift or dead zones after repair.
Symptoms That Suggest Seating, Alignment, or Assembly Errors
Assembly-like constraint symptoms are repeatable patterns of mechanical behavior that remain consistent across successive attempts.
When consistent across repeated actions, these symptom patterns suggest assembly errors.
- Consistent resistance or binding at a specific point: The mechanism always catches or becomes harder to move at the same position, which may suggest an alignment constraint rather than a software calibration issue.
- Uneven or pulling movement: The component consistently drifts or pulls to one side when released, suggesting uneven seating or alignment. Repeat the release from different starting positions to confirm consistency.
- Noise that repeats at the same location: A clicking, grinding, or squealing sound that occurs at the same angle each time may indicate a misaligned part contacting another surface. Repeat the motion slowly to confirm the pattern.
- Loose or excessive play: Noticeable free movement before engagement, repeatable each time, may suggest a part is not fully seated or secured. Gently move the component without force and observe the same slack to confirm.
- Limited range of motion: The mechanism cannot move through its full intended travel consistently, suggesting a physical obstruction or misalignment. Compare the range against known specifications if available.
- Surface wear marks that appear on one side only: Visible wear or scuffing on one edge suggests uneven contact due to seating or alignment errors. This observation is repeatable over multiple cycles of operation.
Key contrast: consistent restriction signals repeat predictably, while variable sensitivity effects change with angle, speed, or temperature, suggesting a fixed constraint rather than a calibration or condition-dependent factor.
Re-check List Before Treating the Joystick Module as Defective
Before concluding the module is defective, work through this re-check list to rule out setup stability, calibration behavior, and physical feel issues.
- Setup stability:
- Power supply voltage is stable under load (e.g., within expected range).
- All connectors are fully seated and free of loose pins or damage.
- Ground level is consistent and not elevated by unexpected resistance.
- No intermittent connections when the cable or device is moved.
- Calibration behavior:
- Center position returns consistent output voltage (or digital value) each time.
- Full deflection in both directions produces symmetrical readings.
- Output remains stable over repeated movements, not drifting.
- Software calibration, if available, has been performed after any hardware changes.
- Physical feel:
- Joystick moves without unusual friction or binding.
- No audible clicking or scraping that suggests mechanical interference.
- The stick returns to center freely without sticking.
- Clearance around the joystick is sufficient to avoid side loading.
If all items pass but the symptom persists, the issue may still lie in the installation itself. In that case, return to the joystick replacement steps to verify alignment, soldering, and mechanical seating. Avoid repeated calibration loops without first confirming hardware integrity.
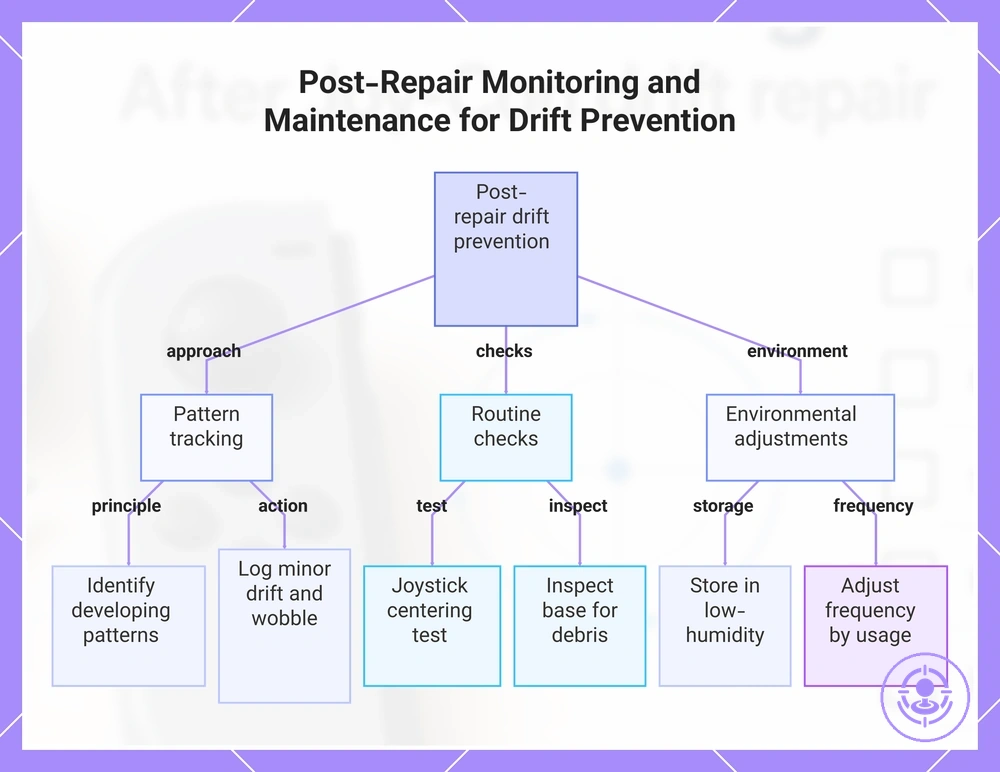
Post-repair monitoring and maintenance to reduce drift returning
Post-repair monitoring helps reduce the chance of drift returning by catching small changes before they become problems. Track patterns, not one-off events.
Your usage intensity and environment affect how much monitoring and maintenance reduce recurrence risk.
- Quick joystick centering test after each session to detect early drift.
- Inspect joystick base for debris and dust; clean if needed.
- Store controllers in low-humidity environment away from direct heat to reduce component degradation risk.
- Retest after repair or disassembly to check if fix holds.
- Record minor input lag or wobble in a simple log to spot trends.
- Use protective cases when traveling to avoid impact damage.
- Routine check every few months to verify joystick returns to center.
- Adjust maintenance frequency based on usage intensity and environmental conditions.
For example, if you notice a slight upward drift after a long session, note it in a quick log. If the same drift appears again in the next session under similar conditions, it may signal a developing pattern rather than a one-time event. If a pattern emerges, Joy-Con drift repair kit hub provides more information on repair options.
This chart outlines the key monitoring practices, routine checks, and environmental adjustments to reduce the chance of drift returning after repair.
Short-term monitoring after repair and what to record
A short-term monitoring window of a few playing sessions after repair helps confirm joystick stability by recording center position changes and unexpected inputs for later comparison.
During each session, record these observable items for repeatable comparison:
- Center drift – record if cursor or character moves without touching the stick, and when it occurs (e.g., during idle moments).
- Return-to-center behavior – note if the stick snaps back cleanly after release or stays slightly off.
- Input lag – record instances where a directional push is not registered immediately.
- Intermittent dead zones – note if certain directions (up, down, left, right) occasionally stop responding during a session.
- Situational anomalies – record whether the problem appears only during certain games, after extended play, or when the controller is held at a particular angle.
One anomaly across a single session does not confirm drift returned; only a pattern across sessions under the same setup should be retested.
Cleaning and Handling Habits That Lower Future Drift Risk
Consistent cleaning and handling habits can reduce future drift risk, but they won't guarantee a fix for existing drift. The safe practices below are grouped into storage, handling, and gentle cleaning to minimize debris exposure and mechanical wear.
- Storage:
- Store the controller in a clean, dry environment to limit dust and debris accumulation.
- Use a protective case or cover to further reduce airborne particle exposure.
- Avoid leaving the controller in areas with high humidity or temperature extremes.
- Handling:
- Handle the controller with clean hands to reduce oil and residue transfer.
- Avoid eating or drinking near the controller to reduce spills and sticky residue.
- Keep the controller away from dusty or sandy environments.
- Gentle cleaning:
- Gently wipe external surfaces with a soft, dry microfiber cloth to remove dust and fingerprints.
- Use a soft brush to dislodge debris from crevices without forcing it deeper.
- Keep cleaning limited to surface-level care; avoid inserting tools or applying moisture.
Stop cleaning and move to post-repair troubleshooting if drift persists after cleaning, since repeated cleaning may not address internal component wear.