Joy-Con drift repair kit: what it is and when you need one
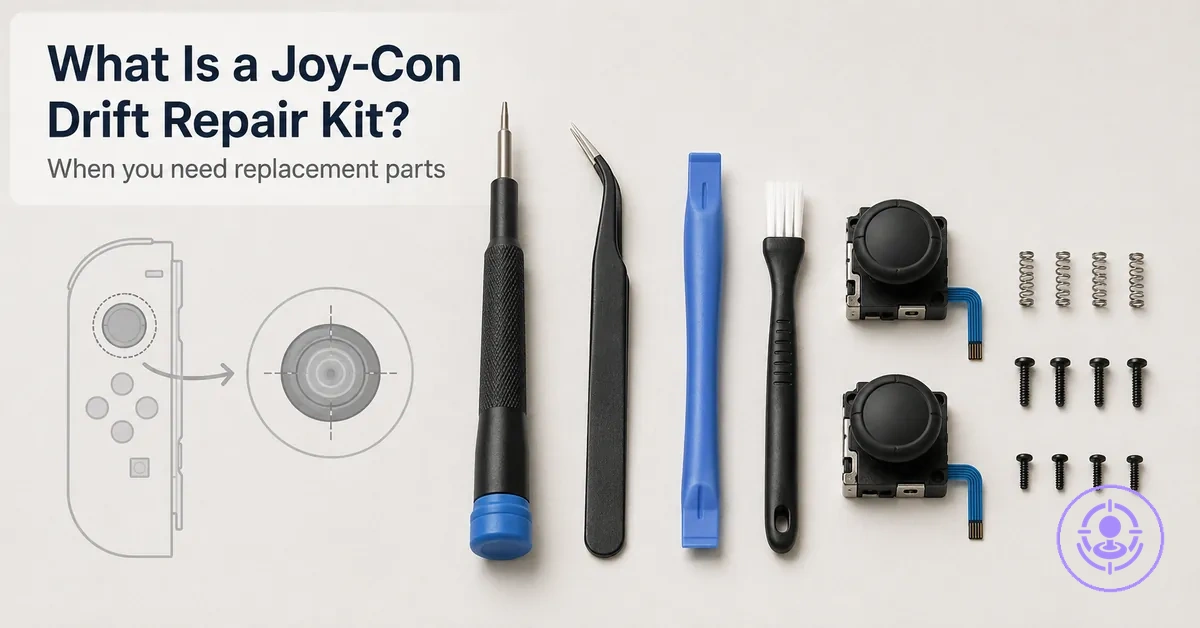
A Joy-Con drift repair kit is a bundle of replacement joystick modules and basic tools for addressing drift on Nintendo Switch Joy-Con controllers. It helps users decide whether this repair option fits their situation.
When a Joy-Con begins registering unintended input during gameplay, the issue may be caused by wear, dirt, or internal failure. Repair kits allow users to replace the analog stick rather than sending the controller for service, but the outcome depends on the controller's condition, part fit, and handling quality. The kit is treated as a category, not as step-by-step repair instructions or deep troubleshooting. Kit-based replacement differs from non-invasive attempts such as cleaning or calibration, which typically address only surface-level causes.
A kit bundles the joystick module alongside tools like screwdrivers and a spudger, while a standalone part may require separate tool purchases.
Joy-Con drift repair kit meaning, purpose, and what “repair kit” refers to
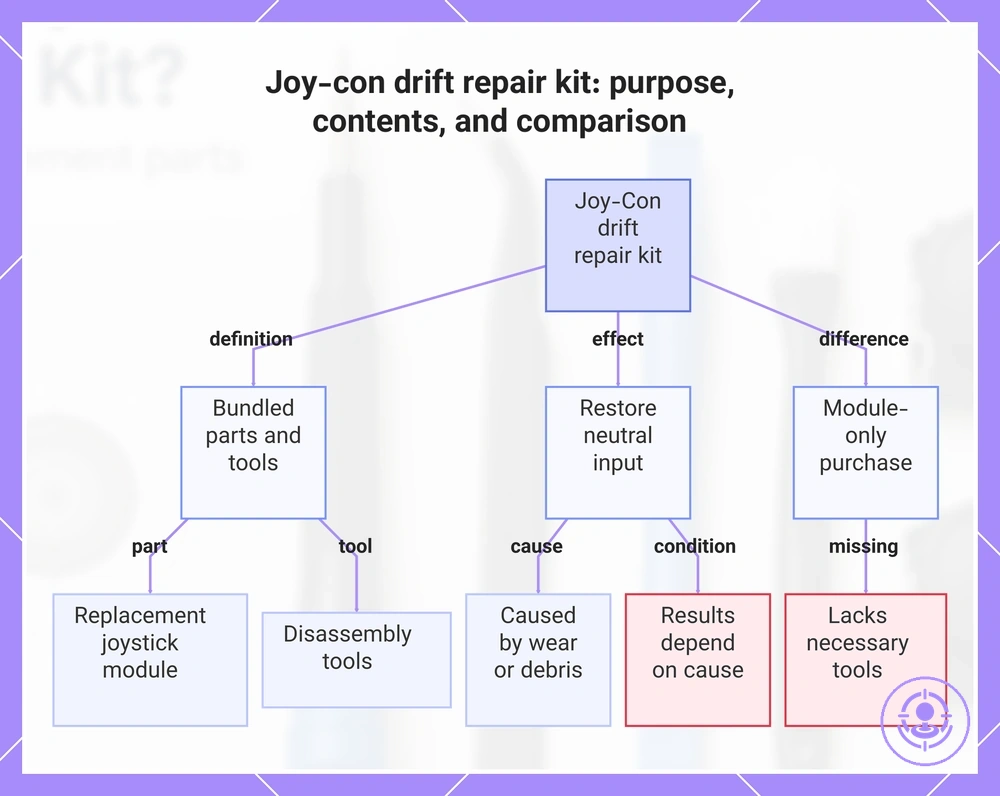
A Joy-Con drift repair kit bundles the parts and tools needed to safely access and replace the analog stick inside a controller. Its purpose is to restore neutral input when drift occurs—caused by wear or debris—though results depend on the cause.
- The kit typically includes a replacement joystick module along with the screwdrivers, prying tools, and tweezers needed to open the controller and swap the component.
This bundled approach differs from buying just a joystick module, which does not include the tools needed for replacement.
This chart explains what a Joy-Con drift repair kit is, its purpose to fix drift, its included parts and tools, and how it compares to buying a joystick module alone.
What Joy-Con Drift Is and What a Repair Kit Is Designed to Fix
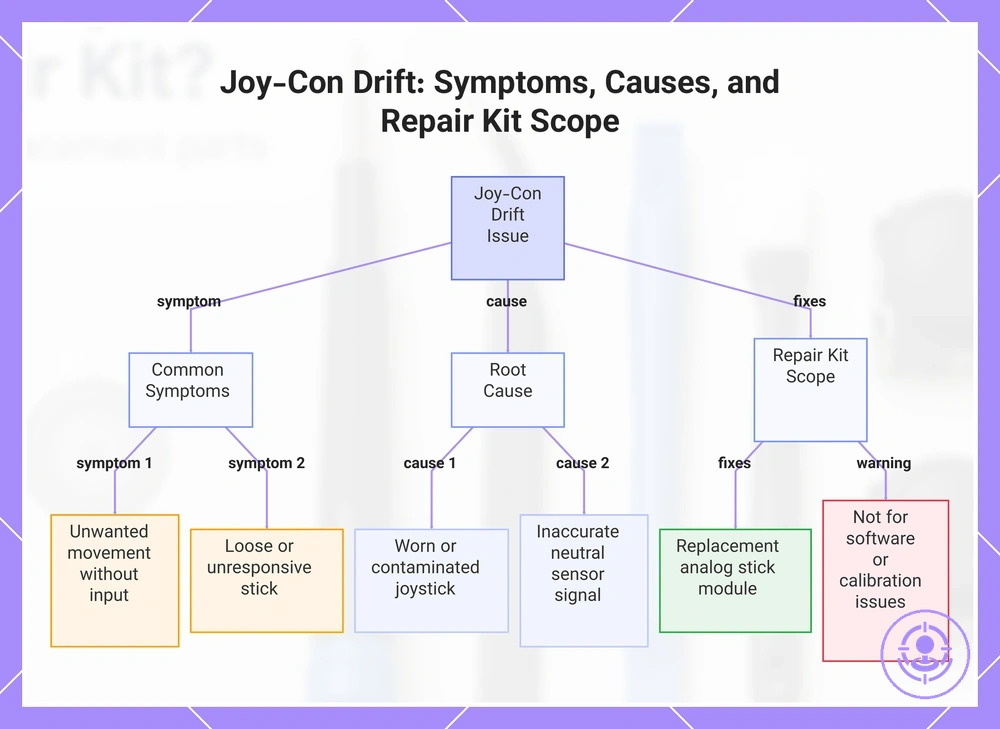
Joy-Con drift occurs when the Nintendo Switch registers movement from the analog stick even when the stick is not being touched. A Joy-Con drift repair kit addresses this by providing replacement joystick modules and tools needed to swap out a worn or contaminated component.
- Character moves or camera pans without input
- Cursor or selection drifts on the home screen
- Analog stick feels loose or unresponsive in certain directions
Drift often develops when the joystick mechanism wears down or collects debris over time. This can cause the sensor to send an inaccurate neutral signal, leading the system to interpret the stick as moving even when it is centered. A repair kit targets this chain by offering a replacement analog stick module and the screwdrivers, spudgers, and latch parts needed to open the controller and swap the faulty component. However, drift-like symptoms—such as erratic input or unresponsiveness—can sometimes stem from software bugs, calibration errors, or a loose connection between the Joy-Con and the console. A repair kit is unlikely to resolve those cases, and updating system settings or checking the rail connection may be more appropriate first steps.
This chart explains the symptoms and root cause of Joy-Con drift, and what a repair kit is designed to fix—including its limitations.
What usually comes in a Joy-Con drift repair kit at a high level
A Joy-Con drift repair kit collects replacement joystick modules and tools to fix stick drift on Nintendo Switch controllers. Its contents usually fall into three categories: analog stick replacements, opening tools, and small spare parts to prevent issues during reassembly.
The annotated image below shows what usually comes in a Joy-Con drift repair kit at a high level, grouped by their role in the repair.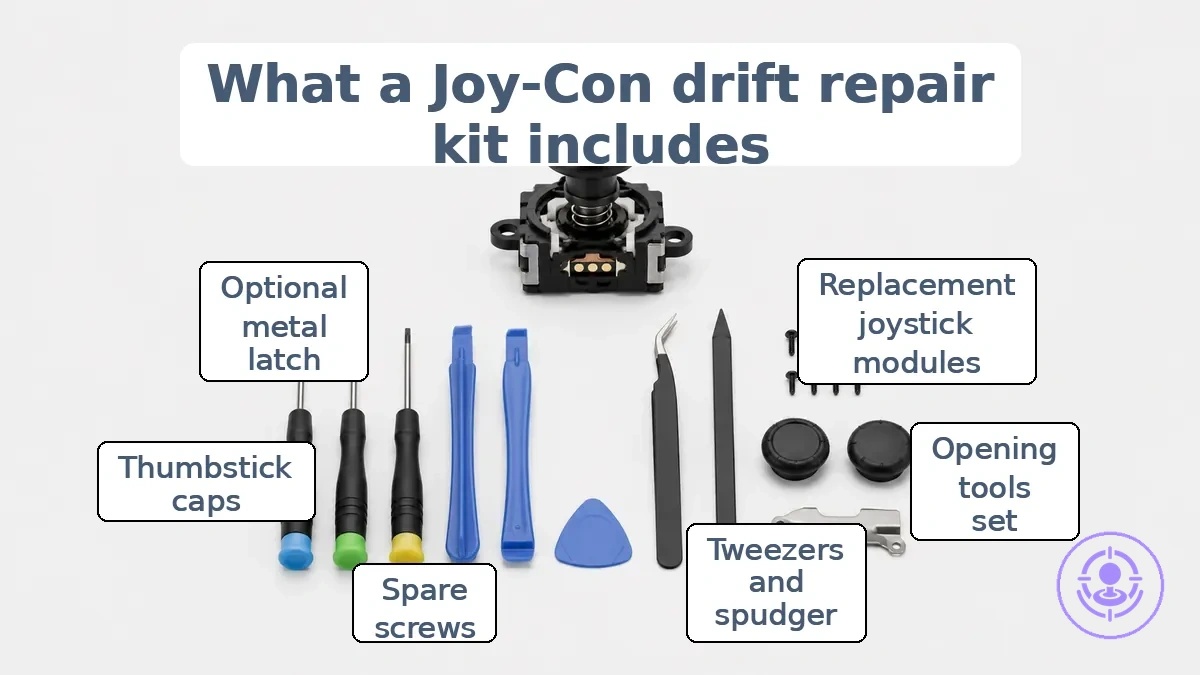
Not all kits contain every item, so check the contents before starting.
- Replacement joystick (analog stick) modules – these correct drift by replacing the worn component that typically causes unintended movement.
- Opening tools (Y-shaped and Phillips screwdrivers, pry tools) – these provide access to the joystick housing while reducing the risk of damaging the controller shell or stripping the tiny screws.
- Tweezers and spudger – these let you manipulate ribbon cables and small connectors, reducing the risk of tearing fragile ribbons during removal or insertion.
- Spare screws and thumbstick caps – these prevent frustration if an original screw is lost or the rubber cap is damaged during disassembly.
- Replacement metal latch (optional) – some kits include alloy locks to fix a loose Joy-Con connection to the console, addressing a separate wear point.
A kit lacking a proper Y1.5 screwdriver risks stripping the tri-wing screws. Missing spare screws could leave the shell unclosable if an original screw drops into a hard-to-reach spot. For a complete parts checklist, see what comes in a Joy-Con drift repair kit.
Joystick replacement modules and why they are the core drift-fix part
Joystick replacement modules are the main component used to correct wear-induced drift in Nintendo Switch Joy-Con controllers.
These modules contain the analog stick mechanism and its potentiometers, which convert physical movement into electrical signals. When drift is caused by worn or contaminated sensing elements, replacing the module often restores accurate neutral tracking.
The outcome depends on proper fit and careful handling; damaged board traces or poor solder joints can leave drift unresolved.
- Replacing the module addresses the drift-prone assembly—the analog stick and its potentiometers—in one step.
- Repair kits for Joy-Con drift typically include replacement modules along with opening tools and screws, making the module the functional core of the kit.
- Drift reduction is most likely when the replacement module matches the original part dimensions.
- A module that restores neutral input also improves the controller's response because the system no longer reads a constant off-center signal.
Opening and handling tools that make access possible without damage
Opening and handling tools in a Joy-Con drift repair kit let you access internal components for Nintendo Switch joystick replacement while lowering damage risk. These typically include screwdrivers, plastic pry tools, and tweezers for disassembly and reassembly tasks.
- Screwdrivers remove small screws on the Joy-Con shell and analog stick bracket, preventing stripped threads that could complicate reassembly.
- Plastic pry tools separate the casing and disconnect ribbon cables while reducing the risk of scratching the circuit board or tearing delicate connectors, lowering the chance of needing more repairs.
- Tweezers enable precise handling of small parts such as screws, springs, and cable ends, reducing the risk of dropping or misplacing components that could interfere with joystick alignment.
- Using all tools together supports accurate reassembly by matching each tool to its intended purpose during the Joy-Con repair.
Small spares and consumables that help the repair go smoothly
A Joy-Con drift repair kit often includes small spares and consumables that help avoid interruptions when replacing a worn joystick on a Nintendo Switch. These parts typically cover common failure points like stripped screws, loose connectors, or misaligned components that could otherwise stall the repair.
Examples grouped by the problem they prevent and the effect on repair continuity:
- Replacement screws – if the original fasteners strip or are lost, spare screws help prevent disassembly delays and keep the joystick module accessible.
- Cable ties – when internal cables need routing, cable ties help prevent loose wires from interfering with the analog stick's neutral position.
- Adhesive pads – if the original adhesive loses its grip, replacement pads help prevent the module from shifting and maintain consistent input registration.
- Ribbon cable retainers – when a flex connector loosens, a retainer helps prevent intermittent signal loss that can mimic drift after the replacement.
- Alignment guides or spacers – if shell tolerances vary, a guide helps prevent misalignment that can cause the thumbstick to bind or register off‑center.
Compatibility Basics for Joy-Con Drift Repair Kits Across Switch Controllers
Compatibility for Joy-Con drift repair kits involves selecting a replacement joystick module that matches both the controller variant and the intended side. The module must be designed for either the standard Joy-Con or the Nintendo Switch Lite controller, as the internal layout and access differ.
The annotated visual below illustrates the compatibility basics for Joy-Con drift repair kits across Switch controllers.
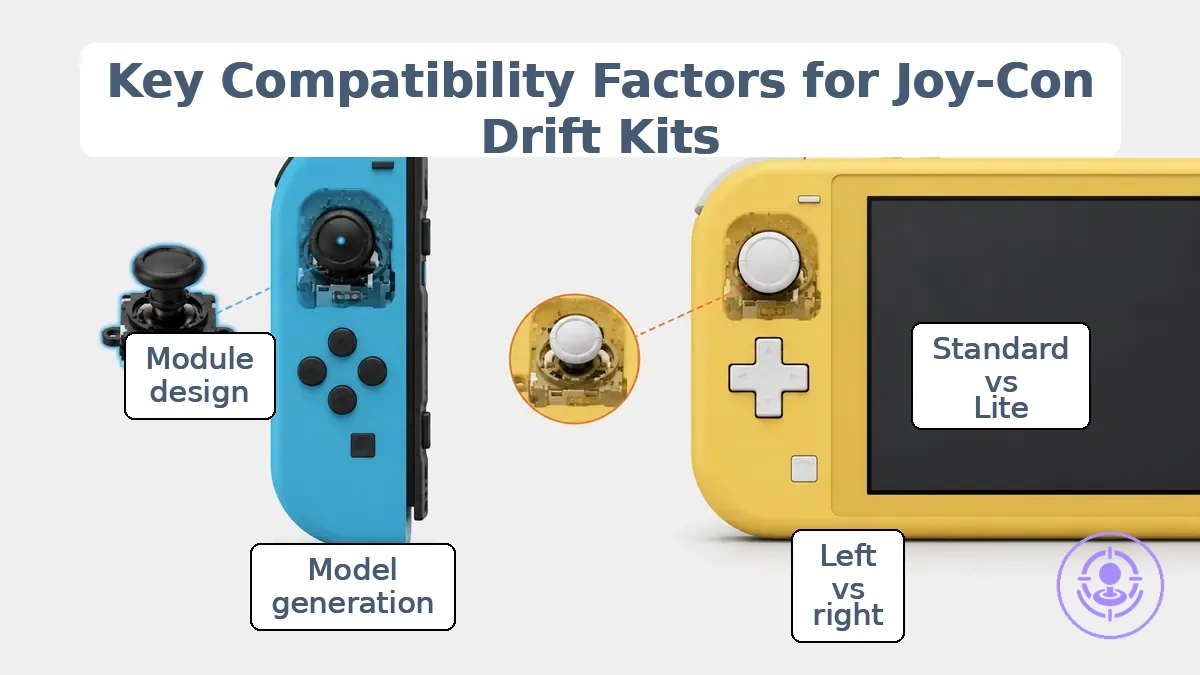
Standard Joy-Con controllers are simpler to open than the Switch Lite, which requires disassembling the console body. Hardware revisions may affect fit; verifying the part shape before purchase can help prevent mismatches.
For example, installing a standard Joy-Con module into a Switch Lite without checking the ribbon cable orientation may cause a poor connection. Opting for a kit that explicitly lists compatibility with your specific model reduces the chance of a mismatch.
Before ordering or opening a controller, confirm the following compatibility factors:
- Controller variant: Standard Joy-Con (removable) vs Switch Lite (built-in). Opening procedure and tool access differ.
- Left vs right side: Some kits include a single module for one side; others include a pair. Verify that the kit covers the required side.
- Model generation: Kits may list compatibility with multiple Switch models (standard, Lite, OLED). Confirm with the seller if the kit covers your specific model.
- Module design: The replacement joystick should typically match the original in size, connector type, and mounting points.
Standard Joy-Con vs Switch Lite joystick differences that affect kit fit
Standard Joy-Con and Switch Lite joysticks have different internal assemblies, which affect whether a drift repair kit fits correctly. Although the analog stick mechanism is often the same in both models, a kit intended for one model may still not fit without checking.
- The device type—Joy-Con or Switch Lite—affects the housing shape and screw placement, determining whether a standard replacement module fits without modification.
- The analog stick module has a different part number for each model, reflecting possible revisions that alter fit despite an identical external design.
- Ribbon cable length and connector orientation vary between standard Joy-Con and Switch Lite assemblies, affecting whether the replacement module reaches the correct socket on the Lite's mainboard.
- The access method differs—the Switch Lite's integrated body requires a different approach than a detachable Joy-Con, so the tools included in a repair kit may or may not be sufficient.
Left vs right Joy-Con considerations when matching replacement parts
Left and right Joy-Con drift repairs on the Nintendo Switch require side-aware matching because joystick modules are identical across sides but the shells, button boards, and rail assemblies differ. When ordering a repair kit, consider these three points.
- Drifting side: Determine which side is drifting – left, right, or both – so you know which joystick module(s) to replace.
- Controller type: Standard Nintendo Switch Joy-Con shells and modules are generally not compatible with Switch Lite, which uses built-in controls that cannot typically be swapped with separate parts.
- Quantity needed: If drift is on one side only, one module may be enough; if both sides drift, order two modules to handle both repairs at once.
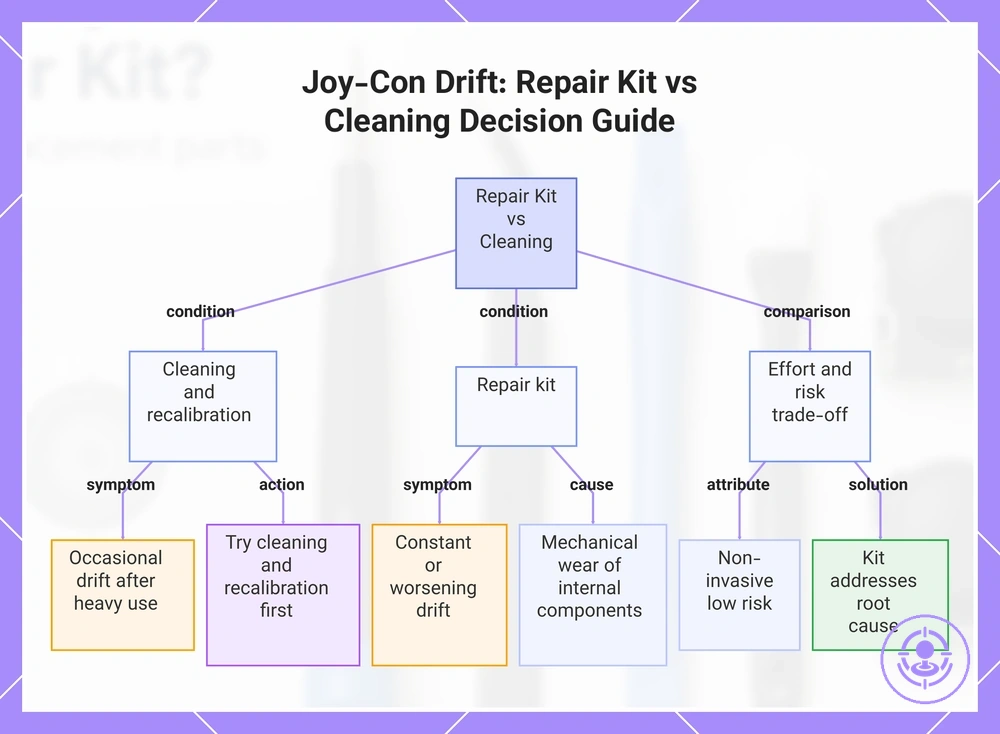
When you actually need a repair kit instead of quick checks or cleaning
If drift continues after basic cleaning and the joystick shows signs of mechanical wear rather than temporary debris, a Joy-Con drift repair kit is often the more practical option than quick checks or cleaning alone. When the analog stick still registers unintended input after surface dust removal or recalibration, the internal module may be physically worn.
The decision between a kit and non-invasive methods depends on the drift persistence pattern and what it signals.
- When drift appears only occasionally or after a period of heavy use, a quick check of the joystick’s neutral position or a gentle cleaning may resolve it.
- When drift is constant, worsens over time, or returns soon after cleaning, the cause is likely mechanical wear of the analog stick’s internal components. In that case, a repair kit with tools for opening the controller and replacing the module is usually the preferred path.
The effort and risk trade-off is clear: non-invasive checks carry low risk but may not fix deeper wear, while a kit requires careful opening and screw handling but addresses the root cause when wear is confirmed. See our comparison page on when to use a repair kit vs cleaning for more on the differences.
A single symptom like intermittent drift does not guarantee a kit is needed; it may indicate a temporary issue that resolves with a simple recalibration.
This chart shows the conditions that determine whether a repair kit or non-invasive cleaning/recalibration is the right solution for Joy-Con drift.
Signs the drift is likely wear-related and replacement is the realistic fix
Persistent drift after cleaning and calibration is a key sign of mechanical wear inside the joystick module of a Nintendo Switch Joy-Con. For example, if the drift is constant and the thumbstick does not return to a precise neutral center, the potentiometers or housing may be physically degraded. A Joy-Con drift repair kit that replaces the analog stick is a realistic fix when worn internal components cause the drift, rather than temporary debris or software issues.
Signs pointing to wear rather than temporary issues include:
- Constant drift at rest: The joystick registers input even when untouched, indicating worn potentiometers or bent springs, which prevents accurate neutral input. Replacing the analog stick module removes the degraded part.
- Drift that worsens with use: If the drift becomes more pronounced after extended play, the internal components are likely degrading further. Normal cleaning no longer restores proper input response.
- Drift only in one direction: Often points to a specific worn contact surface inside the joystick. The neutral position may be off in that axis, and replacement can restore even response.
- Drift that returns after calibration: If calibration provides only temporary correction, the hardware cannot maintain the set zero point. This often signals wear that typically requires replacement.
- Unresponsive or sticky movement: When the thumbstick feels loose or does not snap back, the spring or pivot has lost tension, affecting input precision. Module replacement is the practical fix.
- Drift accompanied by clicking or grinding: Physical damage inside the joystick housing produces abnormal sounds, and the mechanism is no longer smooth. Replacement eliminates the damaged assembly.
Signs a non-replacement attempt is worth trying before opening the controller
A non-replacement attempt is worth trying when Joy-Con drift is mild, intermittent, does not persist across all inputs, or is linked to software issues rather than hardware wear. If the issue resolves with recalibration or software adjustments, the hardware likely does not need replacement.
Drift that appears only in certain games or after the controller enters sleep mode may be tied to calibration settings rather than internal wear.
- Intermittent drift not linked to physical damage: often correctable through system recalibration.
- Drift that disappears after a Nintendo Switch restart: may indicate a temporary firmware or software glitch.
- Drift present only in a specific game: likely caused by in-game settings or tilt controls rather than joystick wear.
- Drift that changes with controller orientation: suggests a calibration offset that can be reset through the system menu.
- Drift accompanied by input lag only in wireless mode: could be interference or connection issue rather than a hardware issue.
When an official repair route makes more sense than using a DIY kit
A manufacturer repair makes more sense when warranty coverage, risk tolerance, skill comfort, or time constraints outweigh the benefits of using a Joy-Con drift repair kit.
- Warranty: Under warranty, using a drift repair kit may void coverage, making a manufacturer repair the safer choice.
- Skill: Lack of confidence in opening the Joy-Con and handling the delicate joystick module increases risk of damage, so manufacturer repair is the safer option.
- Time: When speed is critical, a manufacturer repair may be faster if the shop has immediate availability, since a DIY kit requires preparation time.
- Risk: Discomfort with possibly worsening drift or damaging the analog stick makes manufacturer repair a more predictable choice.
- Tools: Without specific screwdrivers and opening tools for a drift repair kit, the risk of stripped screws or broken clips makes manufacturer repair more cost-effective.
Joy-Con drift repair kit vs joystick replacement: how the terms relate
Joy-Con drift on a Nintendo Switch often requires replacing the analog stick module; a repair kit bundles that module with tools, while a standalone joystick replacement includes only the module. The annotated visual illustrates the scope difference between a Joy-Con drift repair kit and a joystick replacement.
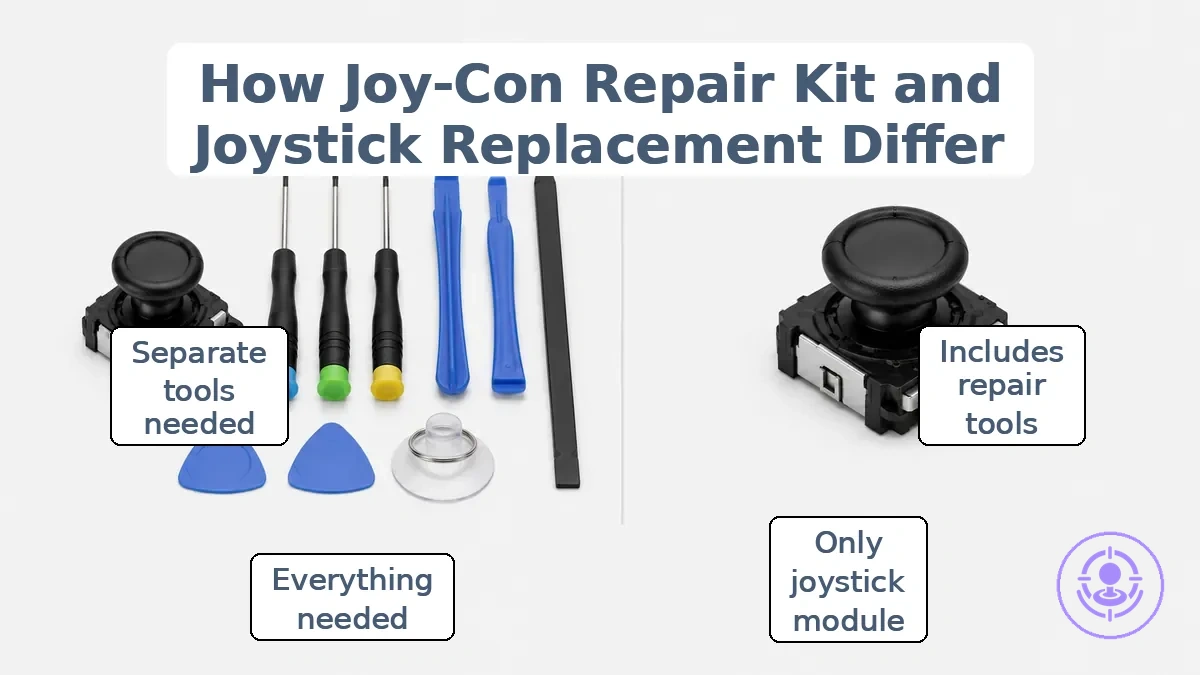
"joystick replacement" is often one part, while "repair kit" implies a bundle. The table clarifies how their scope and implied contents differ.
| Term | What it includes | What it implies |
|---|---|---|
| Repair kit | Typically includes a new analog stick module plus tools such as a screwdriver and opening picks. | Typically implies that the package contains everything needed to perform the replacement, often without needing to buy additional tools separately. |
| Joystick replacement | Only the joystick module (the component that registers input). | You may need to source tools separately; the purchase covers only the replacement part. |
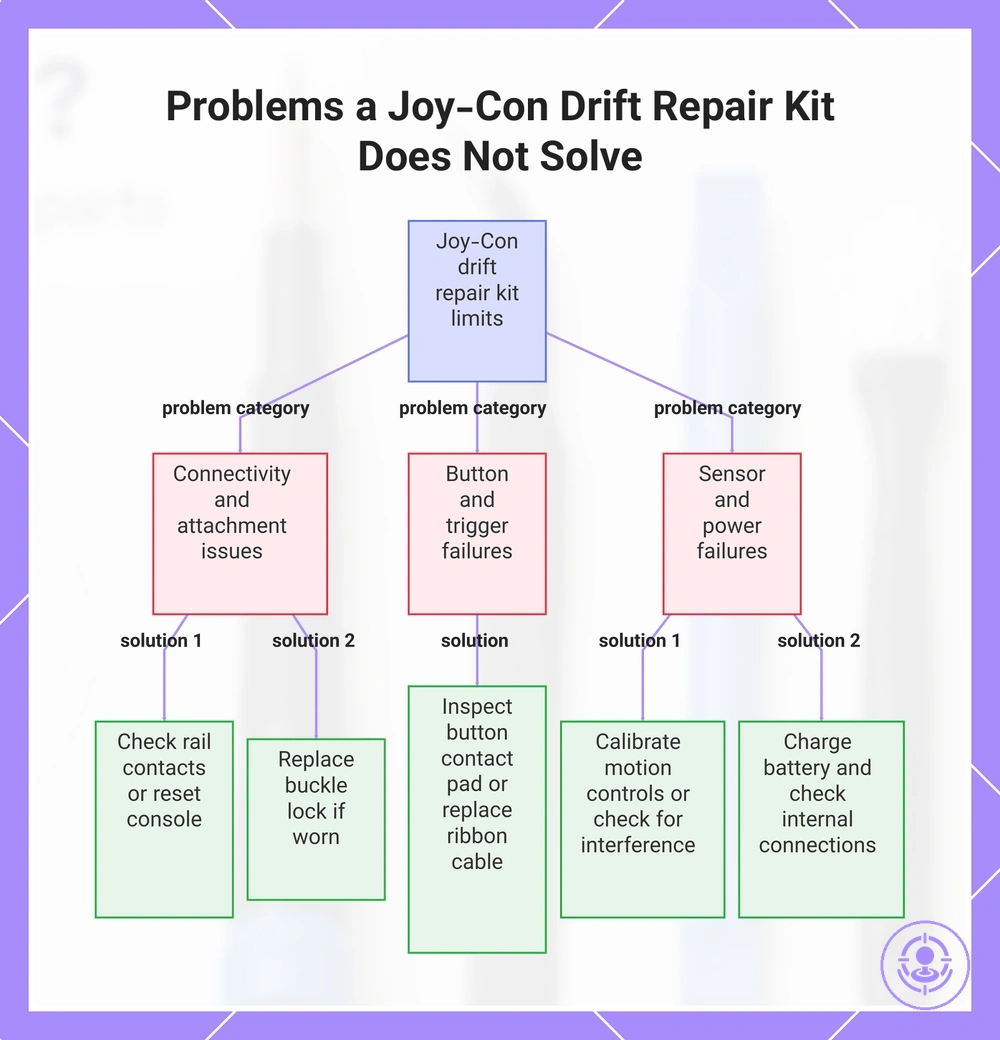
Limits of a Joy-Con drift repair kit and problems it won’t solve
A Joy-Con drift repair kit for Nintendo Switch targets drift caused by the joystick module itself, usually through cleaning or replacing the analog stick. However, problems from other controller components—like connectivity issues or button failures—are typically not covered by the kit.
Problems that do not come from the joystick module fall outside what a drift repair kit can address. A safer next step is listed for each issue below.
- Connectivity problems (handheld or wireless disconnection): These involve the rail connector, antenna, or Bluetooth interference rather than the joystick assembly, so the kit typically does not address them. Safer next step: check the rail contacts or reset the console.
- Shoulder button or trigger failure: The kit provides tools for opening the Joy-Con and sometimes extra joystick modules, but it typically does not include replacement switches or flex cables for buttons, because the fault is in that separate mechanism. Safer next step: inspect the button contact pad or consider replacing the ribbon cable.
- Joy-Con won’t stay attached: This is caused by worn lock tabs on the rail, not the joystick module, so the kit typically includes no parts or procedures for the locking mechanism. Safer next step: replace the buckle lock if it is worn.
- Motion control or NFC/amiibo scanning issues: These rely on separate sensors (gyroscope, accelerometer, NFC antenna) outside the joystick circuit, so cleaning or replacing the analog stick cannot restore motion sensing or tag reading. Safer next step: calibrate motion controls or check for interference.
- Loss of all function (no power or no response): If the Joy-Con does not turn on or does not respond to any input, the problem may be a dead battery, a disconnected internal cable, or a motherboard fault—none of which the kit typically addresses. Safer next step: charge the battery and check internal connections.
This chart shows the types of controller issues that a Joy-Con drift repair kit cannot address, along with recommended safer next steps for each problem.
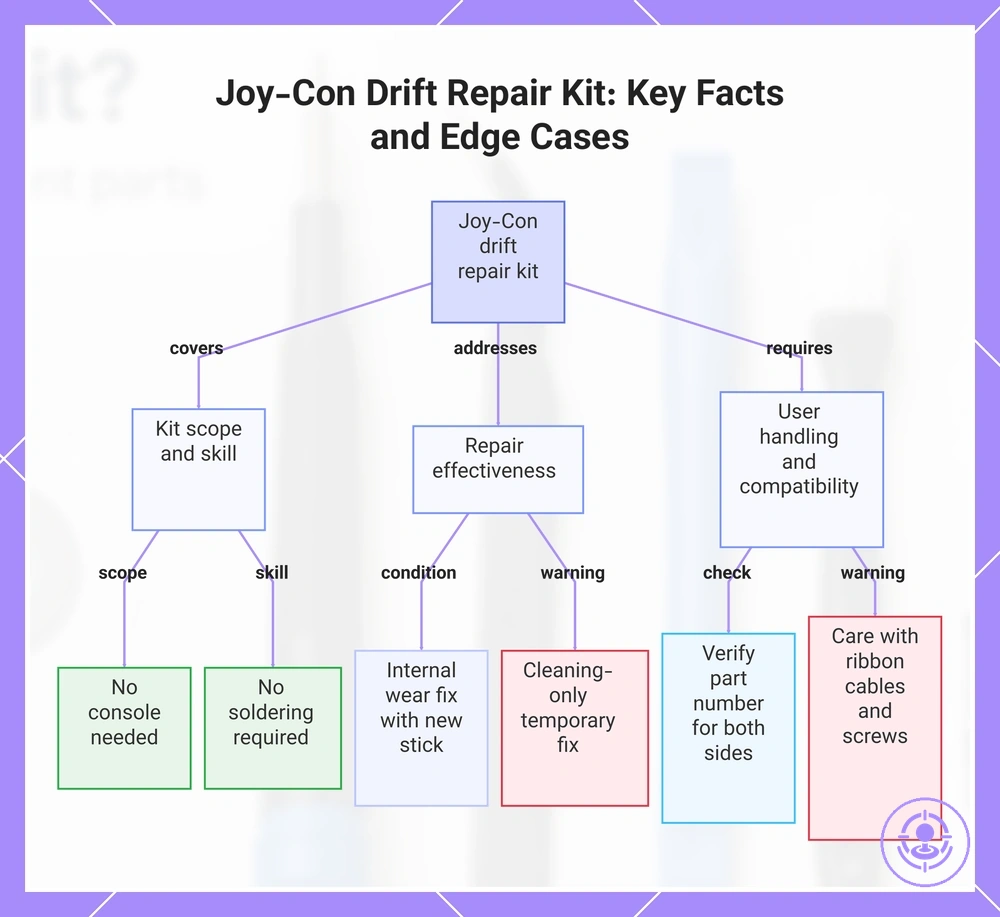
Joy-Con drift repair kit FAQ for common doubts and edge-case questions
This FAQ focuses on edge-case outcomes that depend on wear level, fit, or handling when using a Joy-Con drift repair kit.
Question: Do I need to send my whole console to use a repair kit?
Answer: No — a Joy-Con drift repair kit is designed for the controller only, so you can fix it at home using the bundle’s tools and replacement part without shipping your Switch.
Question: Can a repair kit fix drift caused by internal wear rather than debris?
Answer: Yes, if the kit includes a new analog stick — replacing the worn joystick can resolve drift that cleaning cannot, but success depends on whether the internal component is the root cause and whether the replacement part fits your controller model.
Question: Does using a repair kit require soldering or professional skills?
Answer: Most kits are DIY-friendly with plug-and-play parts and basic tools like a tri-wing screwdriver. You do not need soldering if the kit includes a complete joystick module, but care is needed with ribbon cables and small screws.
Question: Can a cleaning-only kit fix drift permanently?
Answer: A kit that provides only cleaning tools may fix drift temporarily when the issue is caused by dust or debris under the joystick skirt. If the drift returns after cleaning, the internal potentiometer may be worn, and replacing the analog stick is a more reliable solution.
Question: Does a repair kit work for both left and right Joy-Con?
Answer: Many kits include parts that are compatible with both sides, but you should confirm the part number or read the product description. Some kits are sold as single-side replacements, while others are a bundle with two joysticks for fixing both controllers.
This chart summarizes the key answers from the Joy-Con drift repair kit FAQ, covering its scope, repair effectiveness, and user handling requirements.
Is Joy-Con drift actually fixable and what 'fixed' usually means
Joy-Con drift is often fixable when you address the underlying cause, but results vary. 'Fixed' usually means the joystick registers neutral input again, restoring normal control, though drift can return depending on wear and how you use the controller.
When drift comes from worn internal parts, using a Joy-Con drift repair kit bundle with the right tools and a replacement part can help restore function, but how long it lasts depends on part quality and how you use the controller.
Do you have to take a Joy-Con apart to use a repair kit
Most Joy-Con drift repair kits require opening the controller to access the internal parts. The bundle of replacement parts and tools is designed for internal access, specifically to the analog stick module where drift occurs.
Some drift issues may be resolved by recalibration or cleaning first, but if those steps fail, the kit replaces the faulty component.
Can contact cleaners or WD-40 style sprays replace the need for a kit
Contact cleaners or WD-40 style sprays cannot replace a Joy-Con drift repair kit bundle when drift stems from mechanical wear in the analog stick assembly. The bundle includes the specific tools and replacement part needed.
They may help if the drift results from dirt or oxidation. Otherwise, physical replacement of the joystick module is more realistic.