Is a Joy-Con drift repair kit worth it: value trade-offs, risks, and outcome expectations
Whether a Joy-Con drift repair kit is worth it depends on weighing its cost and effort against the likely outcomes and risks.
Success varies with joystick condition, part quality, and installation care. A weak link in any of these can lead to the repair failing, with drift returning weeks or months later.
Whether it is worth it comes down to the cost saved versus the risk of redoing the repair. Key variables to consider:
- Repair kit cost: usually lower than buying a new Joy-Con or paying for repair.
- Time investment: depends on your experience and skill.
- Skill needed: basic electronics handling, patience, and a steady hand.
- Expected outcome: ranges from a temporary fix to extended normal use, with no promise of permanent resolution.
- Tolerance for rework: how willing you are to repeat the process if drift comes back.
- Alternatives: warranty service (if available), paid repair, or new controllers.
This page focuses on the worth-it trade-off; detailed repair instructions are covered elsewhere.
What a Joy-Con drift repair kit changes and what it does not address
A Joy-Con drift repair kit is a set of components to replace the joystick module (the analog stick assembly) inside a Joy-Con controller, targeting the part most commonly associated with drift symptoms. It addresses only this module and does not cover other potential causes.
The diagram shows what the kit replaces and what remains outside its scope.
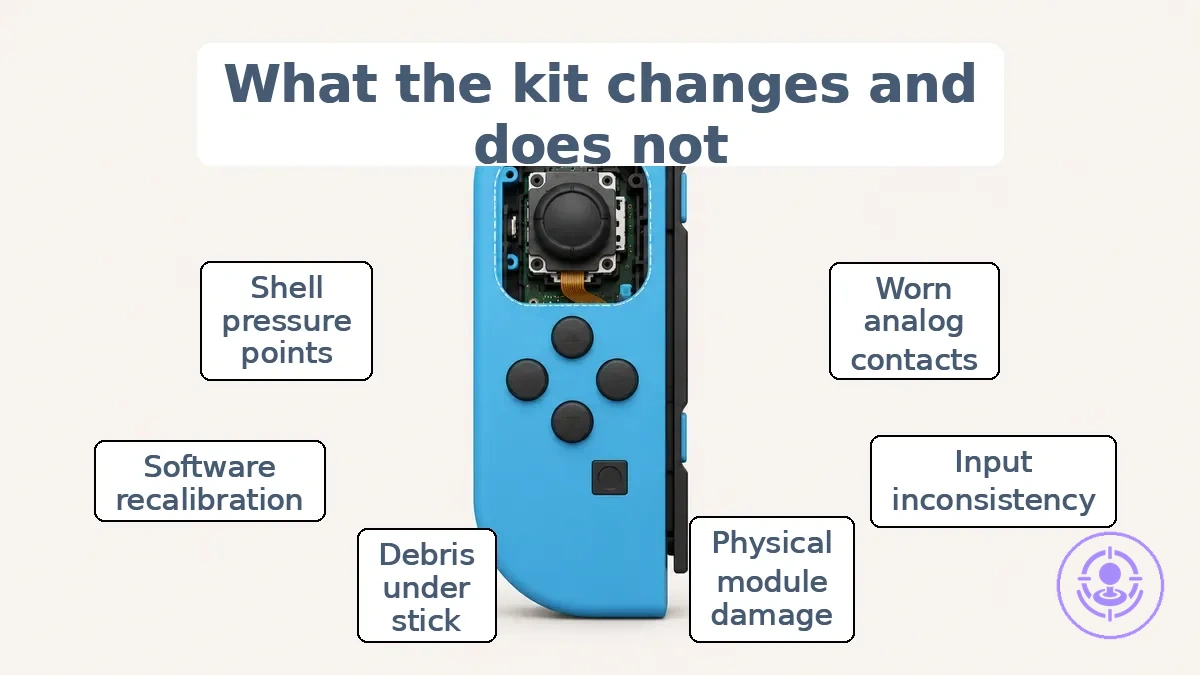
- Likely improved
- Drift caused by worn analog stick contacts
- Unresponsive or erratic movement from joystick wear
- Input inconsistency due to degraded internal components
- Physical damage to the joystick module
- Calibration issues caused by joystick wear that persist after software reset
See the Joy-Con drift repair kit overview for a broader explanation.
- Not addressed
- Drift caused by debris or dirt under the stick
- Software-related drift fixable by recalibration or firmware update
- Drift from damaged ribbon cables or motherboard issues
- Drift from worn-out springs or mechanical parts outside the module
- Drift resulting from controller shell warping or pressure points
The kit does not guarantee a permanent fix if the root cause lies outside the joystick module.
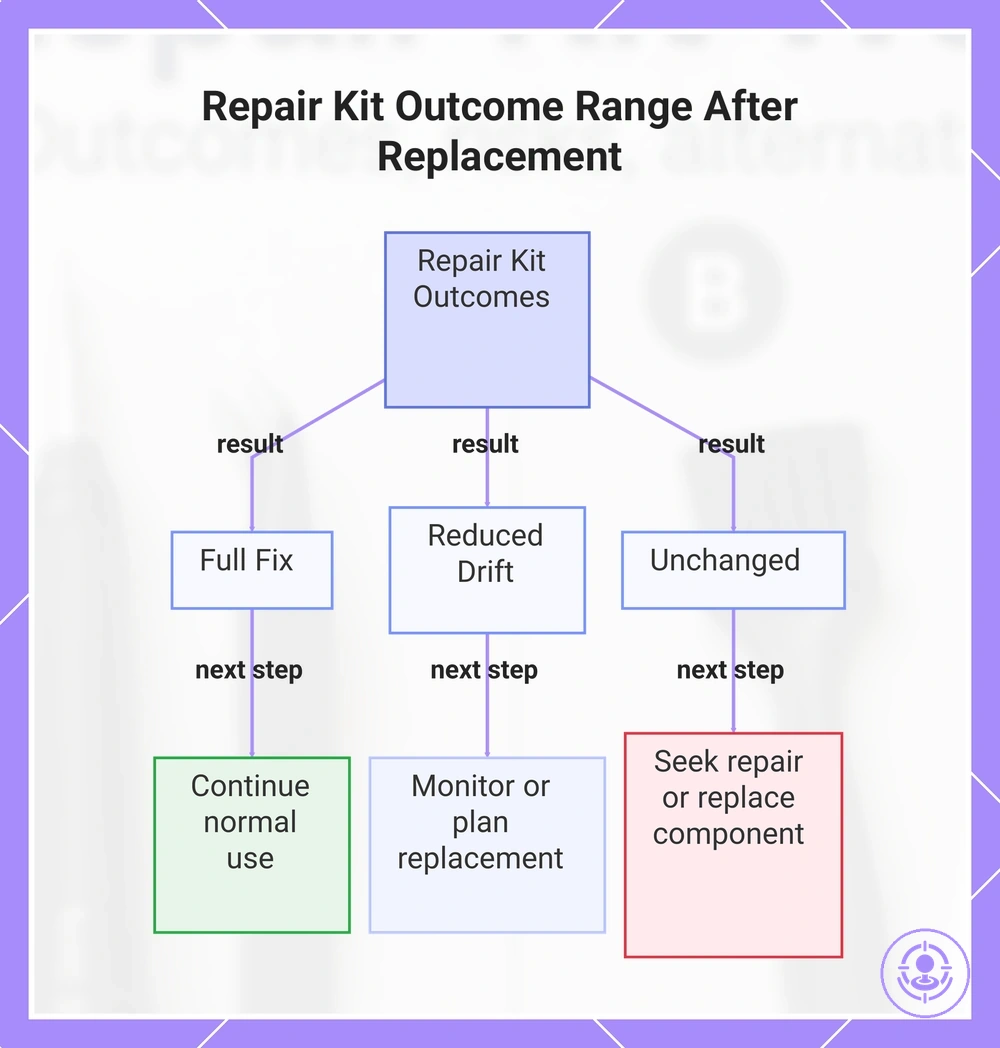
Repair kit outcomes in real use: what 'success' looks like after replacement
Success after a repair kit is an outcome range, not a guarantee. The result depends on damage type, kit quality, and execution, so expectations should match the condition.
- Full fix – Drift can be eliminated and stability over time restored; the next decision is typically to continue normal use with no further action needed.
- Reduced drift – Drift intensity drops but does not disappear; usability typically improves, but the next decision is to monitor for wear return or plan a future replacement.
- Unchanged – Drift persists at the same level; the next decision is usually to seek a professional repair or replace the component.
This chart shows the three possible outcomes after using a repair kit and the next decision for each.
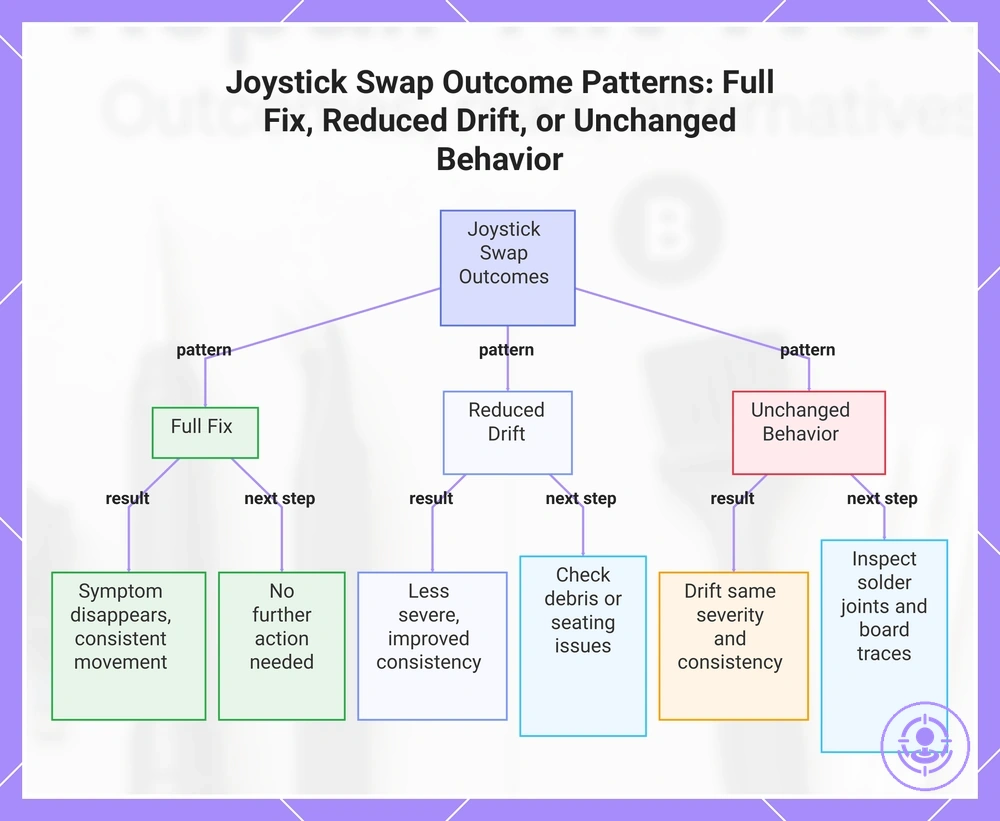
Outcome Patterns After a Joystick Swap: Full Fix, Reduced Drift, or Unchanged Behavior
The outcome after a joystick swap falls into three patterns: full fix, reduced drift, or unchanged behavior.
- Full fix: Symptom can feel like it disappears; stick movement feels consistent, meaning the new component works and the swap addressed the root cause. Next decision cue: No further action needed; controller ready for normal use.
- Reduced drift: Symptom less severe but still noticeable; consistency improves but does not return to zero, indicating partial resolution and that the underlying cause may remain. Next decision cue: Check for debris or seating issues; consider re-seating or replacing if consistency remains poor.
- Unchanged behavior: Drift remains at the same severity and consistency as before, indicating the swap did not address the cause and the issue is likely external to the joystick module. Next decision cue: Inspect solder joints and board traces; a different diagnostic approach or professional service may be needed.
This chart shows the three possible outcomes after a joystick swap and the next decision cues for each.
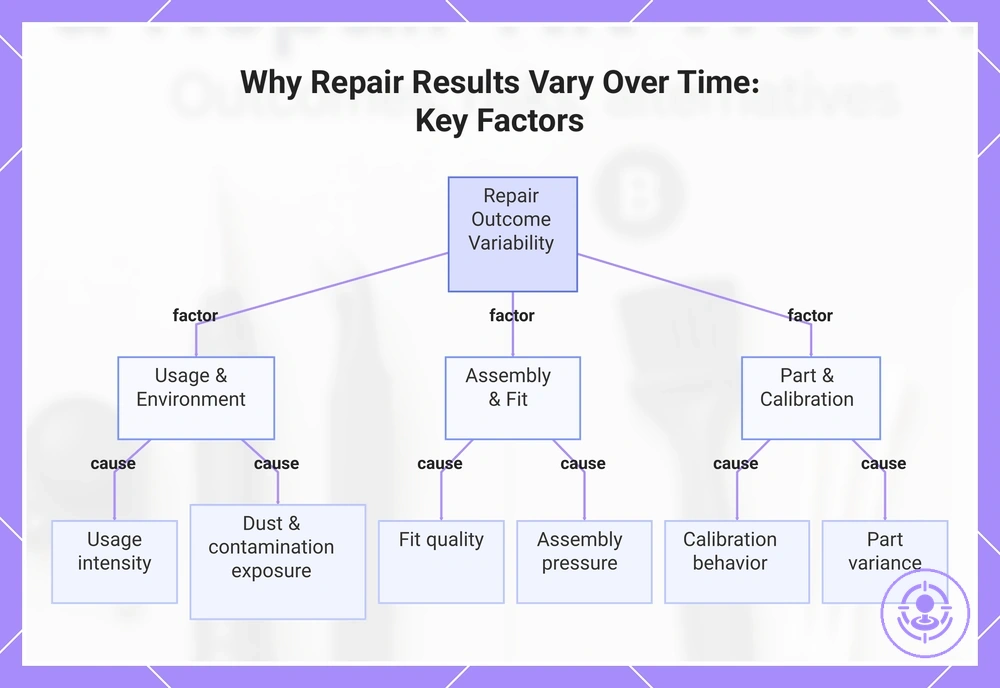
Why results vary over time: durability, wear return, and quality variance in parts
The longer-term value of a repair depends on durability, tolerance variance, part quality, usage intensity, and the likelihood of wear return—not only on whether symptoms disappear right after installation. Immediate improvement does not guarantee sustained performance.
Several variables affect the long-term value of a repair:
- Usage intensity — how often and how aggressively the controller is used
- Dust and contamination exposure — environmental particles that can accelerate wear
- Fit quality — how precisely the part sits within the assembly
- Calibration behavior — whether the part maintains a consistent neutral signal
- Assembly pressure — tightness of the housing and connection after reassembly
- Part variance — dimensional differences between units of the same type
These factors interact, so no single part guarantees identical long-term results across different controllers and usage patterns.
This chart shows the six main factors that cause long-term repair outcomes to vary across different controllers and usage patterns.
Success rate drivers: controller condition, installation quality, and calibration limits
Success rate drivers — controller condition, installation quality, and calibration limits — determine whether a repair is likely to hold, not the kit alone. These drivers determine if a DIY repair offers good value or if alternatives are more cost-effective.
The image labels the three success rate driver categories, and the table organizes them for assessment.
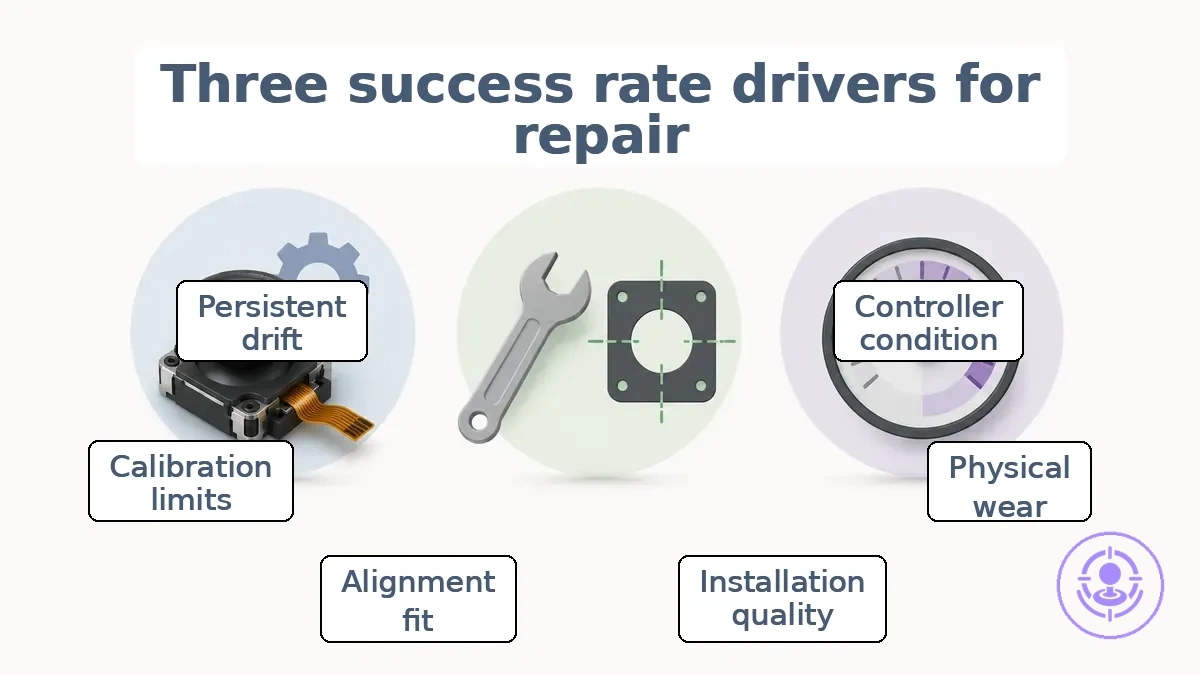
| Driver category | What to look for | What it changes | Decision implication |
|---|---|---|---|
| Condition signals | Physical wear, contamination, or visible damage in the analog stick mechanism | Whether cleaning or replacement can restore function or whether the part is too degraded | Advanced wear favors part replacement over cleaning; higher condition degradation lowers the likelihood of a lasting fix |
| Execution signals | Alignment of the replacement part, fit of the housing, and solid connections | Whether the repair holds over time without stiffness or unintended inputs | Poor alignment or loose fit lowers the probability of long-term success; careful installation can approach factory performance |
| Calibration/limits signals | Persistent drift after the hardware fix, or behavior that changes with calibration routines | Whether the root cause is mechanical or whether a deeper calibration issue remains | If calibration limits are reached, DIY is less likely to fully resolve drift; alternative solutions may be needed |
Evaluating these driver categories clarifies whether your situation favors a DIY route or an alternative approach.
Some assume a repair kit alone is sufficient, but condition, installation quality, and calibration limits each set boundaries on what any kit can achieve. The right frame is criteria before repair; troubleshooting after.
Signals that the joystick is the main cause vs a different drift cause
Signals pointing to the joystick cause can be separated from those suggesting another cause. This separation increases confidence when deciding whether joystick replacement is justified.
Signal checks help distinguish joystick cause from other cause:
- Gradual worsening drift over weeks or months suggests progressive mechanical wear, increasing confidence in joystick cause.
- Sudden drift after exposure to dust or liquid suggests contamination rather than wear, pointing to another cause and decreasing confidence in joystick replacement.
- Considering the repair kit vs cleaning decision can clarify the next step when the signal is unclear.
- Erratic jitter or shaky cursor movement suggests unpredictable internal wear, increasing confidence in joystick cause.
- Consistent drift across all games and after calibration resets suggests a hardware issue in the joystick sensor, increasing confidence in joystick cause.
- Intermittent drift that changes with temperature or controller orientation may indicate digital reading noise from other components, lowering confidence in joystick replacement.
- Physical stick wobble or loose feel suggests mechanical centering wear, strengthening the joystick-cause signal.
When signals remain unclear or conflict, confidence in a DIY diagnosis decreases, making lower-risk paths like cleaning or professional assessment more valuable.
Reassembly and Fit Factors That Change Results: Alignment, Pressure Points, and Cable Seating
Small fit and seating errors during reassembly can produce symptoms that mimic a failed repair. The three factor groups—alignment, pressure points, and cable seating—each cause distinct symptom patterns, and these patterns are reversible with correct adjustment. Because the issue is fit rather than component failure, the redo cost is typically limited to time and attention rather than replacement parts.
Alignment
- Alignment: Improper saddle fore-aft or tilt can create pressure on the hands, lower back, or perineum, mimicking a mechanical fault but reversible by resetting the saddle position within the available adjustment range.
- Alignment: A saddle that is too far forward often causes weight transfer to the hands and reduced breathing efficiency, feeling like a bike-handling problem yet reversible when the seat is moved back to the balance point.
- Alignment: Pelvic misalignment under load can produce hip drop or knee pain that resembles a leg-length issue; reversibility depends on correcting saddle height and fore-aft rather than adding shims prematurely.
Pressure Points
- Pressure points: Incorrect saddle tilt or nose angle concentrates weight on soft tissue, leading to numbness or discomfort, reversible by adjusting tilt to match pelvic rotation during pedaling.
- Pressure points: A saddle that is too narrow or too wide can pin the sit bones and cause ischemic pain, often mistaken for a saddle defect but reversible by selecting a saddle width that matches sit bone spacing.
- Pressure points: Excessive padding or incorrect foam density can create hot spots even after a saddle change, reversible by returning to a saddle with appropriate support rather than more cushioning.
Cable Seating
- Cable seating: A poorly seated cable connector at the seatpost or derailleur can cause erratic shifting or brake drag that suggests a failed component, reversible at no cost by fully inserting the cable head into its counterbore and rechecking tension.
- Cable seating: When a cable housing is not fully seated in the stop, symptoms like delayed response or no movement can appear; reversibility involves reseating the housing with a firm push and verifying engagement.
- Cable seating: Routing that pinches the cable between frame and moving parts can cause friction or intermittent function, mimicking a worn cable but reversible when the cable is rerouted away from pinch points.
DIY risk profile: what can break during Joy-Con repair and what it costs to undo
Most DIY repair risk for Joy-Con drift comes from a few fragile internal components and mistakes that can force a full replacement, and spotting those mistakes early sets the cost boundary for whether the repair remains worth it.
The DIY risk profile lays out likelihood, cost impact, and recoverability to help you decide where to be more cautious or when to stop. This image labels the fragile areas referenced in the risk table.
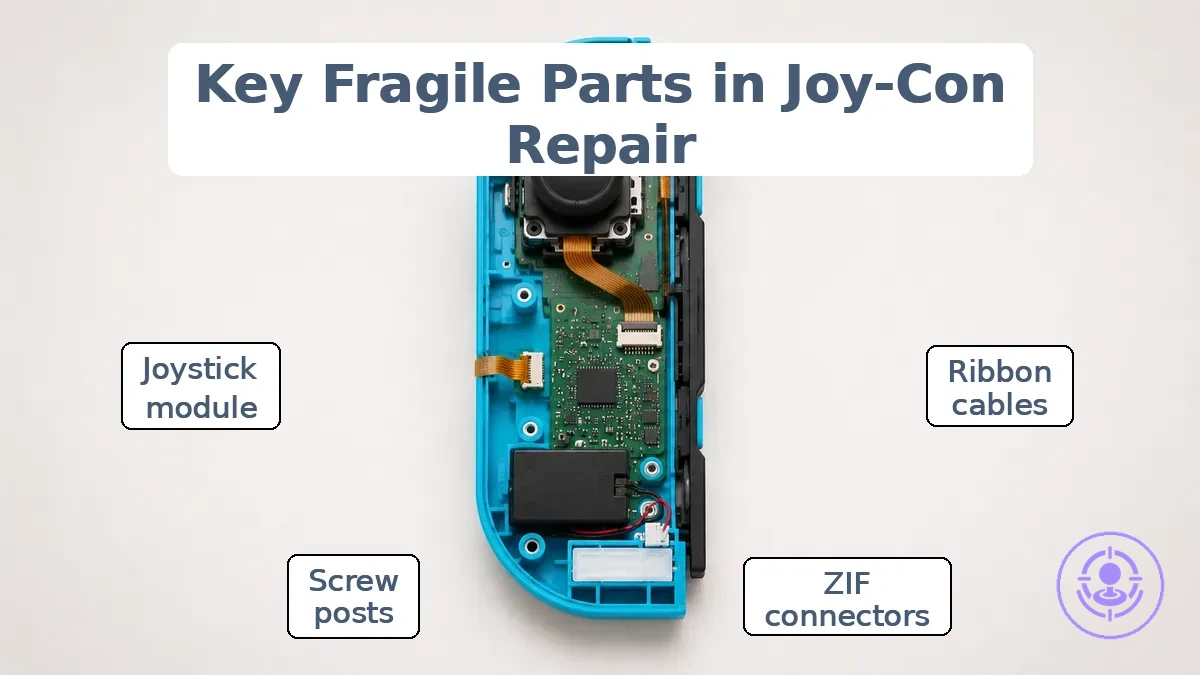
| Risk item | What can go wrong | What you notice | Cost/value impact |
|---|---|---|---|
| Ribbon cables | Tearing or pinching the thin flex cable during disassembly or reassembly | Controller may stop responding or a function may be lost | Replacement cable: may require entire board if connector is damaged |
| ZIF connectors | Breaking the tiny latch or lifting the connector pad | Cable may not seat firmly or connection may become intermittent | Can force board replacement if latch breaks |
| Screw posts | Stripping the plastic threads by over‑tightening or using wrong bit | Screw may no longer tighten or may spin freely | May need new shell or drilling out the screw |
| Joystick module | Knocking the housing out of alignment or damaging the sensor during removal | Stick drift may worsen or joystick may feel loose | New module; potential need for professional repair if board is damaged |
The table shows how recoverability varies: some errors force board replacement, while others remain fixable with a new part.
A user comfortable with soldering but unfamiliar with ZIF latches can turn a joystick swap into a board replacement with a single mistake, often at greater expense. In that case, the DIY risk is worth it only if you are willing to accept the downside of that single error.
Failure Points That Trigger Replacement
These are the highest-cost DIY failure points because they can often be hard to reverse.
- Ribbon cable: repeated flexing without stress relief can cause internal trace fractures, leading to intermittent or lost connection; can trigger full cable replacement.
- Connector: applying excessive force to a locked connector or using an incorrect tool can break the latch or bend pins, resulting in poor contact or no connection; can trigger connector or main board replacement.
- Stripped screw: over-torquing or using a worn bit rounds out the head or damages threads; the fastener may become non-removable or fail to hold; can trigger screw extraction and housing replacement.
- Shell damage: cracks from overtightening or impact compromise structural integrity; components may shift or fail to seat; can trigger full shell replacement.
Without careful inspection, assuming replacement is the only option can lead to unnecessary expense.
When drift persists after replacement: calibration problems and non-joystick root causes
When drift persists after replacement, a calibration mismatch or a non-joystick cause often indicates the problem. A quick check of software calibration or the controller’s internal reference can reveal the issue without additional hardware changes. For deeper troubleshooting steps, the troubleshooting if results aren’t right guide covers the full process.
To address persistent drift after replacement, apply this criteria split:
- Check: Run the controller’s built-in calibration routine or use a game’s dead-zone adjustment to recenter the stick.
- Check: Update the controller firmware if an update is available.
- Check: Swap the controller to a different device or game to confirm whether the drift is consistent across platforms.
- Check: Verify that the replacement joystick is seated fully and that no solder bridges or cold joints are present.
- Stop: If drift persists after these checks, the cause may be on the console side; escalate to console-level diagnostics.
- Stop: If calibration and reseating do not stop the drift, the symptom likely indicates a non‑joystick cause; a switch path to focused diagnostics is the next step.
Cost-value comparison: repair kit vs buying new Joy-Cons vs warranty or paid repair
Choosing between a repair kit, new Joy-Cons, warranty repair, and paid repair depends on total cost, time, and risk-adjusted reliability. Each option trades off direct outlay, hidden costs, long-term reliability, and turnaround time.
The table below compares each option along the cost-value comparison axes.
| Option | Typical cost drivers | Time/effort | Risk/reliability | Best when |
|---|---|---|---|---|
| Repair kit | Low direct cost; hidden costs include tools, replacement parts if something breaks | Moderate; requires learning and careful work | Variable; depends on part quality and your skill; drift may return over time | You want to minimize upfront cost and have time to learn |
| New Joy-Cons | High direct cost; hidden costs include potential repeat drift later | Low; just buy and sync | New units may carry similar drift risk over time | You need a quick, simple fix and are willing to pay more |
| Warranty repair | Often free or low shipping; hidden costs include eligibility checks and wait | Moderate; shipping and processing take days to weeks | Typically reliable for the repaired unit, but drift may recur | You are the original purchaser and can wait for turnaround |
| Paid repair | Moderate direct cost; hidden costs minimal if service is reputable | Moderate to fast, depending on service | Generally reliable, often with a warranty on the repair | You want professional handling without the DIY hassle |
For a direct cost comparison, the price range and offer evaluation table shows how different services compare.
For a steady-handed user with only drift issues, a low-cost path may work. If you lack confidence or face a tight deadline, paying for professional service may deliver more predictable results.
Total DIY cost beyond the kit: tools, time, redo probability, and risk-adjusted value
A DIY repair kit may appear cost-effective, but hidden costs—such as time, redo probability, and damage risk—often reduce the savings. Estimating the true risk-adjusted value means looking beyond the kit price and also considering those same hidden costs.
To make these hidden costs easier to compare, consider the following factors when deciding between a DIY repair and an alternative:
- Tool availability – do you already own the necessary tools, or must you buy or borrow them?
- Time budget – how many hours can you realistically set aside for the repair, including learning and setup?
- First-time risk – are you comfortable with the possibility that your first attempt may not succeed?
- Redo probability – how often does this type of repair need a second try to get right?
- Tolerance for failure – can you accept a failed repair that may leave the device unusable?
- Alternative access – do you have a nearby repair service or replacement option as a fallback?
Use this breakdown as decision support, not as a guarantee of outcome—the true cost of a DIY repair varies by your specific situation and skill level.
Alternative paths that outperform DIY on value: reliability, turnaround, and coverage
Alternative paths can outperform DIY on value when reliability, turnaround, or coverage matter more than upfront savings.
Which alternative path wins depends on the priority—reliability, turnaround, or coverage.
- Professional repair service – wins when reliability and coverage are critical – can reduce the risk of errors and often includes a service guarantee, adding long-term value.
- Manufacturer replacement – wins when turnaround and full coverage are priorities – reduces repair uncertainty and can provide a like-new device, offering strong risk reduction.
- Third-party repair shop – wins when convenience and moderate turnaround are needed – balances reliability with cost, saving time while maintaining acceptable quality.
- Mail-in repair service – wins when speed and predictability are valued – reduces the hassle of self-repair and often comes with a warranty, increasing value through reduced effort.
Upfront cost versus long-term predictability decides which alternative path offers the best value.
Decision cutoffs: when to stop DIY and switch to an alternative
The decision cutoff to stop DIY and switch to an alternative is reached when risk-adjusted cost rises, failure signals repeat, or root-cause confidence remains low.
Decision cutoffs turn potential outcomes and risks into a clear switch point, so you can evaluate whether continuing DIY still offers value or switching to an alternative is a better investment. The checklist below shows when a project has reached a decision cutoff:
- Trigger: Repair time significantly exceeds initial estimate → Meaning: Poor time estimation or unexpected complexity → Next path: Calculate the hourly value of your time and compare with a professional quote → Cost-value: If your time value exceeds the pro cost, switching often makes sense.
- Trigger: The same issue reoccurs after a repair (repeat failure) → Meaning: The root cause may be misidentified or beyond your skill → Next path: Seek a diagnostic check from an expert before attempting another fix → Cost-value: Paying for diagnosis can prevent wasted materials and time.
- Trigger: You are unsure about the source of the problem (low confidence) → Meaning: Risk of making the issue worse or causing secondary damage → Next path: Stop and gather more information from reliable sources or a pro → Cost-value: A small upfront investment in knowledge can avoid costly mistakes.
- Trigger: Required tools or parts are not on hand and must be bought or rented → Meaning: Additional cost and time that may not have been planned → Next path: Compare the total tool/part cost against hiring a professional who already has them → Cost-value: Renting or buying specialized equipment often pushes the DIY cost above a pro quote.
- Trigger: The repair involves electrical, gas, or structural components → Meaning: Safety risk is significant and code compliance may be required → Next path: Consider a licensed professional for such work → Cost-value: The premium for safety and legal compliance is usually justified.
- Trigger: The project has dragged on without visible progress (time pressure) → Meaning: Motivation drops and other responsibilities suffer → Next path: Set a hard deadline; if not met, switch to a professional or abandon → Cost-value: The cost of prolonged disruption often outweighs the savings from DIY.
- Trigger: A trial attempt results in visible damage to the item or its components → Meaning: Skill level is insufficient for this specific task → Next path: Assess whether the damage is reversible; if not, call a pro immediately → Cost-value: Early switch can help prevent further damage and higher repair bills later.
- Trigger: You have already spent more on supplies than an alternative solution costs → Meaning: The economic case for DIY has weakened → Next path: Compare total sunk cost with the cost of switching; if switching is cheaper, do it → Cost-value: Continuing to invest in a losing proposition is rarely justified.
If you're still considering DIY, a step-by-step repair process helps maintain structure and reduces common mistakes. Two scenarios illustrate how thresholds differ: A homeowner with low risk tolerance and a tight deadline may switch to a pro after one failed attempt, while a hobbyist with high tolerance and flexible time may continue through several retries. The right path depends on your personal risk appetite and the urgency of the result — your decision cutoff shifts accordingly.
This chart categorizes the main triggers that indicate it is time to stop a DIY repair and switch to a professional or alternative solution.

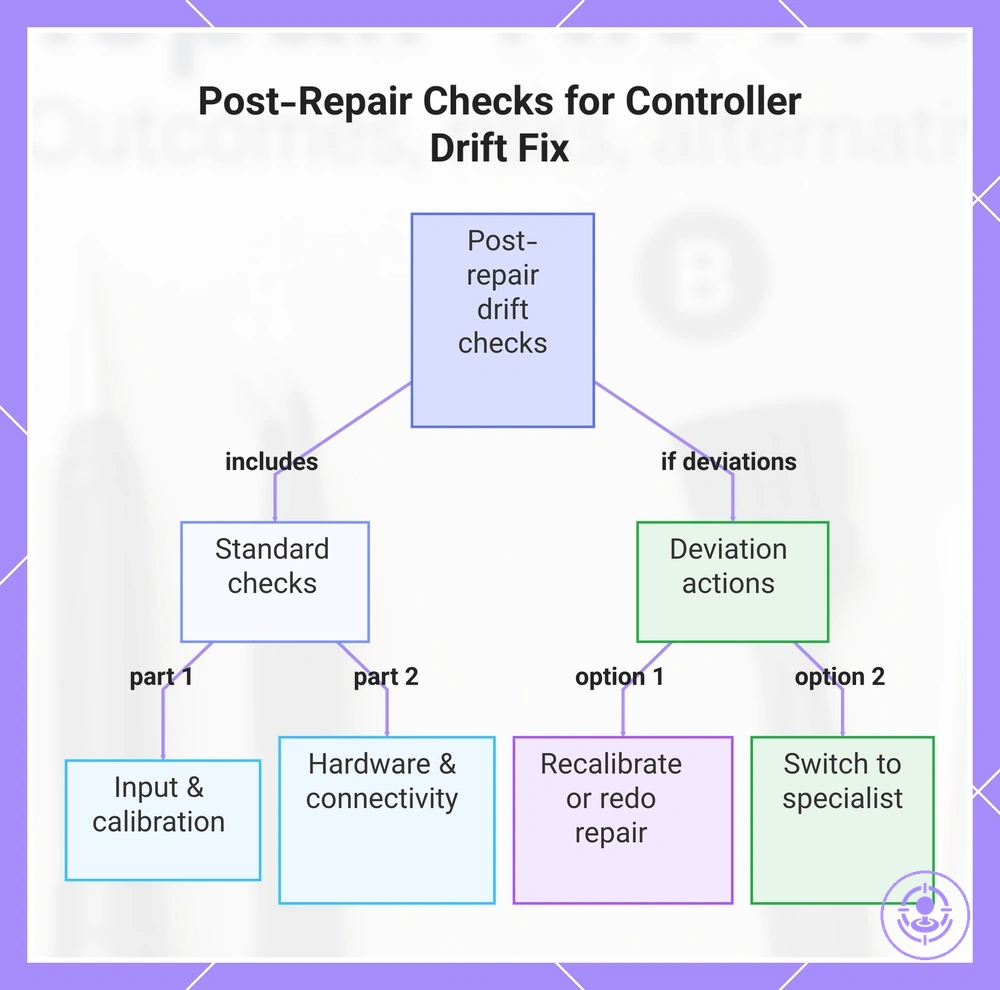
Post-repair checks that confirm a good outcome and prevent repeat drift
Post-repair checks verify whether the value decision delivered the expected improvement. These checks confirm that the repair functions as intended.
Post-repair checks typically include these steps:
- Analog stick movement and centering — Normal: smooth, full range of motion, no sticking, and returns to center without drift.
- Calibration status — Normal: sensor registers correct neutral position and full range in all axes after calibration.
- Button and trigger response — Normal: each button registers press and release without double-input, delay, or missed input.
- Wireless connectivity — Normal: controller maintains stable connection with console without disconnects during use.
- Power and charging — Normal: controller powers on, charges correctly, and holds charge as expected.
- Reassembly fit — Normal: casing fits flush, screws are tight, and no loose parts or rattling.
A common myth is that any visible fix means the problem is gone entirely. Deviations from expected behavior often signal incomplete or misapplied repairs. Post-repair checks identify these deviations; based on findings, you can recalibrate, redo the repair, or switch paths to a professional service.
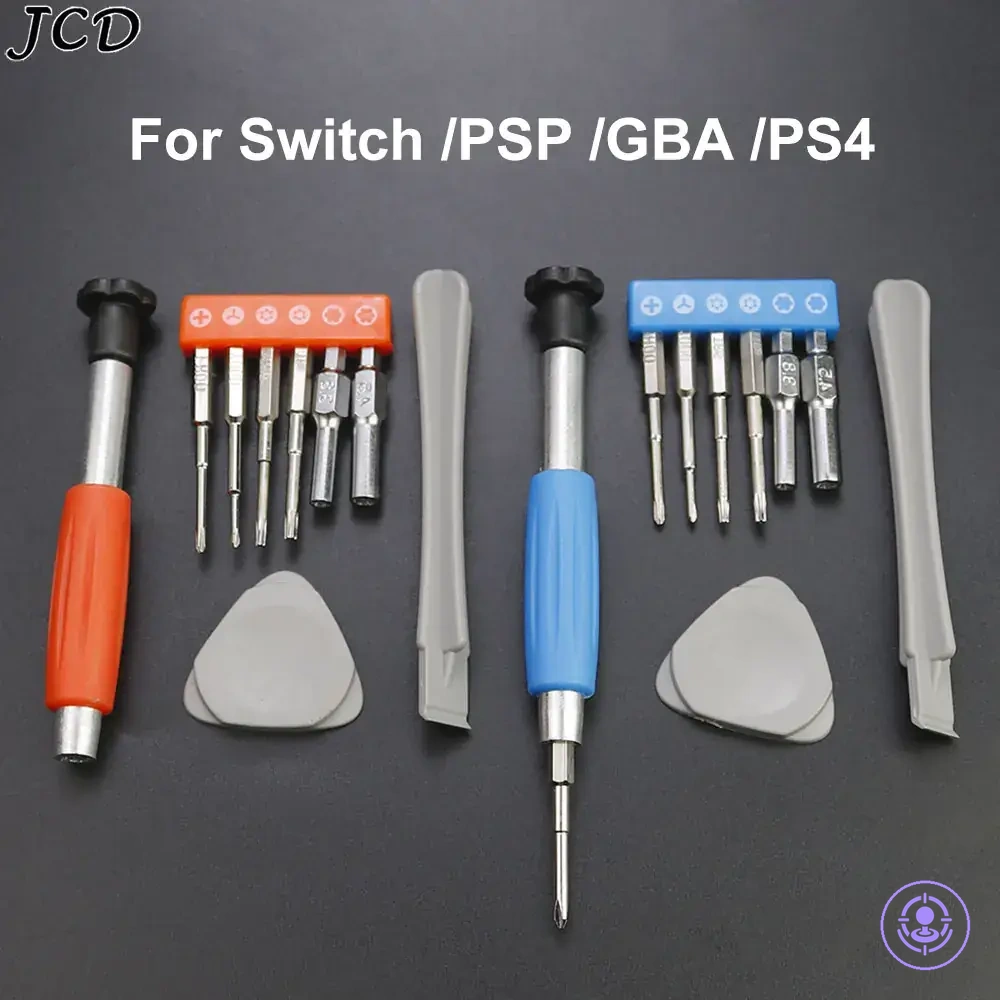
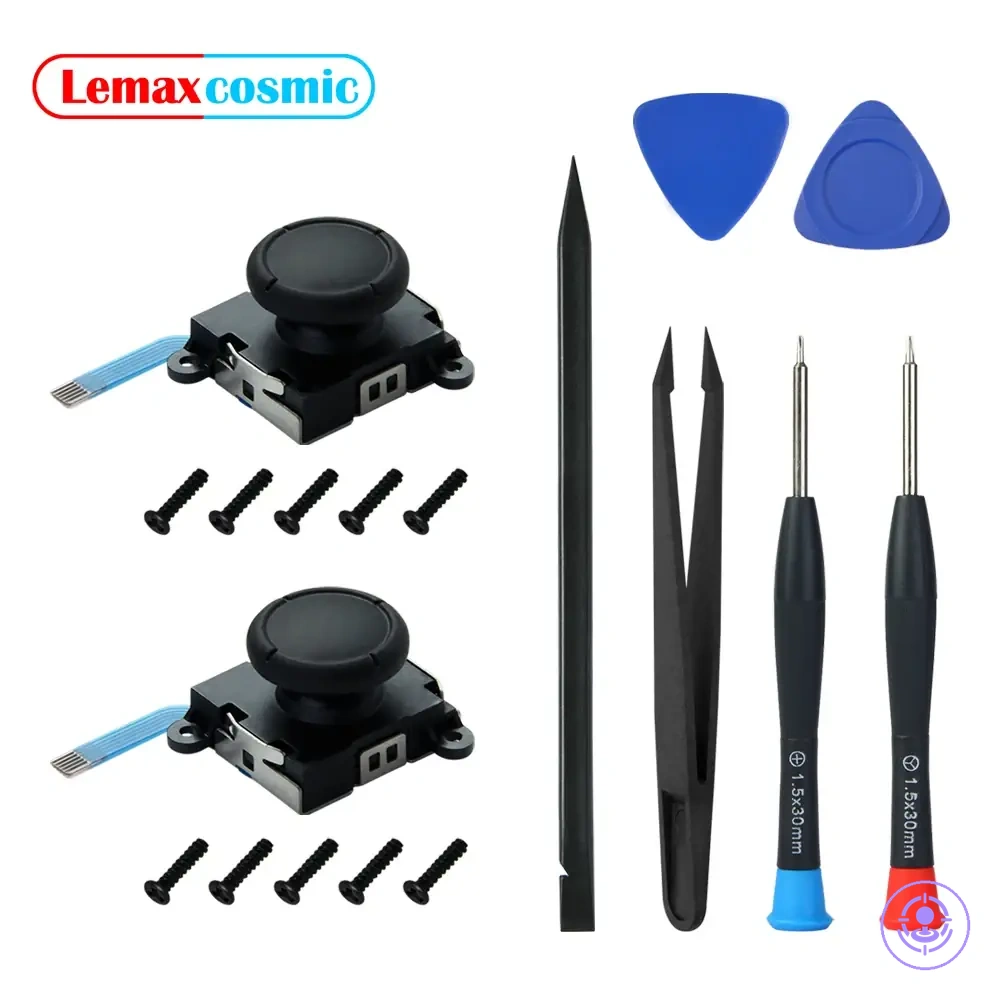
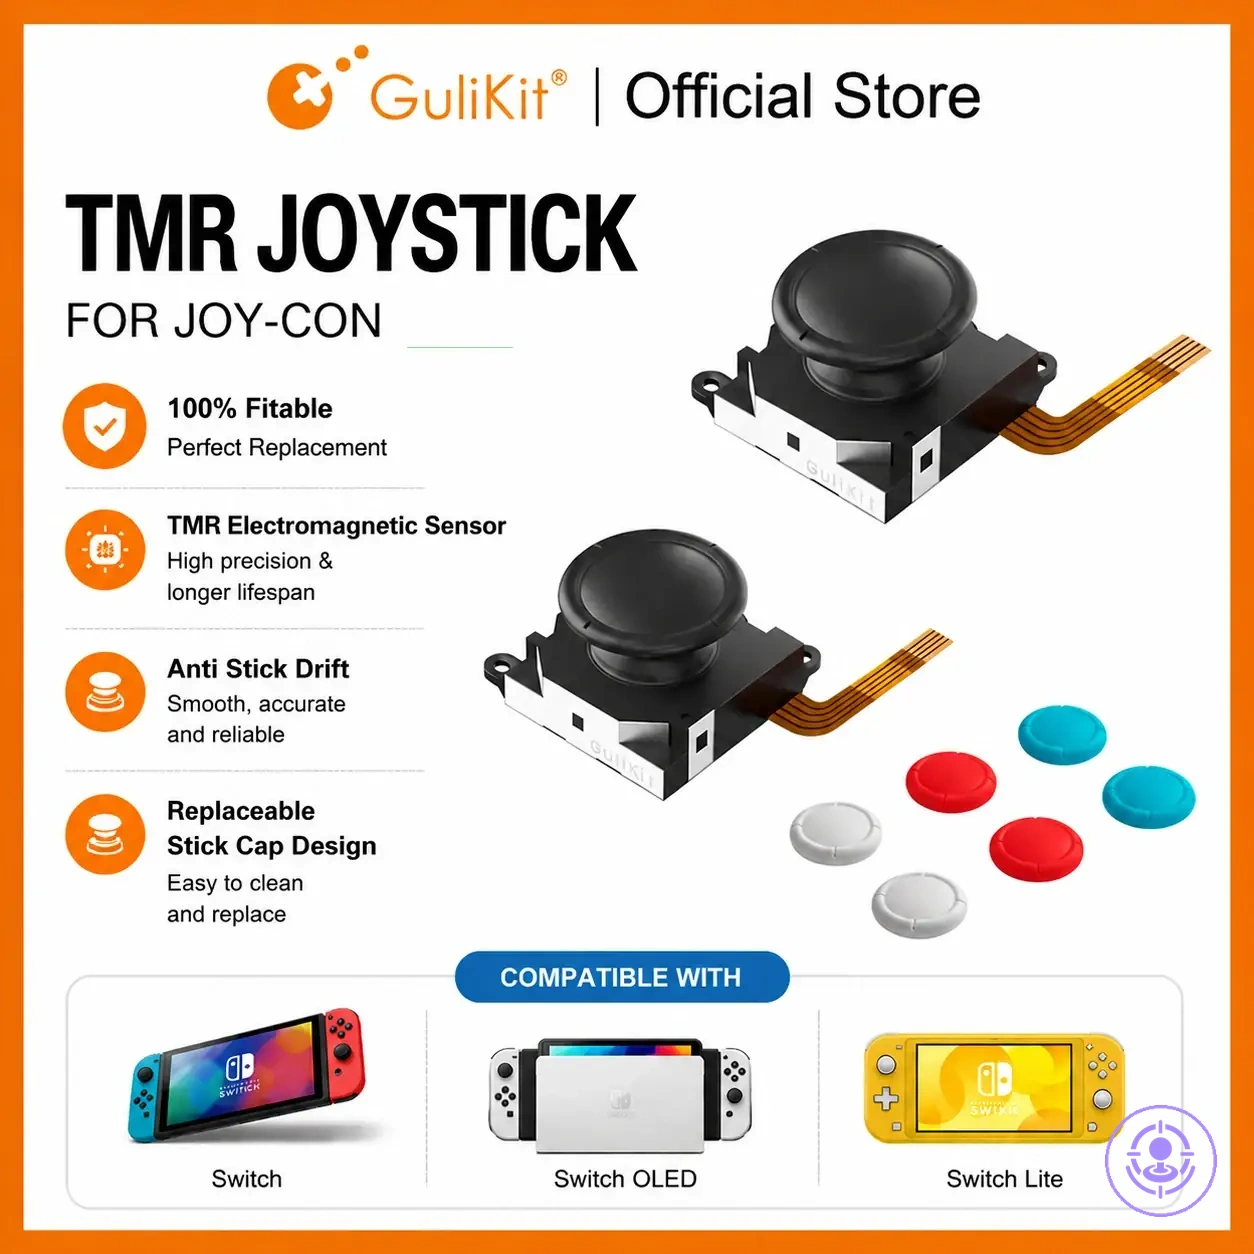
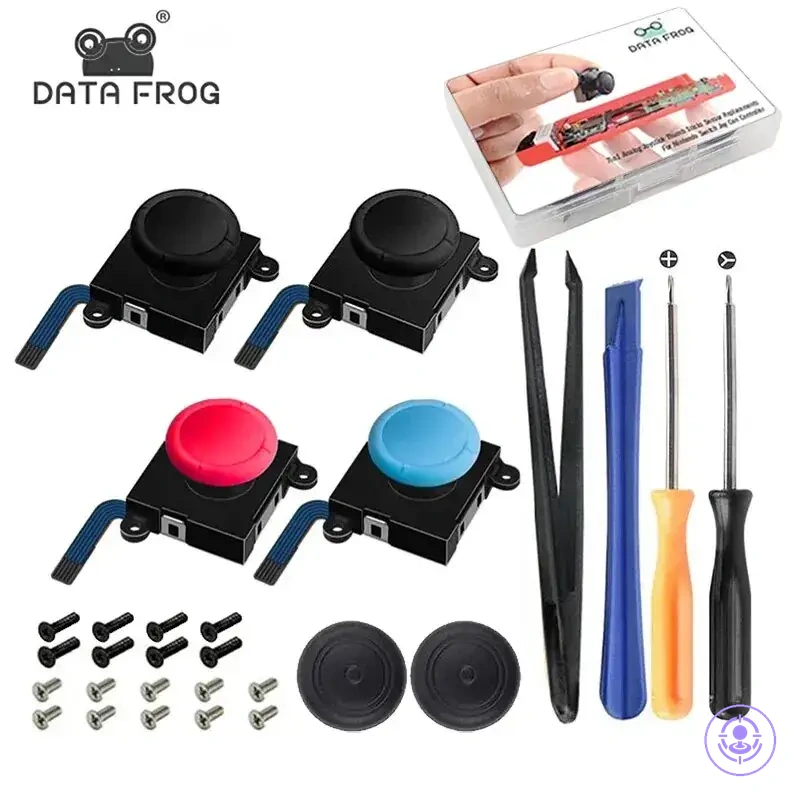
Here are product examples that may make comparison easier. Before buying, always review the compatibility criteria, essential features, and product details.
- Analog stick drift or sticking → suggests incomplete cleaning or misalignment → recalibrate or redo the repair.
- Calibration error persists → suggests sensor misalignment or damage → recalibrate or consider part replacement.
- Stick drift in one direction → suggests analog stick recalibration needed → redo calibration.
- No response or erratic movement → suggests faulty replacement component → switch to a specialist for evaluation.
This chart outlines the standard post-repair checks to confirm a successful drift fix and the recommended actions if any deviations are detected.